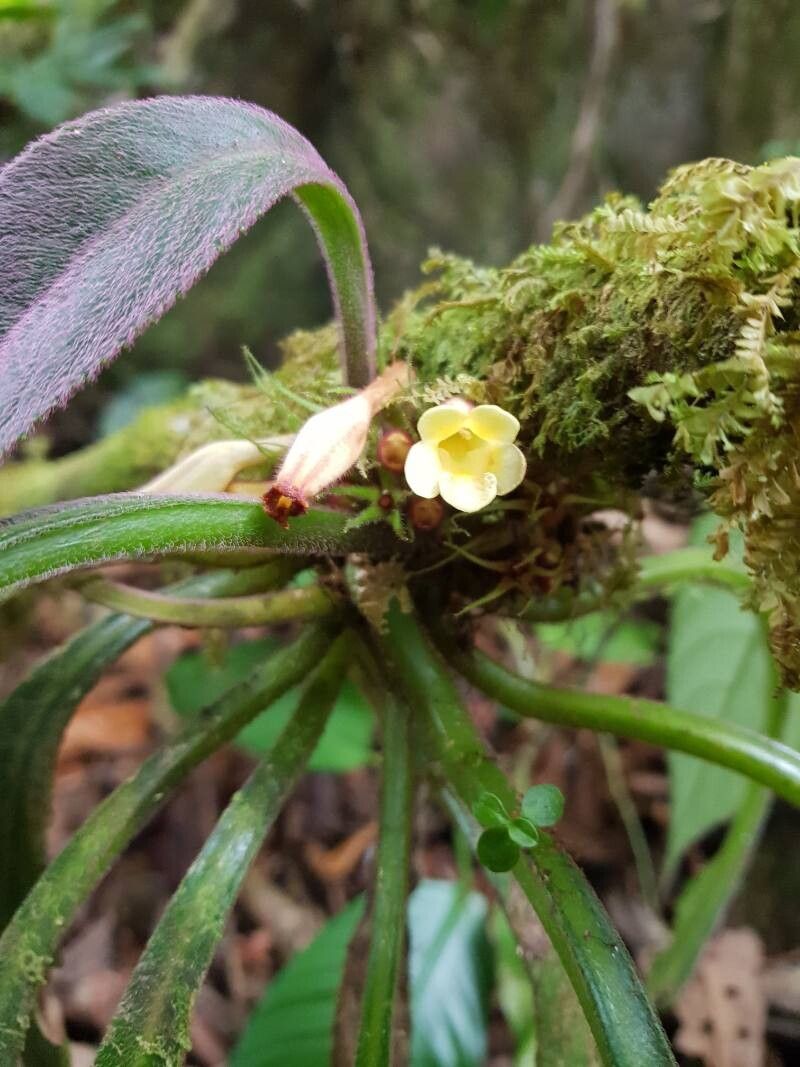
Oh, hello there, fellow plant enthusiast! I’m so excited to talk to you today about a genuinely delightful plant: Paradrymonia ciliosa. If you’ve ever seen one of these beauties, you know exactly what I mean. With its showy, often brightly colored tubular flowers and textured foliage, it’s a real showstopper. And the best part? You can easily multiply this joy without breaking the bank!
Propagating Paradrymonia ciliosa is incredibly rewarding. There’s something so magical about taking a small piece of a plant and watching it transform into a whole new, thriving specimen. Now, if you’re new to this plant parent game, I’d say Paradrymonia ciliosa is moderately easy to propagate. It’s not quite a “stick it in the ground and forget it” kind of situation, but with a little attention, you’ll be celebrating success.
The Best Time to Start
My experience tells me the absolute sweet spot for propagating Paradrymonia ciliosa is during its active growing season. Think late spring through summer, when the plant is full of life and energy. You’ll want to take cuttings from healthy, vigorous stems that haven’t just bloomed or are showing signs of stress. New growth that’s firm but not yet woody is ideal.
Supplies You’ll Need
Before we get our hands dirty, let’s gather our tools:
- Sharp, clean pruning shears or a horticultural knife: For making precise cuts.
- Rooting hormone (optional but helpful): A powder or gel to encourage root development.
- Well-draining potting mix: I like a blend of peat moss, perlite, and a little orchid bark. You want it to hold some moisture but drain like a sieve.
- Small pots or seed trays: For your cuttings.
- Plastic bags or a propagation dome: To create a humid environment.
- Spray bottle: For misting.
- Labels: So you don’t forget what you’ve planted and when!
Propagation Methods
Let’s dive into how we can get more Paradrymonia ciliosa plants!
Stem Cuttings
This is my go-to method for this plant, and it works like a charm.
- Select a healthy stem: Look for a piece that’s about 4-6 inches long and has several sets of leaves. Avoid any that are flowering or look weak.
- Make a clean cut: Just below a leaf node (where a leaf attaches to the stem), make a clean cut with your sharp shears.
- Prepare the cutting: Gently remove the lower leaves, leaving about two or three at the top. This prevents them from rotting in the soil.
- Apply rooting hormone (if using): Dip the cut end of the stem into your rooting hormone. Tap off any excess.
- Plant your cutting: Make a small hole in your prepared potting mix with a pencil or your finger. Insert the cutting, ensuring the nodes where you removed leaves are covered by the soil. Gently firm the soil around it.
- Water and cover: Water the soil lightly until it’s just moist. Then, cover the pot with a plastic bag or propagation dome to trap humidity. You can secure the bag with a rubber band.
Water Propagation
This is a slightly more visual method, and sometimes it’s just satisfying to watch the roots grow.
- Take your cutting: Follow steps 1-3 from the stem cutting method.
- Place in water: Fill a clean jar or glass with room-temperature water. Place the cutting in the water, ensuring at least one leaf node is submerged.
- Provide light: Place the container in a bright spot with indirect light.
- Change water regularly: Change the water every few days, or whenever it starts to look cloudy. This is crucial to prevent bacterial growth.
The “Secret Sauce” (Pro Tips)
Here are a few tricks I’ve picked up over the years that really make a difference:
- Don’t let the leaves touch the stagnant water: If you’re doing water propagation, ensure the leaves themselves aren’t submerged in the water. They’ll get mushy and could rot the whole cutting. Keep them just above the water line.
- Bottom heat is your best friend: For stem cuttings, placing the pots on a heat mat can significantly speed up root formation. It mimics the warmth of spring soil and gives those nascent roots a real boost. Just make sure the mat isn’t too hot – warm to the touch is perfect.
- Patience is a virtue, but so is ventilation: While you want high humidity, don’t suffocate your cuttings. Open the plastic bag or dome for a few minutes each day to allow for some air circulation. This helps prevent fungal diseases from taking hold.
Aftercare & Troubleshooting
Once you see that magical sign of new growth or tiny roots peeking out from the drainage holes (for stem cuttings), it’s time for a slightly different approach.
- Acclimating to lower humidity: Gradually remove the plastic bag or dome over a week or two. Start by opening it for a few hours a day.
- Watering: Continue to keep the soil consistently moist, but not soggy. Allow the surface to dry out slightly between waterings.
- Light: Maintain bright, indirect light. Avoid direct sun, which can scorch delicate new leaves.
Now, what if things don’t go as planned? The most common culprit is rot. If you see a cutting turning black and mushy, it’s likely due to overwatering or poor drainage. If you’re doing water propagation and the stems are slimy, change the water and try again, making sure to be more diligent about fresh water. Sometimes, it’s just a matter of a weak cutting or less-than-ideal conditions – don’t be discouraged! Just grab another stem and try again.
A Encouraging Closing
Propagating Paradrymonia ciliosa is a wonderful journey of patience and observation. Don’t be afraid to experiment, and remember that every gardener has had cuttings fail. The satisfaction of nurturing a new plant from a tiny piece is something truly special. So go ahead, get your hands dirty, and enjoy the process! You’ve got this.
Resource:
https://identify.plantnet.org/k-world-flora/species/Paradrymonia%20ciliosa%20(Mart.)%20Wiehler/data