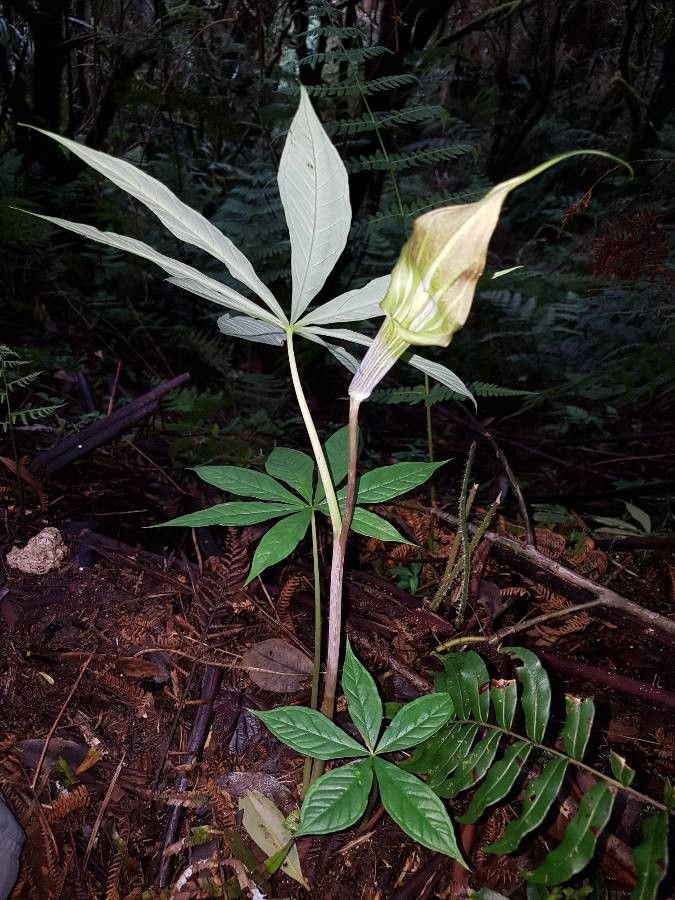
Oh, the wonders of Arisaema polyphyllum! If you’ve ever laid eyes on this fascinating aroid, you know its allure. With its intricate spathes and architectural foliage, it brings a touch of the exotic to any shady corner. And let me tell you, coaxing a new one into being from an existing plant is one of gardening’s most satisfying little victories. It’s not a plant that’s going to rush you, but with a little care, you’ll be rewarded. For beginners, I’d say it’s moderately challenging – you’ll need to pay attention, but it’s far from impossible.
The Best Time to Start
Timing is everything, as they say! The absolute best time to propagate Arisaema polyphyllum is during its active growing season. For most of us, this means late spring through summer, when the plant is putting on vigorous growth and has ample energy to spare. Look for healthy, mature plants that have fully emerged from their dormancy and are showing good leaf development. Trying to propagate when the plant is dormant or just beginning to fade is a recipe for disappointment.
Supplies You’ll Need
Here’s what you’ll want to have on hand before you dive in:
- Sharp, sterile pruning shears or a sharp knife: Cleanliness is key to preventing disease.
- Well-draining potting mix: I often use a blend of equal parts peat moss or coco coir, perlite, and coarse sand. Some growers swear by orchid bark mixed in, too, for extra aeration.
- Small pots or propagation trays: Whatever you have available, as long as they have drainage holes.
- Rooting hormone (optional but recommended): A good quality powdered hormone can give those stubborn cuttings a boost.
- Clear plastic bag or propagator lid: To maintain humidity around your cuttings.
- Gloves: Some aroids can be irritating to the skin, so it’s better to be safe.
- Watering can with a fine rose: For gentle watering.
Propagation Methods
Arisaema polyphyllum is most commonly propagated through division or by encouraging offsets (pups). While some aroids can be propagated from leaf cuttings, this species is typically a bit more resistant to that method for creating a whole new plant.
1. Division (for Mature, Clump-Forming Plants)
This is my go-to method when I have a well-established Arisaema.
- Gently excavate: When the plant is dormant (usually late fall or early winter, after the leaves have yellowed and died back), carefully dig around the base of the plant. You want to expose the tuber and any offsets, or “pups,” that have formed.
- Identify the divisions: Look for smaller tubers or young shoots growing off the main tuber. They should have their own roots and at least one visible bud or emerging leaf shoot.
- Separate with care: Using your clean pruning shears or knife, carefully slice through the connecting tissue to separate the divisions. Make sure each division has some healthy roots attached. If a division seems to have very few roots, don’t despair – they can often regrow them.
- Allow to air dry (optional but helpful): Some growers like to leave the divided pieces to air dry for a day or two in a cool, dry place. This helps any cut surfaces callus over, reducing the risk of rot.
- Pot them up: Plant each division in its own pot filled with your well-draining potting mix. The top of the tuber should be planted just at the soil surface or slightly below. Water gently.
2. Encouraging and Separating Offsets (Pups)
Sometimes, your Arisaema will naturally produce baby plants, or “pups,” from the base of the main tuber.
- Inspect the base: During active growth, look around the base of your mature plant. You might see small, rounded growths peeking out from the soil. These are your pups!
- Wait for size: It’s best to let these pups grow a bit before attempting to separate them. You want them to have developed their own root system, which usually happens when they are a decent size, perhaps palm-sized or larger.
- Gentle separation: When the time is right, and the parent plant is still actively growing (or even better, when dividing the parent plant as described above), carefully try to wiggle or tease the pup away from the mother tuber. You want to preserve as many of the pup’s roots as possible. A clean knife might be needed to sever any connecting points.
- Pot them up: Treat these pups just like your divisions – pot them in well-draining soil and water gently.
The “Secret Sauce” (Pro Tips)
- Don’t rush the water: When you pot up your divisions or pups, resist the urge to drown them. Water just enough to settle the soil. Overwatering at this stage is a fast track to rot. Let the soil dry out slightly between waterings until you see signs of new growth.
- Think about humidity: Arisaema loves a bit of humidity, especially when young and vulnerable. Once potted, I like to pop the pots into a clear plastic bag or cover them with a propagator lid. This creates a mini-greenhouse effect, keeping the moisture in and encouraging root development. Just remember to “burp” it daily, opening the bag or lid for a few minutes to allow for air circulation and prevent fungal issues.
- Patience is a virtue, especially with tubers: Understand that a newly potted division or pup might not show top growth for weeks, or even months. They are busy building root systems underground. Don’t panic if you don’t see leaves right away. Trust the process!
Aftercare & Troubleshooting
Once your propagated Arisaema starts to show signs of life – a tiny bit of green emerging from the soil – you’re on the right track!
- Gradually reduce humidity: As the plant gains strength and more leaves unfurl, you can start to gradually acclimate it to lower humidity. This might mean opening the plastic bag or propagator lid for longer periods each day, eventually removing it altogether.
- Watering: Continue to water moderately, allowing the soil to dry slightly between waterings. Always ensure good drainage.
- Light: Keep them in bright, indirect light. Direct sun will scorch brand new foliage.
- The dreaded rot: This is the most common problem. Signs include a mushy base, blackening stems, or a general wilting without any apparent cause. If you suspect rot, gently lift the plant. If it’s mushy and discolored, it’s likely too far gone. If there’s still a firm part, you can try cutting away the rot with a sterilized blade and repotting in fresh, dry soil. Prevention through good drainage and careful watering is your best defense.
- No growth: As I mentioned, sometimes they just take their sweet time. If you’ve done everything right and there’s still no sign of life after a couple of months, check the tuber for firmness. If it’s still firm, it might just be a very slow starter. If it’s soft and decaying, it’s a sign that something went wrong, likely too much moisture.
A Encouraging Closing
Propagating Arisaema polyphyllum is a journey, not a race. There will be plants that take off like rockets, and others that test your patience. Don’t get discouraged if not every attempt is a roaring success. Each new plant you nurture into being is a testament to your growing skills and your love for these botanical marvels. So, get your hands dirty, enjoy the process, and soon you’ll be admiring your own little collection of these spectacular aroids! Happy gardening!
Resource:
https://identify.plantnet.org/k-world-flora/species/Arisaema%20polyphyllum%20(Blanco)%20Merr./data