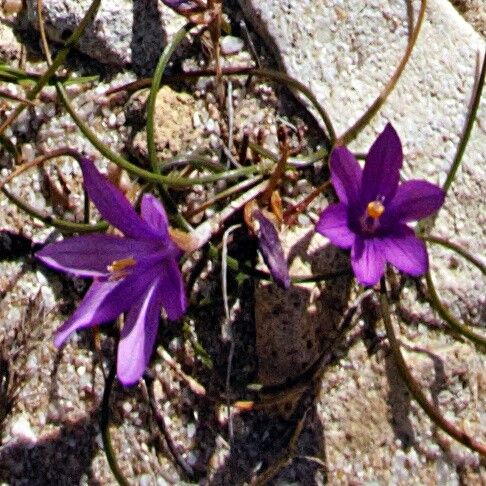
Oh, hello there! Pull up a chair and let’s chat about Romulea requienii. I’ve been growing these little darlings for quite a while now, and they always bring a smile to my face. They’re like tiny jewels, aren’t they? Especially the deep purple varieties. Propagating them feels like sharing a bit of that magic, and trust me, it’s a truly satisfying endeavor.
Now, I won’t lie and say Romulea requienii is as straightforward as propagating a pothos. It’s a tad more delicate, but with a bit of attention and the right approach, you’ll be well on your way to a whole patch of these beauties. Think of it as a charming little challenge that truly pays off.
The Best Time to Start
Timing is everything, as we gardeners know. For Romulea requienii, the sweet spot is during their active growing season. This generally means late spring through early summer, after they’ve had their blooming spurt and are really putting on energy. You’re essentially working with nature’s momentum, making your job a whole lot easier.
Supplies You’ll Need
Gathering your tools before you start makes the whole process smoother. Here’s what I usually have on hand:
- Well-draining potting mix: A good blend for bulbs or corms is perfect. I often use a mix of compost, sharp sand, and perlite.
- Small pots or trays: Clean containers are key to preventing disease.
- Sharp pruning shears or a clean knife: For making precise cuts.
- Rooting hormone (optional but helpful): Especially for cuttings. Look for a powder or liquid formula.
- Watering can with a fine rose: To avoid disturbing delicate new growths.
- Labels and a permanent marker: To keep track of what’s what.
- A propagator or plastic bag: To maintain humidity around cuttings.
Propagation Methods
Romulea requienii typically propagates best from its corms. These are the little bulb-like structures at the base of the plant.
Division of Corms: This is the most reliable method for Romulea requienii.
- Gently excavate: In late spring or early summer, after the foliage has mostly died back, carefully dig up the parent plant. You want to disturb the roots as little as possible.
- Identify and separate: You’ll see the main corm and likely some smaller offsets or cormels attached to it. Use your clean knife or shears to carefully detach the smaller cormels. Make sure each one has at least one small bud or growing point.
- Allow to cure (optional but recommended): Let the separated cormels sit in a dry, airy spot for a day or two. This helps any cut surfaces heal and prevents rot.
- Plant them up: Fill your small pots with your well-draining mix. Plant each cormel about an inch deep, ensuring the pointy end (where the shoot will emerge) is facing upwards.
- Water gently: Give them a light watering. Don’t drench them.
Stem Cuttings (less common but possible): While less common for Romulea, if you’re feeling adventurous and want to try from a piece of stem with developing corm material.
- Take the cutting: Select a healthy stem that’s just starting to form a corm at its base. Make a clean cut just below the developing corm using your sharp shears.
- Dip in rooting hormone: If using, dip the cut end in rooting hormone.
- Plant in soil: Prepare a small pot with your well-draining mix. Make a small hole and insert the cutting, ensuring the corm part is nestled in the soil.
- Provide humidity: Water gently and cover the pot with a plastic bag or place it in a propagator to keep humidity levels high.
The “Secret Sauce” (Pro Tips)
Here are a few things I’ve learned over the years that can really boost your success:
- Don’t overwater after planting: This is probably the most important tip. Romulea corms are susceptible to rot. They need moisture to root, but they hate sitting in soggy soil. Let the soil dry out a bit between waterings.
- Bottom heat for cuttings: If you’re attempting stem cuttings and struggling to see rooting, a gentle bottom heat source (like a heat mat designed for seedlings) can make a world of difference. It encourages root development without drying out the top layer of soil too quickly.
- Patience is truly a virtue: Romulea requienii aren’t the fastest propagators. Don’t be discouraged if you don’t see immediate growth. Give them time to establish. I’ve had cormels that took months to show signs of life.
Aftercare & Troubleshooting
Once your cormels or cuttings are planted, keep the soil lightly moist, not wet. Place them in a bright location, but out of harsh, direct sunlight, especially for cuttings.
The biggest culprit for failure with these delicate plants is rot. If you see your corms or cuttings turning mushy, black, and smelling unpleasant, it’s almost always due to overwatering and poor drainage. If you catch it early, you might be able to save a corm by letting it dry out completely and trimming away any soft, rotten parts before replanting in fresh, dry soil.
You’ll know you’re successful when you start to see new shoots emerging from the soil. This is the most rewarding sight!
A Warm Closing
Propagating Romulea requienii is a lovely way to multiply those charming blooms. Don’t get discouraged if your first attempt isn’t perfect – gardening is a journey of learning and observation. Enjoy the process of nurturing these tiny lives, and soon you’ll have even more of their delicate beauty to admire. Happy growing!
Resource:
https://identify.plantnet.org/k-world-flora/species/Romulea%20requienii%20Parl./data