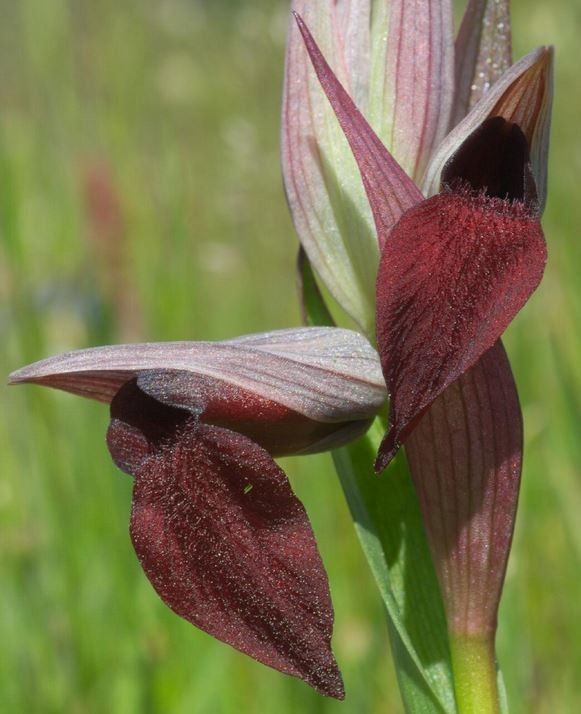
Oh, Serapias olbia! If you’ve ever seen one of these beauties, you know exactly why I’m so excited to talk about them. Their delicate, orchid-like blooms are just breathtaking, and the sheer joy of nurturing a new plant from a tiny piece of its parent is truly something special. Now, I won’t lie to you – propagating Serapias olbia isn’t quite as straightforward as sticking a begonia cutting in some water. It can be a bit challenging for absolute beginners, but with a little patience and the right approach, you’ll be well on your way to success.
The Best Time to Start
For Serapias olbia, the absolute sweet spot for propagation is early spring. This is right after your mature plant has finished its flowering cycle and is just starting to stir back to life. Think of it as giving your healthy plant a gentle nudge as it wakes up from its winter slumber. It’s actively growing, full of stored energy, and much more receptive to creating new life. Trying to propagate when it’s dormant or stressed just won’t yield the results you’re hoping for.
Supplies You’ll Need
Gathering your tools beforehand makes the whole process smooth sailing. Here’s what I always have on hand:
- Sharp, sterile pruning shears or a clean craft knife: For making precise cuts. Sterilize them with rubbing alcohol!
- A well-draining potting mix: I like a mix of orchid bark, perlite, and a bit of peat moss. You want it to be airy and not hold too much moisture.
- Small pots or seed trays with drainage holes: Cleanliness is key here, too.
- Rooting hormone (optional but highly recommended): This gives your cuttings a helpful boost. Look for a powdered or gel type.
- A spray bottle: For gentle misting.
- Labels and a marker: So you don’t forget what you’ve propagated!
- A propagation mat or a warm, bright location: Some gentle bottom heat can work wonders.
Propagation Methods
When it comes to Serapias olbia, we’re primarily looking at division as our main propagation method. They don’t readily take to stem cuttings in the way some other plants do, especially in a typical home environment.
Division: The Serapias Way
This is the most reliable way to get more Serapias olbia plants.
- Gently Remove from Pot: Carefully take your established Serapias olbia plant out of its pot. You want to disturb the root ball as little as possible.
- Inspect the Roots: Examine the root system. You’re looking for distinct sections or clumps that have their own healthy roots and, ideally, a shoot or two emerging.
- Carefully Separate: Using your sterile pruning shears or a clean knife, carefully tease apart or cut through the root ball to separate these divisions. Each division should have a good portion of roots and at least one healthy stem or pseudobulb. Don’t be afraid to get a little rough, but always aim for clean cuts.
- Pot Up Your New Babies: Pot each division into its own container filled with your special well-draining mix. Make sure the roots are spread out nicely.
- Water Lightly: Give the newly potted divisions a very gentle watering. You want the soil to be moist, but not soggy.
- Provide Ideal Conditions: Place your new divisions in a spot with bright, indirect light. They’ll appreciate a bit of warmth and humidity.
The “Secret Sauce” (Pro Tips)
After years of tinkering, I’ve picked up a few tricks that make all the difference:
- Don’t Overwater, Ever! This is the cardinal sin with orchids and Serapias. Soggy roots are a death sentence. Err on the side of slightly too dry rather than too wet, especially when they’re young and establishing.
- Embrace Bottom Heat: A gentle warmth from below, just like a cozy blanket, really encourages root development for divisions. A propagation mat set to a mild temperature is fantastic for this.
- Patience is Your Superpower: Seriously, don’t be discouraged if you don’t see immediate growth. These plants work on their own schedule. Weeks can go by before you see new shoots. Just keep providing consistent, albeit minimal, care.
Aftercare & Troubleshooting
Once your new Serapias division is potted up, keep it in that bright, indirect light and continue with light watering. Avoid direct sunlight, which can scorch those delicate new leaves.
The most common issue you’ll encounter is rot. If you notice mushy, brown stems or an off-putting smell coming from the pot, this is a sign of overwatering and a potential rot situation. In this case, you might need to gently unpot the plant, trim away any rotted parts with your sterile shears, and repot into fresh, dry mix. Sometimes, a lighter misting or waiting longer between waterings is all that’s needed. Yellowing leaves can also be a sign of stress, either from too much or too little water. Again, adjust your watering schedule.
A Encouraging Closing
Growing more of these exquisite Serapias olbia plants is such a rewarding journey. It’s a chance to connect with nature on a deeper level, to learn the rhythms of these unique flowers. Be patient with your new sprouts, celebrate the tiny victories, and don’t get discouraged by any setbacks. Enjoy the process, my friends, and soon you’ll have even more of these botanical treasures to admire!
Resource:
https://identify.plantnet.org/k-world-flora/species/Serapias%20olbia%20Verg./data