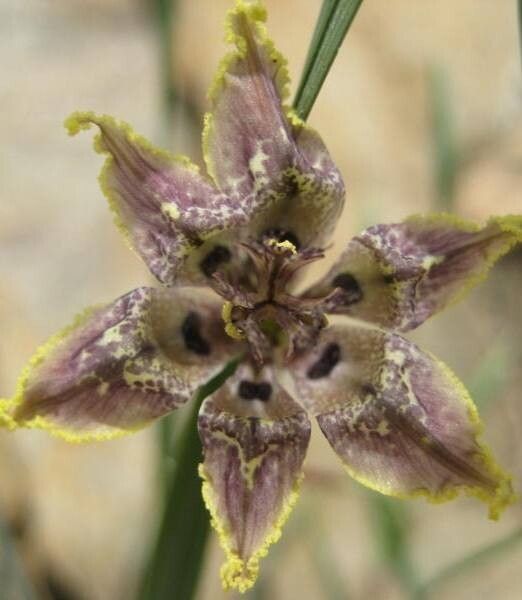
Oh, Ferraria crispa! What a stunner. Those ruffled, almost spidery blooms are truly unique, aren’t they? They have this delicate, antique charm that just makes you want to stare. And the best part? You can bring that charm into even more corners of your garden by propagating them. For me, the joy isn’t just in the blooms, but in nurturing a new life from a piece of an existing one. Now, Ferraria crispa can be a little bit of a diva, so while not impossible for a beginner, it’s perhaps best tackled after you’ve had a bit of success with some easier plants. But don’t let that deter you! With a little patience and the right know-how, you’ll be rewarded.
When to Get Your Hands Dirty
The absolute sweet spot for propagating Ferraria crispa is late spring to early summer. This is when the plant is actively growing after its dormant period, and it has the energy to spare for sending out new roots. You’re looking for healthy, vigorous growth – no sad, wilting bits allowed here!
What You’ll Need for Your Propagation Station
- Sharp Pruning Shears or a Craft Knife: A clean cut is crucial to prevent disease. Think razor-sharp!
- Rooting Hormone (Optional but Recommended): This can give your cuttings a real boost in root development. Look for one that contains IBA.
- Well-Draining Potting Mix: A typical houseplant mix is usually too heavy. I like to use a blend of equal parts perlite, coarse sand, and peat moss or coco coir. This ensures water can drain away quickly.
- Small Pots or Trays: Terracotta pots are great because they breathe.
- Plastic Bag or Propagation Dome: To create a humid environment.
- Watering Can with a Fine Rose: Gentle watering is key.
- Labeling Stakes: Don’t forget to mark what you’ve propagated!
Let’s Get Propagating: Division is Your Friend
For Ferraria crispa, the most reliable and rewarding method of propagation is division. These beauties grow from rhizomes, which are essentially underground stems, and these rhizomes will naturally multiply over time.
- Gently Excavate: When the plant is dormant or just beginning its active growth phase (remember, late spring/early summer is ideal!), carefully dig up the entire plant. You want to be as gentle as possible to avoid damaging the rhizomes.
- Clean Off the Soil: Once out of the pot, gently brush or wash away as much of the old soil as you can. This allows you to see the rhizome structure clearly.
- Identify Natural Divisions: Look for where the rhizome naturally splits or where there are distinct sections with intact roots and at least one or two growth buds (these are usually small, nubby things).
- Make the Cut: Using your sterilized pruning shears or craft knife, carefully cut the rhizome into sections. Ensure each section has a good clump of roots and at least one healthy bud. If a rhizome is very large and unwieldy, you can cut it, but if you’re a beginner, try to start with smaller, more manageable divisions.
- Let it Callus (Optional but Helpful): If you’ve made any significant cuts, you can let the divided pieces sit out in a dry, airy spot for a day or two. This allows the cut surface to dry and form a protective callus, which can help prevent rot.
- Pot Them Up: Fill your small pots with your well-draining potting mix. Plant each rhizome division so the top of the rhizome is just at or slightly below the soil surface. You should be able to see the growth buds.
- Water Lightly: Give the pots a gentle watering to settle the soil around the rhizomes.
The “Secret Sauce” for Success
- Don’t Over-Pot: Starting your divisions in large pots is a recipe for disaster. Small pots mean less soil to hold excess moisture, which is exactly what we want to avoid.
- Bottom Heat is Your Best Friend: Ferraria crispa rhizomes love a little warmth to kickstart root growth. Placing your pots on a gentle heated propagator mat can make a world of difference, especially if your room temperatures fluctuate.
Aftercare and What to Watch For
Once your divisions are planted, the key is consistent but not excessive moisture. Keep the soil lightly moist, like a wrung-out sponge. Avoid letting it become waterlogged.
- New Growth: The first sign of success will be new leaf growth emerging from the buds. This can take anywhere from a few weeks to a couple of months, so be patient!
- Troubleshooting Rot: The most common sign of failure is rot. If you notice your division is mushy, dark, and smells unpleasant, it’s likely rotted. This usually happens from too much moisture and poor drainage. Unfortunately, once rot sets in, it’s very difficult to save the division.
Keep Growing!
Propagating Ferraria crispa is a journey of patience and observation. Don’t be discouraged if your first attempt isn’t a roaring success. Every gardener has had their share of failed propagations – it’s how we learn! Just keep trying, enjoy the process of nurturing these unique plants, and soon you’ll have more of those fascinating blooms to admire. Happy gardening!
Resource:
https://identify.plantnet.org/k-world-flora/species/Ferraria%20crispa%20Burm./data