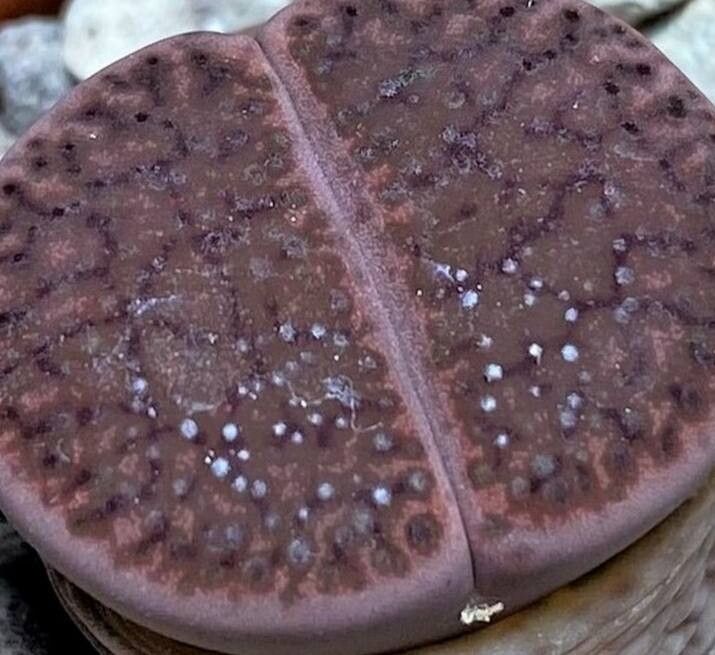
Well hello there, fellow plant lover! I’m so excited to chat with you today about one of my all-time favorite subjects: Lithops glaudinae, often called “living stones.” Isn’t it just the most fascinating little plant? Their uncanny resemblance to pebbles and their incredible ability to thrive in arid conditions make them a real conversation starter. And the reward of successfully coaxing a new Lithops into existence? Pure gardening joy!
Now, I won’t lie. Propagating Lithops can be a bit of a delicate dance, especially for absolute beginners. They’re not quite as forgiving as a pothos, but with a little patience and the right approach, you absolutely can do it. Think of it as a rewarding challenge that will deepen your understanding of these unique succulents.
The Best Time to Start
When I’m looking to multiply my Lithops collection, I always aim for the active growing season. For Lithops glaudinae, this typically falls in the late winter to early spring, just as they start to emerge from their winter dormancy and before the intense summer heat kicks in. This is when they have the most energy to dedicate to developing new roots and growth.
Supplies You’ll Need
Here’s what you’ll want to have on hand for our propagation adventure:
- Well-draining soil mix: Think a gritty blend. I usually mix equal parts coarse sand, perlite, and a good quality succulent potting mix. You can also buy specialized cactus and succulent mixes.
- Sharp, sterilized knife or razor blade: For making clean cuts. A craft knife or small pruning shears work well.
- Rooting hormone (optional but recommended): A powder like Clonex or Dip N Grow can give your cuttings a helpful boost.
- Small pots or seed trays: With drainage holes, of course!
- Spray bottle: For gentle misting.
- Labels: So you don’t forget what you planted!
- Good light source: Bright, indirect light is key.
Propagation Methods
While Lithops are primarily grown from seed, propagating them from offsets or divisions is a more common and often successful method for experienced growers. It’s how I expand my own collection most often.
Propagating from Offsets (Baby Lithops):
- Wait for the right moment: You’ll see small “baby” Lithops forming at the base of the parent plant. They’ll usually be noticeable during their active growing season.
- Gently detach: Carefully examine the connection point between the parent plant and the offset. Using your sterilized knife, make a clean cut to separate the baby Lithops. Try to get at least one tiny root with the offset if possible.
- Callus over: This is a crucial step! Let the cut end of the offset air dry for 2-3 days in a well-ventilated spot, away from direct sunlight. This forms a protective callus, preventing rot.
- Plant it up: Plant the callused offset in your well-draining soil mix. Just barely cover the base of the plant.
- Resist watering: This is the hardest part! Do not water immediately. Wait at least a week, and even then, start with very light misting.
Propagation from Division (Less Common for Lithops, but possible):
If your Lithops is a larger clump with multiple distinct body divisions, you might be able to carefully split them.
- Carefully unpot: Gently remove the entire Lithops clump from its pot.
- Brush away soil: Carefully brush away as much soil as you can from the root ball to see the divisions.
- Separate gently: With your hands or a very clean, sharp tool, gently pull or cut the clump into smaller sections. Ensure each section has some roots attached.
- Callus and plant: Follow steps 3-5 from the offset method: callus over for a few days, then plant in dry soil and wait to water.
The “Secret Sauce” (Pro Tips)
Here are a few tricks I’ve learned over the years that can make a big difference:
- Don’t rush the watering: Seriously, patience is your best friend with Lithops propagation. Overwatering too soon is the number one killer of new offsets. Wait until you see firm growth or new roots developing before giving anything more than a light mist.
- Bottom heat can be a game-changer: If you can provide a gentle, consistent warmth from below (like with a seedling heat mat set to a low temperature, around 70-75°F or 21-24°C), it can significantly encourage root development. Just make sure the soil doesn’t dry out too quickly.
- Observe closely: Get in the habit of looking at your new plants daily. You get a feel for their subtle cues. Are they plump and firm? Or are they starting to wrinkle or look mushy? Your observations will guide your watering and light adjustments.
Aftercare & Troubleshooting
Once your offset has successfully rooted (you’ll usually see it looking plump and firm, and you might even see new growth), you can begin to water a little more regularly. Water thoroughly when the soil is completely dry, and then let it dry out again. Lithops are prone to rot if kept too wet, so excellent drainage is paramount.
Signs of failure often look like mushy, translucent leaves or complete collapse. This is almost always a sign of too much moisture and the dreaded rot setting in. If you see this, try to remove the affected parts immediately and let any salvageable bits callus and dry completely before attempting to repot.
A Encouraging Closing
Propagating Lithops glaudinae is a journey, not a race. There will be times when things don’t go as planned, and that’s perfectly okay! Every gardener learns through trial and error. The most important thing is to observe your plants, learn from their signals, and enjoy the magical process of bringing new life into your garden. Happy propagating, and may your little living stones flourish!
Resource:
https://identify.plantnet.org/k-world-flora/species/Lithops%20glaudinae%20de%20Boer/data