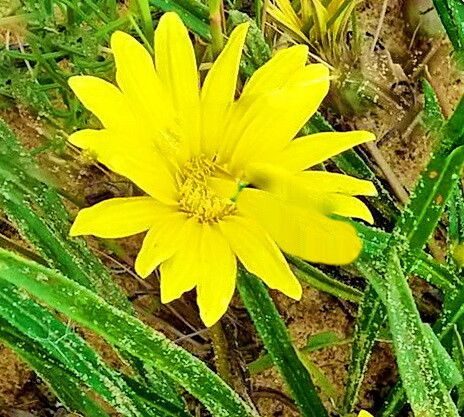
Oh, hello there! Come on in, and let’s chat about one of my favorite garden sparkle-makers: the Gazania krebsiana. You know, those cheerful, daisy-like blooms that just soak up the sun and bring a burst of sunshine to even the cloudiest days? They’re often called Treasure Flowers, and honestly, they live up to the name! Propagating them is one of those wonderfully rewarding gardening tasks. You get more of those vibrant colors without breaking the bank, and it’s a fantastic way to fill up bare spots or share the joy with friends. If you’re new to the gardening game, I’d say Gazanias are moderately easy to propagate, especially with a few helpful hints.
The Best Time to Start
For the absolute highest success rate, I always recommend starting your Gazania propagation in late spring through early summer. This is when the plants are actively growing and have plenty of energy to put into developing new roots. You’re looking for healthy, non-flowering stems that are at least 4-6 inches long. Think of it like this: the plant is already in its prime, so it’s happy to share a piece of itself to make a new friend.
Supplies You’ll Need
To give your new Gazanias the best start, gather these essentials:
- Sharp pruning shears or a clean knife: For making nice, clean cuts.
- Rooting hormone (optional but recommended): This little helper encourages faster and stronger root development. I prefer powdered forms, but liquid works too.
- Well-draining potting mix: A blend of peat moss, perlite, and a bit of compost is ideal. You want something airy that won’t hold too much moisture.
- Small pots or seed trays: With drainage holes, of course!
- Plastic bags or a propagator: To create a humid environment around your cuttings.
- Watering can with a fine rose: For gentle watering.
- A sunny, but not scorching, location: For your cuttings to root.
Propagation Methods
Let’s get our hands dirty! The most reliable way to multiply your Gazanias is through stem cuttings.
-
Taking the Cuttings: Find a healthy, non-flowering stem on your established Gazania. Using your clean shears, make a cut just below a leaf node (that little bump where a leaf grows from the stem). You want cuttings that are about 4 to 6 inches long. Gently remove the lower leaves, leaving just a few at the top.
-
Applying Rooting Hormone (Optional): Dip the cut end of the stem into your rooting hormone. Just a light coating is all you need. Tap off any excess.
-
Planting the Cuttings: Fill your small pots with the well-draining potting mix. Make a hole in the center with your finger or a pencil. Carefully insert the cut end of the Gazania stem into the hole, making sure the leaf nodes that were buried are covered by soil. Gently firm the soil around the cutting.
-
Watering and Covering: Water the potting mix thoroughly but gently until water drains from the bottom. Now, here’s where the humidity comes in: place the pots inside a plastic bag (making sure the bag doesn’t touch the leaves too much) or cover them with a propagator lid. This creates a mini-greenhouse effect.
-
Placement: Place your potted cuttings in a bright spot that receives indirect sunlight. Direct sun can scorch those delicate baby leaves before they’re ready.
The “Secret Sauce” (Pro Tips)
Okay, lean in, I’ve got a couple of little tricks up my sleeve that have always helped me with Gazanias and other similar plants.
- Don’t let the leaves touch the soil! This might seem obvious, but sometimes when you’re watering, a leaf can dip down and make contact. If it stays wet there, it’s a direct invitation for rot. So, give those lower leaves a good trim before planting.
- A little warmth goes a long way. If you have a heat mat designed for propagators, placing your pots on top of it can really speed up root development. Gazanias love a bit of cozy bottom heat as they’re getting started. It mimics that lovely warm soil they enjoy so much in their natural habitat.
Aftercare & Troubleshooting
Once you’ve got your cuttings planted, patience is key! Keep the soil consistently moist but not soggy. You can check this by poking your finger about an inch into the soil. If it feels dry, it’s time for a gentle watering.
After a few weeks, you should start to see signs of new growth – tiny leaves unfurling at the tip. This is your cue that roots have formed! Gently tug on a cutting; if there’s resistance, you’ve got roots. Once they’re well-rooted, you can remove the plastic cover gradually over a few days to acclimate them to normal humidity. Then, just treat them like a small Gazania plant.
Now, what if things go wrong? The most common culprit is rot. If a cutting turns black and mushy, it’s usually a sign of too much moisture and not enough air circulation. This is why a well-draining mix and that initial humidity dome are so important. If you have blackened, mushy cuttings, unfortunately, they’re probably beyond saving. Just remove them and try again with fresh cuttings and slightly drier conditions.
A Little Bit of Patience
Propagating plants is a little bit like magic, isn’t it? It takes a bit of time, a dash of care, and a whole lot of sunshine. Don’t get discouraged if your first attempt isn’t perfect. Keep trying, observe your plants, and you’ll get the hang of it in no time. Happy propagating, and enjoy your beautiful, new Gazanias!
Resource:
https://identify.plantnet.org/k-world-flora/species/Gazania%20krebsiana%20Less./data