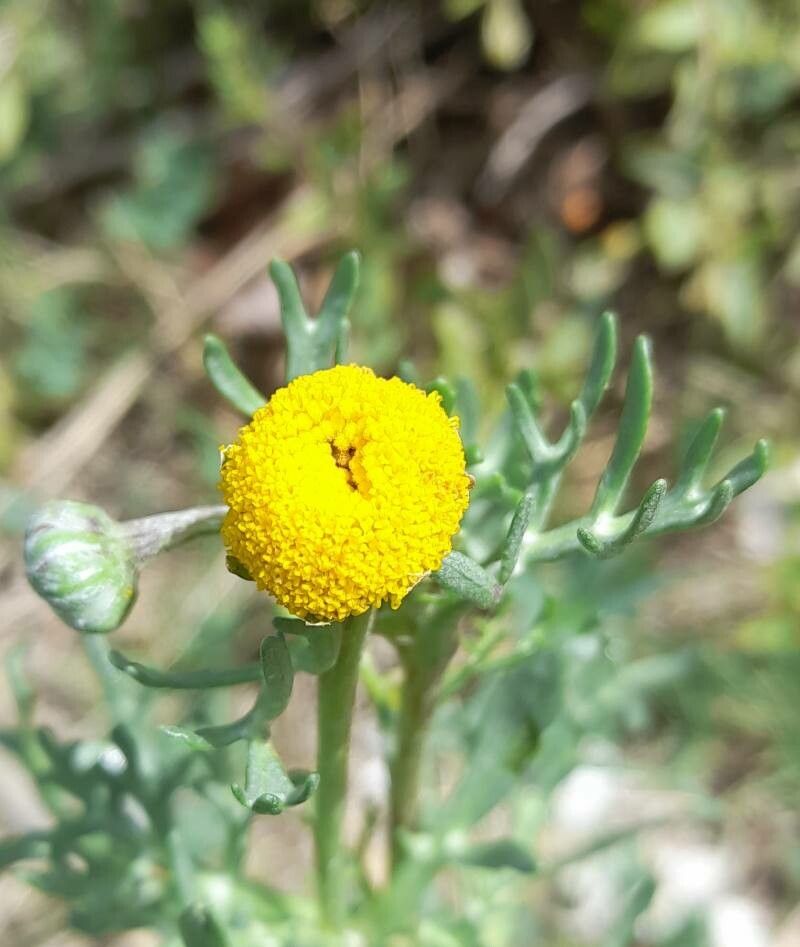
Oh, Hymenoxys robusta! That cheerful splash of sunshine in the garden. I absolutely adore this plant. Its bright yellow blooms are like little bursts of happiness, and it’s surprisingly hardy once it gets going. If you’ve ever admired its beauty and thought, “I wish I had more of those!” – you’re in luck. Propagating it is a truly rewarding endeavor, and I’m happy to share how I do it. For the most part, Hymenoxys robusta is quite forgiving, making it a good candidate even if you’re just dipping your toes into the world of plant propagation.
The Best Time to Start
For the highest success rate with Hymenoxys robusta, I’ve found that the late spring or early summer is your best bet. This is when the plant is actively growing, and the stems are plump and full of life. Starting then gives your new cuttings ample time to establish themselves before the cooler weather creeps in. You can also get away with taking cuttings in early autumn, but the growth might be slower.
Supplies You’ll Need
Before we get our hands dirty, let’s gather our essentials:
- Sharp, clean pruning shears or a craft knife: For making precise cuts. Sterilize them with rubbing alcohol!
- Rooting hormone (optional but recommended): A powder or gel that encourages root development.
- Well-draining potting mix: A good seed-starting mix or a blend of peat moss, perlite, and a little compost works wonders.
- Small pots or seed trays: With drainage holes, of course.
- Plastic bags or a propagation dome: To create a humid environment.
- Watering can or spray bottle: For gentle watering.
- Labels: To keep track of what you’ve planted and when.
Propagation Methods
I find stem cuttings are my go-to method for Hymenoxys robusta. It’s straightforward and yields great results.
- Take Your Cuttings: On a bright, non-rainy morning, select healthy, non-flowering stems from your mature Hymenoxys robusta. You want cuttings that are about 4-6 inches long. Use your clean shears to make a clean cut just below a leaf node (where a leaf attaches to the stem). Remove the lower leaves from the cutting, leaving just a few at the top.
- Apply Rooting Hormone (Optional): If you’re using rooting hormone, dip the cut end of the stem into the powder or gel. Tap off any excess. This step really gives your cuttings a head start.
- Planting the Cuttings: Fill your small pots or trays with your well-draining potting mix. Make a pilot hole in the soil with a pencil or your finger. Gently insert the cut end of the stem into the hole, ensuring that at least one leaf node is below the soil surface. Firm the soil gently around the cutting.
- Create Humidity: Water the potting mix lightly. Then, cover the pots with a plastic bag or place them on a tray under a propagation dome. This creates a mini-greenhouse effect, keeping the humidity high, which is crucial for cuttings to root. Make sure the leaves don’t touch the plastic if possible, to prevent rot.
- Placement: Place your pots in a bright location with indirect sunlight. Avoid direct sun, which can scorch the delicate cuttings.
The “Secret Sauce” (Pro Tips)
Here are a couple of things I’ve learned over the years that make a big difference:
- The “Heel” Trick: Sometimes, when I’m taking cuttings, I’ll try to gently pull a stem away from the parent plant in a way that leaves a small sliver of the older stem attached – it’s like a tiny “heel.” This bit of older material can sometimes speed up root formation.
- Bottom Heat is Your Friend: If you can, place your pots on a gentle heat mat designed for propagation. This bit of warmth from below encourages root development without drying out the top of the cutting and is particularly helpful if your room is on the cooler side.
Aftercare & Troubleshooting
Once your cuttings have started to root – you can usually tell when you see new leaf growth or a gentle tug on the cutting meets resistance – it’s time for a little nurturing. Gradually acclimate them to more normal room humidity by opening the plastic bag or dome a little each day over a week. Continue to keep them in bright, indirect light. Water them when the top inch of soil feels dry.
The most common problem you’ll encounter is rot. If you see a cutting turning mushy, black, or developing mold, it’s usually a sign of too much moisture and not enough air circulation. Unfortunately, these are often unsalvageable. The best defense is that well-draining soil and careful watering. Another sign of a failed cutting is if it wilts dramatically and stays that way, showing no signs of new growth after a few weeks.
A Encouraging Closing
Remember, gardening is a journey, and propagation is a wonderful way to connect with your plants. Don’t be discouraged if not every cutting takes. Each attempt is a learning experience. Be patient, observe your new little plants, and enjoy the magic of watching them grow. Soon enough, you’ll have a whole collection of your own cheerful Hymenoxys robusta!
Resource:
https://identify.plantnet.org/k-world-flora/species/Hymenoxys%20robusta%20(Rusby)%20K.F.Parker/data