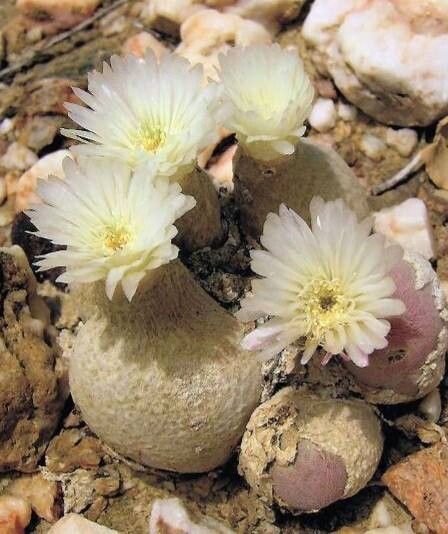
Oh, Muiria hortenseae! Isn’t she just a darling? I remember the first time I laid eyes on this little gem. Those plump, almost alien-looking leaves, a soft, dusty grey-green, just begging to be touched. If you’re looking for a plant that offers a unique kind of beauty and a deeply satisfying propagation project, you’ve found it. I’ll be honest, Muiria hortenseae isn’t the most foolproof plant for a complete beginner looking for instant gratification. It takes a bit of patience and understanding, but the reward of seeing a tiny new life sprout from your own efforts? That’s pure gardening magic, and it’s absolutely worth it.
The Best Time to Start
For Muiria hortenseae, timing is everything. You’ll have the best luck during its active growing season, which is typically spring and early summer. This is when the plant is energized and has the most vigor to produce new roots and shoots. Starting outside of this period is still possible, but success rates can dip. Think of it like trying to kickstart a car in the dead of winter versus a warm spring day – you want all the help you can get!
Supplies You’ll Need
Before we get our hands dirty, let’s gather our tools:
- Sharp, clean pruning shears or a sterile knife: To make clean cuts.
- Rooting hormone (optional, but recommended): A gentle fairy dust for your cuttings.
- Well-draining potting mix: This is crucial! I usually use a blend of cactus/succulent mix with added perlite or coarse sand for extra aeration. You want soil that dries out quickly.
- Small pots or containers: Nothing too large, as it can hold too much moisture. Think 2-4 inch pots.
- Spray bottle: For gentle misting.
- Plastic bag or propagator lid: To create a humid microclimate.
- Labels: To keep track of your precious little ones!
Propagation Methods
Muiria hortenseae can be a bit particular, but I’ve found stem cuttings to be the most reliable method. Let’s walk through it:
- Select Your Donor Plant: Choose a healthy, mature plant. Look for a stem that’s firm and shows signs of active growth.
- Make the Cut: Using your clean shears or knife, make a clean cut a few inches below a leaf node. This is where the plant is most likely to produce roots. I like to take cuttings that have at least one or two leaf nodes.
- Let it Callus: This is a super important step for Muiria hortenseae! Gently wipe off any sap from the cut end. Then, let the cutting sit in a dry, airy place for 24-48 hours. You want the cut end to form a dry callus. This prevents rot when you plant it.
- Apply Rooting Hormone (Optional): Once callused, you can dip the cut end into your rooting hormone. Tap off any excess.
- Plant Your Cutting: Fill your small pots with your well-draining mix. Make a small hole with a pencil or your finger and insert the callused end of the cutting. Gently firm the soil around it.
- Water Sparingly: Water just enough to moisten the soil. You don’t want it soggy.
- Create a Humid Environment: Place the pot in a plastic bag or cover it with a propagator lid. This will keep the humidity high, which encourages roots to form. Make sure the leaves aren’t touching the sides of the bag if possible.
- Provide Bright, Indirect Light: Place your propagated cuttings in a location with bright, but not direct sunlight. Too much sun can scorch them.
- Be Patient! This is where the real test of patience comes in. It can take several weeks, sometimes even a couple of months, for roots to develop. You can gently tug on a leaf to feel for resistance – that’s a good sign!
The “Secret Sauce” (Pro Tips)
Alright, let me share a couple of secrets that have served me well over the years:
- Bottom Heat is Your Friend: While not essential, providing a little bottom heat can significantly speed up the rooting process. A seedling heat mat set to a low temperature (around 70-75°F or 21-24°C) can make a big difference, especially if your room temperature is cooler.
- Don’t Mist Too Much: It’s tempting to mist cuttings frequently, especially when they’re in a humid environment. However, with Muiria hortenseae, over-misting can encourage fungal diseases and rot. Aim for a gentle watering of the soil when it feels dry, and maybe a light mist on the surrounding air inside the propagator if it looks a bit parched, but let the callused cutting do its own thing.
- Watch Out for the Mother Plant: When taking cuttings, try to place the mother plant in a slightly less prominent spot for a little while. It might look a bit sad after losing some bits, and giving it a bit of a rest helps it recover its strength for future growth.
Aftercare & Troubleshooting
Once you feel that resistance when gently tugging, or you see signs of new growth, congratulations! Your cutting has rooted.
- Gradually Acclimate: If you had your cutting covered, slowly remove the plastic bag or lid over a week or so to let it get used to normal room humidity.
- Continue with Bright, Indirect Light: Keep it in its bright, indirect light spot.
- Watering: Water when the soil is dry to the touch. It’s better to err on the side of underwatering than overwatering for these guys.
- Troubleshooting: The biggest culprit is rot. If you see mushy, blackening stems or leaves, it’s usually a sign of too much moisture and poor drainage. Unfortunately, if rot sets in, it’s often difficult to save. Prevention is truly key here – ensure that excellent drainage and that callus. Another sign of struggle is wilting, which can be due to not enough roots yet or, again, too much moisture.
A Encouraging Closing
Propagating Muiria hortenseae is a journey, not a race. There might be a learning curve, and sometimes things don’t work out, and that’s okay! Nature has its own rhythm. But with a little care, the right conditions, and a whole lot of patience, you’ll be rewarded with those beautifully unique plants. So go ahead, give it a try. Enjoy the process, the anticipation, and the immense satisfaction of nurturing your own little piece of the succulent world into being. Happy gardening!
Resource:
https://identify.plantnet.org/k-world-flora/species/Muiria%20hortenseae%20N.E.Br./data