Oh, hello there! It’s so lovely to have you join me in my little corner of the garden. Today, we’re going to talk about a plant that always brings a twinkle to my eye: Hieracium cerinthoides. If you’re drawn to its charming, daisy-like blooms and its ability to bring sun-kissed joy to rock gardens or borders, then you’re in for a treat. Propagating these beauties is a wonderfully satisfying endeavor, and I’m thrilled to share my secrets with you.
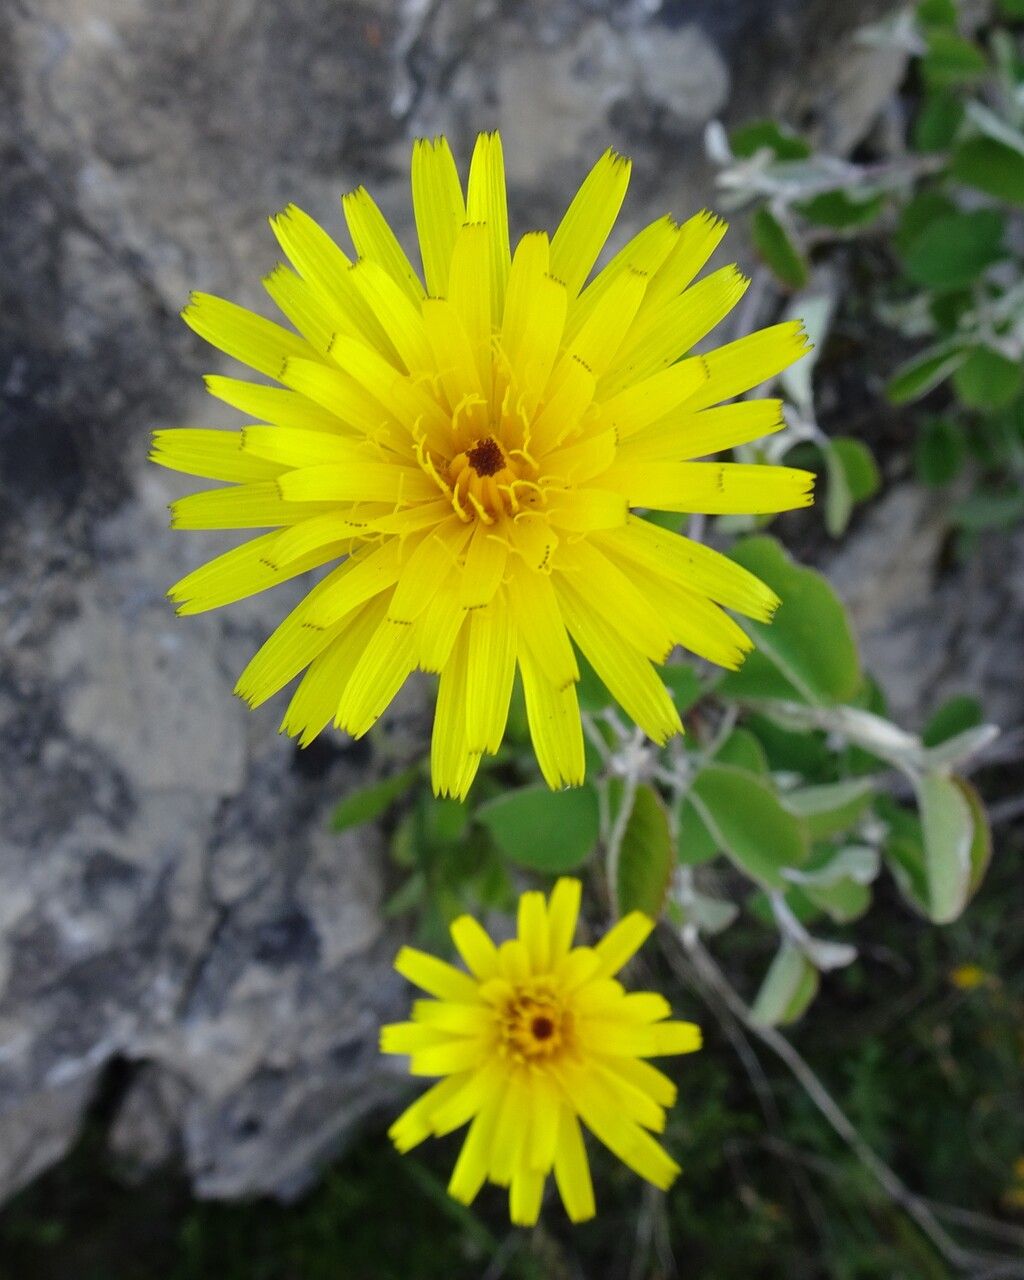
Our Charming Subject: Hieracium cerinthoides
Hieracium cerinthoides, sometimes known as viper’s bugloss hawkweed (though there are many hawkweeds!), is a delightful woodland native with a soft fuzziness to its leaves and a cheerful disposition in flower. The real magic for me lies in its resilience and its knack for naturalizing, which makes propagating it a truly rewarding experience. For beginners, I’d say Hieracium cerinthoides is moderately easy to propagate – a little patience goes a long way, and with these tips, you’ll do wonderfully.
When to Get Your Hands Dirty
The best time to start propagating Hieracium cerinthoides is generally in the late spring or early summer, right after the plant has finished its most vigorous flowering. This is when the stems are developing, full of energy, and have a good chance of rooting. You can also have success with division in the early autumn as the plant begins to slow down its growth.
Gearing Up: Your Propagation Toolkit
Before we dive in, let’s make sure you have everything you need:
- Sharp Pruning Shears or a Clean Knife: For taking clean cuts without damaging the stems.
- Rooting Hormone (Optional but Recommended): A powder or gel can give your cuttings a good head start.
- Well-Draining Potting Mix: I like to use a blend of equal parts seed starting mix and perlite or coarse sand. This ensures great aeration and prevents waterlogging.
- Small Pots or Trays: About 3-4 inches is perfect for starting. Make sure they have drainage holes!
- Dibber or Pencil: To make a nice hole for your cuttings.
- Watering Can with a Fine Rose: To water gently without disturbing your new plants.
- Plastic Bags or a Propagator Lid: To create a humid environment.
- Labels and a Pen: To keep track of what you’ve planted and when.
Bringing New Life: Propagation Methods
Hieracium cerinthoides is quite obliging and readily propagates through a couple of simple methods.
Method 1: Stem Cuttings – My Personal Favorite!
This is my go-to method for Hieracium cerinthoides because it’s efficient and yields strong new plants.
- Select Your Stems: Look for healthy, non-flowering stems that are about 4-6 inches long. Gently bend a stem; if it snaps cleanly, it’s likely ready. If it’s too soft and floppy, wait a bit longer.
- Make the Cut: Using your sharp shears, make a clean cut just below a leaf node (where a leaf attaches to the stem). This node is where new roots will most likely form.
- Prepare the Cuttings: Remove the lower leaves from the stem, leaving just the top few. This prevents them from rotting once you plant them. If the stem is very long, you can even cut it in half horizontally, making sure each piece has at least one leaf node at the bottom.
- Apply Rooting Hormone (Optional): Dip the cut end of the stem into your rooting hormone, tapping off any excess.
- Plant Your Cuttings: Fill your pots with your prepared potting mix. Use your dibber or pencil to create sloping holes in the soil. Gently insert the cuttings, ensuring the leaf nodes are buried in the soil. Gently firm the soil around the base.
- Water Gently: Water the pots thoroughly but gently, allowing the excess water to drain away.
Method 2: Division – For Established Clumps
If you have an older, well-established clump of Hieracium cerinthoides, division is a fantastic way to create multiple new plants and also rejuvenate the parent plant.
- Loosen the Soil: In early spring or early autumn, dig around the base of the clump, loosening the soil.
- Carefully Lift: Gently lift the entire clump out of the ground or pot.
- Separate the Divisions: Use your hands or a clean trowel to gently tease apart the root ball. Look for sections that have their own set of roots and shoots. You want each division to have a good portion of roots and at least a few healthy shoots.
- Trim Damaged Roots: If any roots look broken or damaged, give them a clean trim.
- Replant: Plant each division in its own pot with fresh, well-draining soil, or replant them directly into your garden beds at the same depth they were previously growing. Water well.
The “Secret Sauce”: My Insider Tips!
You know, after all these years, a few little tricks really do make a difference.
- “Don’t Let Those Leaves Touch the Water”: When propagating in water (another option, though I prefer soil for Hieracium), make sure the leaves of your cutting are not submerged. If they are, they’ll rot. Only the stem should be in the water.
- Embrace Bottom Heat: If you can, place your pots on a heated propagator mat. This gentle warmth from below encourages root development. It’s like a cozy little foot spa for your cuttings!
- The Humidity Hug: Newly planted cuttings are thirsty, but they can’t drink much without roots. This is where the plastic bag or propagator lid comes in. It creates a mini-greenhouse, keeping humidity high and reducing water loss from the leaves. Just make sure to open it for a few minutes each day to allow for air circulation and prevent fungal issues.
Nurturing Your New Sprouts
Once your cuttings have developed roots – and you can often tell when tiny roots start peeking out of the drainage holes or when you give a very gentle tug and feel resistance – it’s time for a little extra care.
- Gradual Acclimation: If you’ve used a plastic bag or propagator lid, gradually remove it over a few days to help your new plants adjust to normal room humidity.
- Slightly Less Water: You can start watering a bit less frequently, but always keep the soil consistently moist, not soggy.
- Bright, Indirect Light: Move your developing plants to a spot with bright, indirect light. Avoid harsh direct sun, which can scorch young leaves.
- Troubleshooting: The most common issue you might face is rot, which is usually caused by overwatering or poor drainage. If you see stems turning black and mushy, or if there’s a foul smell, it’s time to discard that cutting and check your watering habits and soil mix for the others.
Keep Growing!
Propagating plants is a journey of patience and observation. Don’t be discouraged if every single cutting doesn’t make it; it’s all part of the learning process. Celebrate the successes, learn from the challenges, and most importantly, enjoy the incredible satisfaction of bringing new life into your garden with your own two hands. Happy propagating!
Resource:
https://identify.plantnet.org/k-world-flora/species/Hieracium%20cerinthoides%20L./data