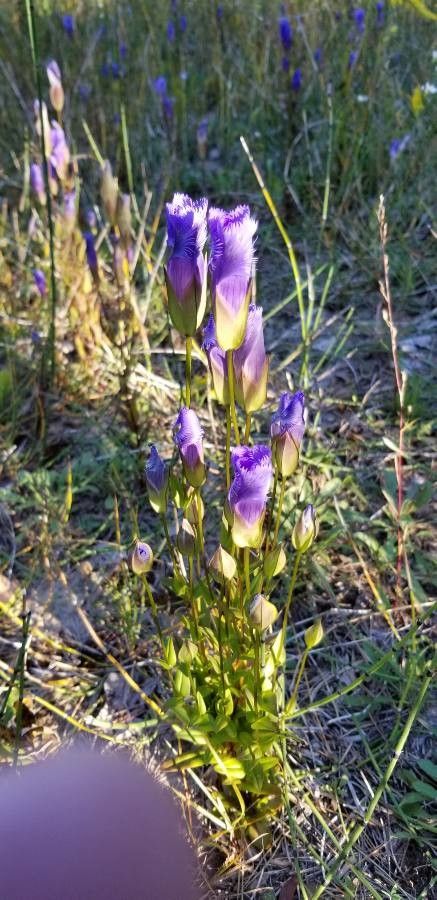
Well hello there, fellow garden enthusiasts! Today, we’re diving into the delicate and utterly charming world of Gentianopsis crinita, or the Fringed Gentian. If you’ve ever seen these ethereal blue bells gracing a meadow or a carefully curated border, you know the magic they hold. Their vibrant, sky-blue petals, with their signature fringed edges, are truly a sight to behold. While they might have a reputation for being a bit particular, I promise you, the reward of coaxing these beauties from seed or cutting is immeasurable. For beginners, I’d say they’re a bit of a challenge, but certainly not impossible with a little patience and the right approach. Think of it as a special project, one that teaches you a lot about the subtle needs of certain plants.
The Best Time to Start
For Gentianopsis crinita, you’ll have the most success starting the process in late winter or early spring. This is when nature is just starting to stir, and the increasing light and warmth mimic the conditions these plants often prefer. If you’re working with seeds, sowing them as soon as you can get them in the ground or pots in late winter is ideal, as they often benefit from a period of cold stratification. For cuttings, early spring, when the plant is actively growing but not yet flowering, is generally the sweet spot.
Supplies You’ll Need
- Seed starting mix: A fine, sterile mix is crucial. I like to use a blend of peat moss, perlite, and a touch of fine compost.
- Fine-grained sand: To improve drainage and mimic their natural habitat.
- Small pots or seed trays: Clean ones, of course!
- Clear plastic domes or bags: To create a humid environment for seeds and cuttings.
- Watering can with a fine rose: To avoid disturbing delicate seedlings.
- Rooting hormone powder (optional, for cuttings): A weak solution can give cuttings a helpful boost.
- Sharp, clean pruning shears or a sharp knife: For taking cuttings.
- Labels and a permanent marker: Don’t underestimate the power of good labeling!
Propagation Methods
While dividing established plants isn’t typically the best way to propagate Gentianopsis crinita (they can be quite sensitive to root disturbance), starting from seed is the most common and rewarding method.
Starting from Seed:
- Gather Seeds: Collect your seeds in the fall after the flowers have faded and the seed pods have dried. Gently tap them into a paper envelope and store them in a cool, dry place.
- Stratification (If Needed): Many gentians benefit from a period of cold, moist stratification. Mix your seeds with a bit of damp sand or peat moss in a plastic bag and store it in the refrigerator for 4-6 weeks.
- Sowing: In late winter or early spring, fill your seed trays or pots with your sterile seed-starting mix. Moisten the mix thoroughly, but don’t make it soggy.
- Sow the Seeds: Sow the seeds thinly on the surface of the soil. Gently press them down, but don’t bury them deeply. They need light to germinate.
- Provide Light and Moisture: Cover the trays with a clear plastic dome or bag to maintain humidity. Place them in a bright spot, but avoid direct, hot sunlight. A north-facing window is often perfect.
- Patience is Key: Germination can be slow and erratic, sometimes taking several weeks or even months. Keep the soil consistently moist but not waterlogged.
- Pricking Out: Once the seedlings have developed a few sets of true leaves and are large enough to handle, you can carefully transplant them into individual pots. Use a fork or a dibber to gently loosen them from the seed starting mix.
The “Secret Sauce” (Pro Tips)
Here are a few things I’ve learned over the years that make a real difference:
- Don’t Overwater! This is probably the single most important tip for gentians. They like consistent moisture, but they absolutely detest soggy feet. Water from the bottom when possible, allowing the soil to wick up moisture.
- Mimic Their Native Habitat: Fringed gentians often grow in lean, well-drained soils. When transplanting, don’t be tempted to add too much rich compost. A lighter, sandier mix will serve them much better and help prevent root rot.
- Airflow is Essential: While you need to create humidity for germination, once seedlings or cuttings have emerged, good airflow is vital. This helps prevent fungal diseases. If your humidity dome is trapping too much moisture, lift it for a few hours each day.
Aftercare & Troubleshooting
Once your seedlings are established and your cuttings have rooted (you’ll see new growth appearing!), it’s time to treat them like precious little jewels. Gradually acclimatize them to normal room conditions if they’ve been under cover. Continue to water sparingly but consistently, ensuring the soil never dries out completely but also never sits in water.
The most common sign of trouble is rot. If you see seedlings wilting suddenly or developing dark, mushy bases, they’re likely drowning. It’s a tough lesson, but often irreversible once it sets in. If you’ve started from seed and a few don’t make it, don’t despair! The ones that do will be all the more special.
A Little Patience Goes a Long Way
Propagating Gentianopsis crinita is a journey, not a race. It requires a gentle hand and a keen eye. Don’t be discouraged if your first attempt isn’t a resounding success. Each plant teaches us something new, and the satisfaction of nurturing these delicate beauties from tiny beginnings is truly a gift. So, grab your tools, embrace the process, and enjoy the anticipation of those breathtaking blue blooms! Happy gardening!
Resource:
https://identify.plantnet.org/k-world-flora/species/Gentianopsis%20crinita%20(Froel.)%20Ma/data