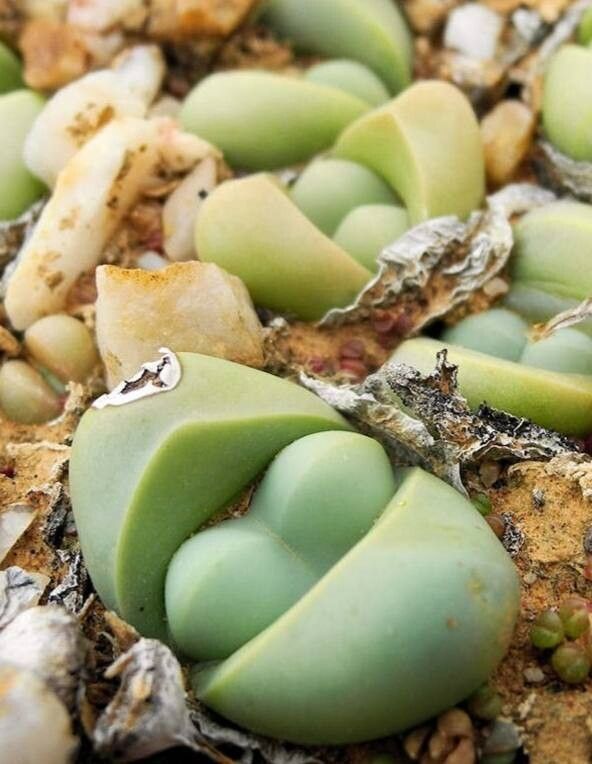
Hello, fellow garden lovers! Today, we’re diving into the fascinating world of Argyroderma delaetii, those little sculptural marvels that look like polished stones resting on the desert floor. If you’ve ever seen their leathery, fused leaves in shades of grey and green, you know why they capture our hearts. Their unique beauty is undeniably captivating.
Propagating these little gems is a truly rewarding experience. It’s like watching a tiny miracle unfold right before your eyes. While they might not be the absolute easiest for a brand-new beginner, with a little guidance and patience, you absolutely can have success. Think of it as leveling up your succulent-growing skills!
The Best Time to Start
When it comes to Argyroderma delaetii, timing is everything. The best time to think about propagation is during their active growing season, which is typically in the spring and early summer. During this period, the plants have the energy reserves to focus on producing new roots and growth. Trying to propagate them when they are dormant, usually in the cooler months or during extreme heat, will significantly decrease your chances of success.
Supplies You’ll Need
Gathering your tools before you begin will make the entire process so much smoother. Here’s what I like to have on hand:
- Well-draining soil mix: A good cactus and succulent mix is a must. I often add a bit of extra perlite or pumice to ensure excellent drainage.
- Sharp, sterilized pruning shears or a sharp knife: Cleanliness is crucial to prevent disease transfer.
- Rooting hormone (optional but helpful): This can give your cuttings a little boost. Look for one specifically for succulents.
- Small pots or seed trays: Choose containers with drainage holes, of course!
- Gloves (optional): Some people find the texture of these succulents a bit unusual.
- Watering can or spray bottle: For gentle watering.
- A warm, bright location: Think a sunny windowsill or a propagation mat.
Propagation Methods
Argyroderma delaetii are best propagated through division. They tend to form clumps or offsets over time, and separating these is the most reliable way to get new plants.
- Gently Remove the Plant from its Pot: Turn the pot on its side and carefully slide the plant out. If it’s a bit stuck, you can gently tap the pot.
- Examine the Root Ball: Look for natural separations where new plantlets or offsets are attached to the parent plant. You’ll often see smaller, distinct bodies growing from the base.
- Divide the Offsets: Using your sterilized pruning shears or knife, carefully cut or twist the offsets away from the parent plant. Try to ensure each offset has at least a few of its own roots. If an offset has no roots, don’t worry too much, as we’ll address that.
- Allow to Callus: This is a critical step! Place the separated offsets in a dry, well-ventilated spot away from direct sunlight for 2-5 days. This allows any cuts or damaged areas to callus over, forming a protective barrier against rot.
- Potting Up: Once callused, plant each offset in its own small pot filled with your well-draining soil mix. If the offset has roots, plant it as you would a normal succulent, burying the roots. If it has no roots, you can simply place it on top of the soil, pressing down gently so it makes good contact.
- Initial Watering (Wait!): Do NOT water immediately. Wait for about a week after potting. This gives any tender new root nubs a chance to settle in and further reduces the risk of rot.
The “Secret Sauce” (Pro Tips)
Here are a few things I’ve learned over the years that can really make a difference:
- The “Dusting” Trick: If you’re dividing a very established plant and some offsets break off with no roots, don’t despair! After callusing, you can lightly dust the cut end with a bit of cinnamon. Cinnamon has natural antifungal properties that can help prevent rot while the offset tries to form new roots.
- Bottom Heat is Your Friend: If you have the setup, placing your pots on a gentle heating mat designed for plant propagation can significantly speed up root development. These succulents love warmth as they are getting established. I’ve found it makes a noticeable difference in how quickly they root.
- Don’t Over-Mist: With newly planted offsets, especially those without roots, it’s tempting to keep them constantly moist. Resist this urge! Allowing the soil to dry out between waterings is crucial. It encourages roots to search for moisture, thereby growing deeper and stronger.
Aftercare & Troubleshooting
Once your offsets have been potted and you’ve finished your initial waiting period, it’s time for gentle watering. Water sparingly at first, allowing the soil to dry out completely between waterings. You’ll know they’re happy when you see new growth, often marked by a slight plumpness or a change in texture of the leaves.
The most common issue you’ll face is rot. Signs of rot include mushy, discolored stems or leaves, and a foul smell. If you see this, act fast. Remove the affected plant immediately and discard it to prevent the rot from spreading. If only a small part is affected, you might be able to cut away the rot and let the remaining healthy part callus and try again.
Another sign that things aren’t going well is if the offsets simply shrivel and dry up without any signs of attempted rooting. This can happen if they are in too bright a light too soon, or if the air is too dry.
A Little Patience, A Lot of Joy
Propagating Argyroderma delaetii is a journey of observation and gentle nurturing. It might take a few weeks, or even a couple of months, before you see significant root development. Don’t get discouraged if it feels slow at first. Celebrate the small victories – a slightly plumper leaf, a hint of new growth. Enjoy the process of learning about these unique plants, and you’ll be rewarded with beautiful new additions to your collection. Happy growing!
Resource:
https://identify.plantnet.org/k-world-flora/species/Argyroderma%20delaetii%20C.A.Maass/data