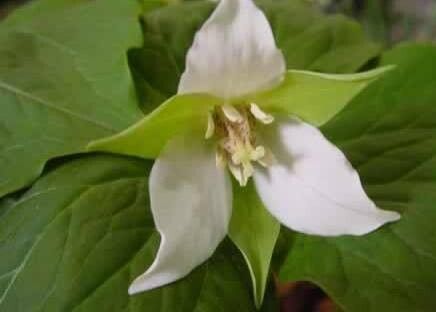
Hello fellow garden enthusiasts! Today, I want to chat about a truly captivating woodland gem: Trillium tschonoskii. You know those woodland walks where you stumble upon something breathtaking, something that whispers tales of ancient forests? That’s often a Trillium. Trillium tschonoskii, with its elegant, trifoliate leaves and that single, ethereal bloom, is especially enchanting. Propagating these beauties is a journey, and while they’re not the absolute easiest plants for a brand-new gardener, the rewards of nurturing a new Trillium from its parent are immense. It’s like holding a little piece of magic you’ve helped create.
The Best Time to Start
Timing is everything, isn’t it? For Trillium tschonoskii, the sweet spot for propagation, especially by division, is late summer to early autumn, just as the foliage begins to naturally die back. This gives the plant a chance to recover from flowering and store up energy before the next growing season. If you’re considering seed propagation, that’s a whole different, slower ball game altogether, often requiring stratification and a very, very patient hand over several years. We’ll focus on vegetative propagation for a more immediate reward!
Supplies You’ll Need
Gathering your supplies is like preparing for a gentle surgery – precision and the right tools make all the difference. You’ll want:
- A sharp, sterilized spade or trowel: For carefully lifting and dividing the rhizomes. Sterilize with rubbing alcohol between divisions to prevent disease spread.
- Environmentally friendly potting mix: A good blend for woodland plants is key. I often use a mix of peat moss, perlite, and compost, aiming for something that drains well but retains a bit of moisture.
- Clean containers or pots: For your newly divided sections. Make sure they have drainage holes!
- Watering can with a fine rose: To gently water your precious new propagations without disturbing them.
- Rooting hormone (optional): While Trilliums can be fickle, some gardeners find a little dip in rooting hormone can boost success, especially for divisions with smaller rhizome pieces. Look for a powder or gel specifically formulated for plants.
- Labels and a permanent marker: To keep track of what you’ve planted and when.
Propagation Methods: Division is Our Star
For Trillium tschonoskii, division of the rhizome is by far the most reliable and direct method for propagation. Trilliums grow from a thick, fleshy underground stem called a rhizome, and these can be carefully divided.
- Locate your Trillium: Gently dig around the base of the established plant in late summer or early autumn. You want to expose the rhizome without causing undue stress.
- Assess the rhizome: You’ll see the thick, fleshy rhizome, often with several growth points or “eyes.” Look for natural divisions where the rhizome has thickened and formed distinct sections.
- Make the cut: Using your sterilized spade or trowel, carefully cut the rhizome into sections. Each section should have at least one healthy growth bud (eye). If you’re using rooting hormone, dust the cut surfaces of the rhizome before proceeding.
- Plant your divisions: Fill your chosen containers with your well-draining potting mix. Make a small depression in the soil and place each rhizome section with the growth bud facing upwards. Cover the rhizome with about an inch of soil.
- Water gently: Water thoroughly but gently, ensuring the soil is moist but not waterlogged.
The “Secret Sauce” (Pro Tips)
You asked for it, so here are a few things I’ve learned over the years that can make a real difference with these sensitive beauties:
- Don’t rush the replanting: After you’ve divided the rhizome, don’t leave it sitting out to dry. Get it into its new pot and moist soil as quickly as possible. Think of it like this: the rhizome is a juicy potato, and you wouldn’t leave a cut potato out to shrivel.
- Think “woodland floor”: When you’re potting, mimic their natural environment. They love that dappled shade, cool soil, and a bit of leaf litter. Avoid direct sun for your newly divided plants. A spot under a larger shrub or on a shaded porch is ideal.
- Patience with the bloom: Just because you’ve divided a rhizome doesn’t mean it will bloom the following year. It can take a season or two for a new division to establish its energy reserves and produce a flower. Celebrate the leafy emergence first!
Aftercare & Troubleshooting
Once your divisions are nestled in their new pots, the real nurturing begins!
- Watering: Keep the soil consistently moist but not soggy. This is crucial. Too much water can lead to rot, and too little will stress the new division. I like to check the soil moisture with my finger – if the top inch feels dry, it’s time for a gentle drink.
- Location: Shade is paramount. Protect your new Trilliums from direct sunlight. A cool, shaded spot is their happy place.
- Signs of failure: The most common culprit is rhizome rot. If you notice your division turning mushy, black, or emitting an unpleasant odor, rot has likely set in. This is usually due to overwatering or poor drainage. If caught early, you might be able to salvage a healthy section, but often, it’s a sign the division hasn’t made it. Another sign of stress is wilting that doesn’t perk up after watering, which could indicate underwatering or too much sun.
A Little Bit of Green Magic
Propagating Trillium tschonoskii is an act of love for the woodland garden. It requires a bit of patience, a gentle hand, and the understanding that nature works on its own schedule. Don’t be discouraged if your first attempt isn’t a roaring success; every gardener has had their learning moments. Celebrate the small victories – a new shoot emerging, a healthy leaf unfurling. Trust your instincts, embrace the process, and enjoy the quiet satisfaction of coaxing new life into being. Happy gardening!
Resource:
https://identify.plantnet.org/k-world-flora/species/Trillium%20tschonoskii%20Maxim./data