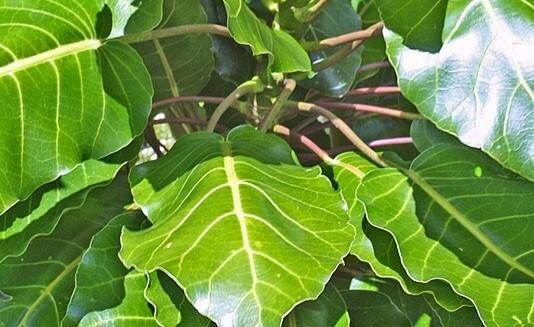
Oh, let me tell you, Meryta sinclairii – the Puka! If you’ve ever seen one of these beauties, with its glossy, hand-shaped leaves and that wonderful architectural form, you know exactly why it’s so special. It’s a slice of the tropics that can add such a unique touch to any garden, and even better, it’s not as tricky to propagate as you might think!
I remember my first Puka. I was absolutely smitten. And the joy of seeing tiny roots emerge from a simple cutting? Pure gardening magic! For beginners, I’d say it’s moderately easy. You’ll have a good chance of success if you’re patient and follow a few key steps.
The Best Time to Start
When I’m looking to propagate my Meryta sinclairii, I always aim for late spring or early summer. This is when the plant is in a strong growth spurt, after the chill of winter has passed. The stems are usually more pliable and brimming with energy, which really gives your cuttings the best head start. You want to catch them when they’re actively growing, not when they’re slowing down for a rest.
Supplies You’ll Need
Here’s what I like to have on hand before I dive in:
- Sharp pruning shears or a clean, sharp knife: Essential for making clean cuts.
- Rooting hormone powder (optional but recommended): This really gives your cuttings a boost. Willow bark extract or a commercial rooting hormone works wonders.
- A well-draining potting mix: I usually use a mix of coarse perlite, coco coir, and a bit of compost. You want it to be airy.
- Small pots or seed trays: Clean containers are a must.
- Plastic bags or a propagator: To create a humid environment.
- Watering can or spray bottle: For gentle watering.
- Label stakes and a pen: So you don’t forget what you planted where!
Propagation Methods
The most reliable way to get new Pukas going is through stem cuttings. It’s straightforward and usually yields great results.
- Choose Your Cuttings: Look for healthy, non-flowering stems on your parent plant. You want pieces that are about 6-8 inches long. Make sure each cutting has at least two to three leaf nodes (where the leaves attach to the stem).
- Make the Cut: Using your clean shears or knife, make a clean cut just below a leaf node. This is where the roots will most likely emerge.
- Prepare the Cutting: Gently remove the lower leaves, leaving just a couple at the very top. This prevents them from rotting in the soil or water. If the remaining leaves are very large, I sometimes cut them in half horizontally to reduce water loss.
- Apply Rooting Hormone: Dip the cut end of the stem into your rooting hormone powder. Tap off any excess.
- Planting: Fill your pots with your prepared potting mix. Make a hole in the center with your finger or a small stick. This prevents the rooting hormone from rubbing off. Insert the cutting into the hole, ensuring the lower leaf nodes are buried. Gently firm the soil around the stem.
- Water Gently: Water the soil thoroughly but gently. You don’t want to dislodge the cutting.
- Create Humidity: Place the potted cutting into a plastic bag, forming a mini-greenhouse. Seal it loosely, or prop it open slightly if it feels too wet. You can also place pots in a propagator.
The “Secret Sauce” (Pro Tips)
Now, for a couple of things that have made a real difference for me:
- Bottom Heat is Your Friend: While not strictly necessary, placing your pots on a heated propagator mat can significantly speed up root development. It mimics the warm soil of its native habitat and gives those roots an extra encouraging nudge.
- Don’t Be Afraid of a Little Pruning: If you take a cutting and notice the leaves looking a bit sad even in high humidity, sometimes a small trim of the remaining leaves can help. It just reduces the surface area that the cutting needs to support while it’s building its root system.
Aftercare & Troubleshooting
Once your cuttings are planted, the waiting game begins! Keep the soil consistently moist but not waterlogged. Think of it like a wrung-out sponge. Place them in bright, indirect light. Avoid direct sun, as it can scorch the leaves.
You’ll know your cutting has rooted when you see new leaf growth or feel a gentle resistance when you tug on the stem. This usually takes anywhere from 4 to 8 weeks, sometimes longer. Once roots are established, you can gradually acclimate them to lower humidity and eventually transplant them into their own pots.
If you see signs of rot – mushy stems or blackened ends – it’s usually a sign of too much moisture and not enough air circulation. Unfortunately, a rotted cutting is usually a goner. Don’t be discouraged; just start again with a fresh cutting and ensure your soil is well-draining. It’s all part of the learning process!
A Little Patience Goes a Long Way
Propagating plants is a journey, and each cutting is a little experiment. Don’t get discouraged if your first attempt isn’t perfect. Celebrate the successes, learn from any setbacks, and most importantly, enjoy the process of bringing new life into your garden. Happy propagating!
Resource:
https://identify.plantnet.org/k-world-flora/species/Meryta%20sinclairii%20(Hook.f.)%20Seem./data