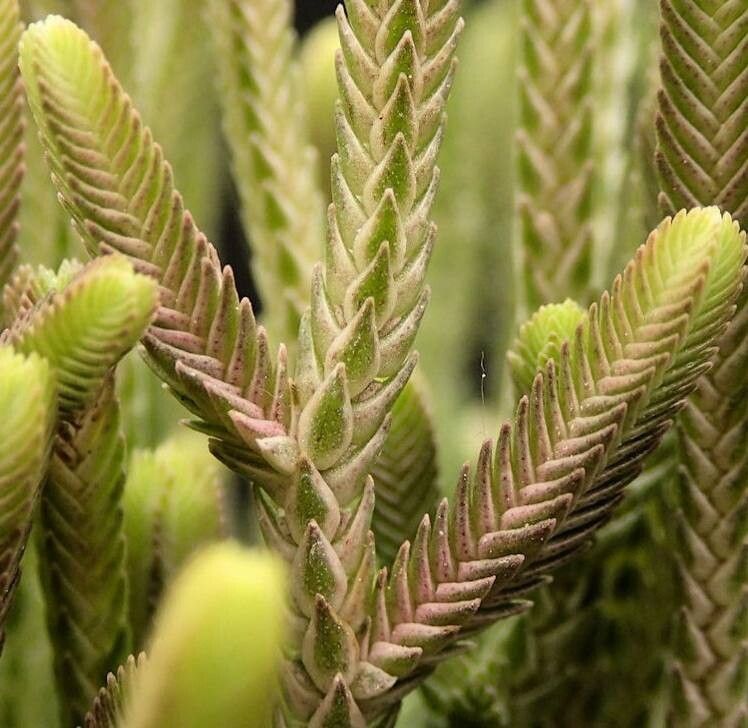
Oh, Crassula muscosa! Also known charmingly as the “Watch Chain Plant” or “Pine Tree Succulent,” this little gem has a special place in my heart. It’s just so delightful with its tightly packed, mossy foliage that forms these charming, upright stems. Plus, the real magic? It’s incredibly easy to multiply! If you’re looking for a propagation project that offers quick rewards and doesn’t require a degree in botany, this is your plant. Beginners, you’ve hit the jackpot here; Crassula muscosa is wonderfully forgiving.
The Best Time to Start
For the absolute best results with Crassula muscosa, I always aim to propagate during its active growing season. That usually means late spring through summer. You’ll notice the plant is putting out new growth, and these fresh stems are the most eager to root. While you can technically propagate them at other times, you might find the rooting process a bit slower.
Supplies You’ll Need
Before we get our hands dirty, let’s gather our gardening goodies:
- Sharp pruning shears or a clean knife: For making neat cuts.
- Well-draining potting mix: A cactus or succulent mix is perfect. You can also make your own by mixing potting soil with perlite or pumice.
- Small pots or trays: To house your cuttings. Make sure they have drainage holes!
- Optional: Rooting hormone: While not strictly necessary for Crassula muscosa, it can give your cuttings a little extra boost.
- Watering can or spray bottle: For providing gentle moisture.
Propagation Methods
Crassula muscosa is a champ at reproducing, and I usually stick to a couple of favorite methods.
Stem Cuttings – My Go-To
This is by far the easiest and most popular way to get more Watch Chain Plants.
- Take your cuttings: Using your clean shears or knife, select a healthy stem and make a clean cut just above a leaf node. Aim for stems that are at least 2-3 inches long. Don’t be afraid to take multiple cuttings; the more, the merrier!
- Let them callus: This is a crucial step for succulents! Allow the cut end of each stem to dry and form a callus for a day or two. You can do this by simply laying them on a clean dry surface in a well-ventilated area. This prevents rot when you plant them.
- Plant your cuttings: Once callused, gently insert the cut end of each stem into your prepared well-draining potting mix. You can plant them about an inch deep, spacing them a few inches apart. If you’re using rooting hormone, dip the callused end in it before planting.
- Water lightly: Water sparingly at first. You want the soil to be slightly moist, not soggy. I like to give mine a light watering and then wait until the soil is dry to the touch before watering again.
Water Propagation – A Visual Treat
If you love watching roots develop, this method is for you!
- Prepare your cuttings: Follow step 1 from stem cuttings – take healthy stems and make clean cuts, then allow them to callus for a day or two.
- Place in water: Get a clean jar or glass and fill it with water. Place the callused cuttings in the water, ensuring only the cut end touches the water. Avoid letting the foliage submerge.
- Change the water regularly: Change the water every few days to keep it fresh and prevent bacterial growth.
- Wait for roots: In a few weeks, you should start to see tiny roots emerge from the cut end. Once the roots are about an inch long, you can plant them in your potting mix following the instructions in step 3 of the stem cutting method.
The “Secret Sauce” (Pro Tips)
Over the years, I’ve learned a few little tricks that really seem to help.
- Don’t crowd your cuttings: When planting in pots, give them a bit of breathing room. This improves air circulation, which is key to preventing fungal issues.
- Bottom heat is your friend: If you can, place your pots on a heating mat set to a low temperature. This extra warmth from below encourages root development much faster. I find this especially helpful if the weather is a bit cooler than ideal.
- Observation is key: Get into the habit of looking at your cuttings every day. You’ll quickly learn to recognize the subtle signs of rooting and the early warnings of trouble.
Aftercare & Troubleshooting
Once your cuttings have developed a good root system, they’re practically independent!
- Gradual transition: If you propagated in water, before planting in soil, make sure the roots are well-established. When you do plant, treat them like any other small succulent – water when the soil is dry, and provide bright, indirect light.
- Watch out for rot: The most common problem you’ll encounter is rot, usually caused by overwatering or insufficient drainage. If you see mushy, discolored stems, it’s a sign to back off on the watering and ensure good airflow. Sadly, once rot sets in, it can be hard to save a cutting.
- Shriveled leaves: If the leaves are looking a bit deflated, it might mean the cutting hasn’t rooted yet and is using up its stored water. Don’t panic! Just ensure the soil is slightly moist (not wet) and be patient.
A Encouraging Closing
Propagating Crassula muscosa is a joy, a simple act of creating more life for your home or to share with friends. Be patient with the process; sometimes nature takes its own sweet time. Enjoy the little victories, celebrate every tiny root, and most importantly, have fun nurturing your new plant babies! Happy gardening!
Resource:
https://identify.plantnet.org/k-world-flora/species/Crassula%20muscosa%20L./data