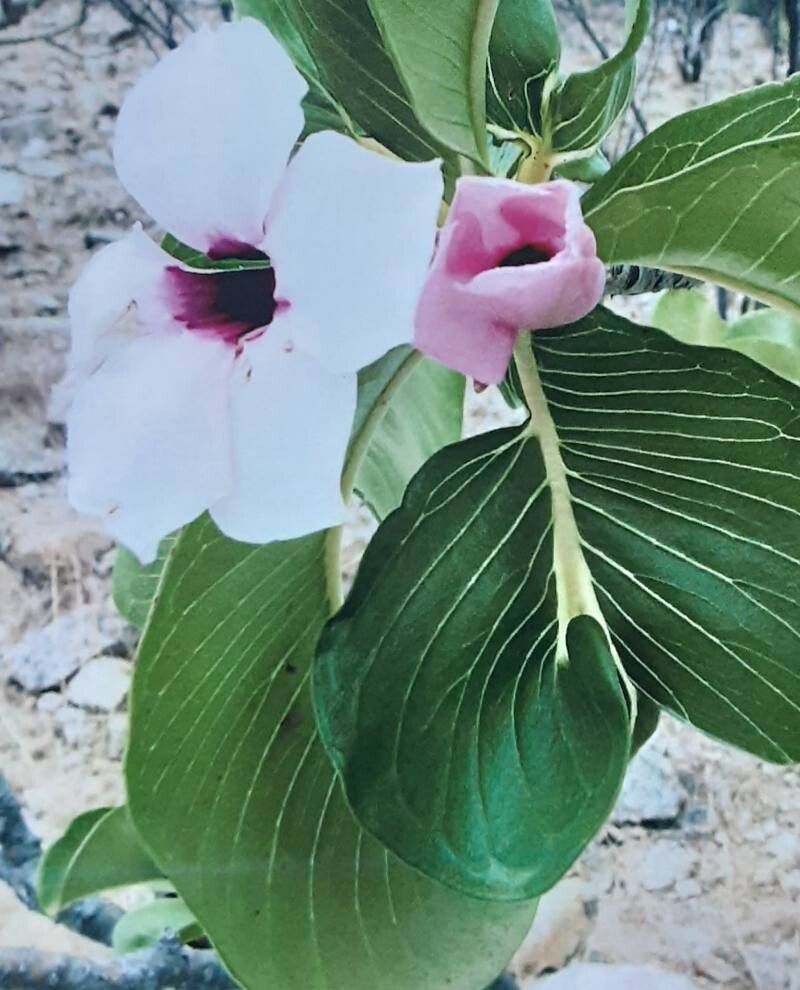
Oh, Adenium boehmianum! You know, those gorgeous desert roses with their swollen, intriguing caudexes and surprisingly delicate blooms. They just have a way of capturing your heart, don’t they? Watching a new little one sprout from your own efforts is one of gardening’s greatest joys. And let me tell you, while it might seem a bit intimidating at first glance, propagating these beauties can be incredibly rewarding, even for those just starting out with their green thumb. It’s all about understanding their needs and being a little patient.
The Best Time to Start
When it comes to giving your Adenium boehmianum the best chance of success, timing is everything. You’ll want to get started in the warmest part of the year, typically late spring or early summer. This is when the plant is actively growing and has the energy to put into developing new roots. Think of it like giving them a head start before the cooler weather arrives.
Supplies You’ll Need
Before you dive in, let’s gather our tools. Having everything ready makes the process so much smoother.
- Sharp, sterile pruning shears or a craft knife: Cleanliness is key to preventing infections.
- Rooting hormone (optional, but recommended): I like to use a powder or gel.
- A well-draining potting mix: A cactus or succulent mix is perfect. You can also make your own by combining equal parts perlite, coarse sand, and peat moss or coco coir.
- Small pots or seed trays: Clean ones!
- Plastic bags or a propagation dome/lid: To create a humid environment.
- Watering can with a fine rose or a spray bottle: Gentle watering is important.
- Gloves: Adenium sap can be sticky and irritating to some.
Propagation Methods
There are a few ways to get more Adenium boehmianum, but my two favorites are stem cuttings and, if you happen to have a mature plant, division.
Stem Cuttings: The Most Common Path
This is usually the easiest and most popular method.
- Take your cutting: Select a healthy stem from a mature plant that’s at least 4-6 inches long. Make a clean cut just below a leaf node (where a leaf attaches to the stem). Remove the lower leaves, leaving only a few at the top.
- Let it callus: This is crucial! Place the cutting in a dry, well-ventilated spot for 2-3 days, or until the cut end has dried and formed a callus. This prevents rot.
- Apply rooting hormone (if using): Dip the callused end into the rooting hormone, tapping off any excess.
- Plant the cutting: Fill your pot with your well-draining mix. Make a small hole in the center with your finger or a pencil. Insert the callused end of the cutting into the hole, deep enough so it’s stable. Gently firm the soil around it.
- Create humidity: Water the soil lightly. Then, cover the pot with a plastic bag or place it in a propagation dome. This traps moisture around the cutting. Make sure the leaves aren’t touching the plastic if possible.
- Place it in its happy place: Put the pot in a bright spot with indirect sunlight. Avoid direct, harsh sun, which can scorch the developing roots. Warmth is your friend here, so a sunny windowsill or a heat mat is ideal.
- Be patient: Roots can take anywhere from 4 weeks to a few months to develop. You’ll know it’s working when you see new growth or feel a gentle tug when you lightly pull on the stem.
Division (For Mature Plants)
If you have a larger, established Adenium boehmianum, you might be able to divide it, especially if it has multiple main stems or lobes.
- Gently unpot the plant: Carefully remove the mature plant from its pot.
- Inspect the root ball: Look for natural divisions where the caudex or root system can be separated without causing excessive damage to either section.
- Make the division: Using your sterilized knife, carefully cut through the roots and any connecting tissue to separate the sections. Dust any cut surfaces with cinnamon or sulfur powder to help prevent rot.
- Allow to callus: Similar to cuttings, let the cut surfaces on the divided sections air dry for a few days until callused.
- Pot them up: Plant each division in its own pot with fresh, well-draining soil. Water very lightly.
- Care as usual: Place them in a bright, warm location.
The “Secret Sauce” (Pro Tips)
Here are a couple of things I’ve learned over the years that really make a difference:
- Don’t drown your cuttings! This is probably the most common mistake. The soil should be barely moist, not soggy. Overwatering is the fastest way to invite rot. I often find myself misting the soil rather than watering from the top when the soil surface looks dry.
- Bottom heat is a game-changer. Placing your pots on a propagation heat mat provides consistent, gentle warmth that really encourages root development. It’s like giving your babies a warm hug to help them grow.
Aftercare & Troubleshooting
Once you see those first signs of life – new leaves or a gentle tug – congratulations! Continue to water sparingly, allowing the soil to dry out between waterings. Gradually introduce them to more light, but avoid scorching them.
Watch out for soft, mushy stems or roots – that’s the dreaded rot. If you see it, you may need to cut away the affected parts and let the remaining healthy portion callus over again. Sometimes, it’s a sign that your soil isn’t draining well enough, or you’re just watering too much. It happens to all of us!
A Encouraging Closing
Propagating Adenium boehmianum is a journey. There might be a few hiccups along the way, but the satisfaction of seeing your own little desert rose thrive is absolutely worth it. Be patient, observe your plants, and most importantly, enjoy the process! Happy gardening!
Resource:
https://identify.plantnet.org/k-world-flora/species/Adenium%20boehmianum%20Schinz/data