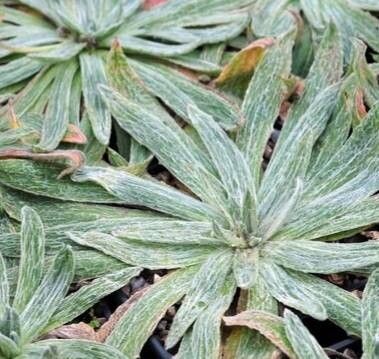
Hello fellow plant lovers! It’s so wonderful to connect with you today. I’m thrilled to dive into a plant that’s been a quiet joy in my garden for years: Plantago nivalis. If you’re looking for a little slice of alpine charm, with its delicate, silvery foliage, then this is the plant for you. Propagating Plantago nivalis is by far one of my favorite ways to expand my collection, and while it might seem a touch specialized, I promise it’s a rewarding journey, even for those just dipping their toes into propagation.
The Best Time to Start
For Plantago nivalis, timing is everything, and my experience tells me that late spring to early summer is your golden window. This is when the plant is in its most vigorous growth phase. You’ll find new shoots that are pliable and bursting with life, which translates to a much higher chance of success when you’re trying to coax them into becoming new plants. Waiting until after the initial bloom, when energy is focused on vegetative growth, really gives you a head start.
Supplies You’ll Need
Gathering your supplies beforehand makes the whole process so much smoother, trust me. Here’s what I always have on hand:
- Sharp pruning shears or a clean craft knife: For clean cuts that heal well.
- Rooting hormone powder or gel: While not always strictly necessary for Plantago nivalis, it can give your cuttings a lovely boost.
- A well-draining potting mix: I love a blend of coarse perlite, peat moss, and a bit of compost. You can also find excellent
specials for succulents and cacti that work wonderfully. - Small pots or seed trays with drainage holes: For your new little plant starts.
- A spray bottle: For gentle misting.
- Clear plastic bags or a propagator lid: To create a humid environment.
- Labels: Because trust me, you’ll forget what’s what!
Propagation Methods
Plantago nivalis is a bit of a star when it comes to propagation through stem cuttings. It’s my go-to method, and I think you’ll find it quite straightforward.
- Select Your Cuttings: Look for healthy, non-flowering shoots that are at least 3-4 inches long. They should still feel somewhat flexible, not woody.
- Make the Cut: Using your clean shears or knife, make a sharp cut just below a leaf node. A leaf node is where a leaf joins the stem; this is where roots love to emerge.
- Prepare the Cutting: Gently remove the lower leaves, leaving just a few at the very top. This helps prevent rot in the soil and focuses the plant’s energy on rooting.
- Apply Rooting Hormone (Optional but Recommended): Dip the cut end of the stem into your rooting hormone powder or gel. Tap off any excess.
- Plant Your Cuttings: Fill your small pots or trays with your prepared potting mix. Make a small hole with your finger or a pencil and insert the cutting, ensuring the nodes where you removed the leaves are buried. Gently firm the soil around the stem.
- Water and Cover: Water the soil thoroughly but gently. Then, place the pots inside a clear plastic bag or cover them with a propagator lid. This is crucial for maintaining humidity.
Another method that works beautifully, and often leads to quicker results, is division. This is best done in spring as well, when the plant is actively growing.
- Gently Excavate: Carefully dig up your Plantago nivalis plant. You want to get as much of the root ball as possible without causing too much disturbance.
- Inspect the Roots: Gently shake off excess soil to get a clear view of the root system. You’re looking for natural divisions where clumps have formed.
- Separate Gently: Using your hands, or a clean, sharp knife if the clumps are stubborn, gently pull or cut apart the larger clumps. You want each new division to have a good amount of healthy root system attached.
- Replant Immediately: Pot up your divisions into their own containers with fresh, well-draining soil, or replant them directly into your garden. Water them in well.
The “Secret Sauce” (Pro Tips)
Here are a couple of little tricks I’ve learned that can really make a difference:
- Don’t Let Leaves Touch the Water (if water propagating): While I often go straight to soil, some gardeners like to start cuttings in water. If you do, ensure none of the leaves are submerged. Leaves underwater will rot, and that’s a sure sign of trouble for your precious cutting.
- Bottom Heat is Your Friend: Plantago nivalis thrives in warmth, and providing gentle bottom heat can significantly speed up the rooting process. You can buy inexpensive seedling heat mats, or even place your pots on top of a gently warm appliance (like a refrigerator motor). It just needs to be consistently warm, not hot.
Aftercare & Troubleshooting
Once your cuttings have rooted – and you can usually tell by seeing new leaf growth or feeling a gentle tug on the stem – it’s time to adjust their care.
- Gradual Acclimation: Slowly acclimate your new plants to outdoor conditions if you’re moving them outside. This means opening the plastic bag or propagator lid for increasing periods each day over a week.
- Light and Water: Keep them in bright, indirect light. Water when the top inch of soil feels dry. Avoid overwatering, as this is the most common killer.
- Troubleshooting: The most common issue you’ll face is rot. If your cuttings turn mushy, black, or slimy, they’ve likely succumbed to too much moisture or insufficient air circulation. Don’t despair! Just start again with fresh cuttings and ensure your soil drains exceptionally well. Sometimes, a cutting just doesn’t take, and that’s okay too.
So there you have it! Propagating Plantago nivalis is a delightful way to share the beauty of this plant or simply to enjoy the satisfaction of nurturing life. Be patient with your little green babies, and remember that every gardener has had failed attempts. It’s all part of the learning process. Happy propagating, and I can’t wait to hear about your successes!
Resource:
https://identify.plantnet.org/k-world-flora/species/Plantago%20nivalis%20Boiss./data