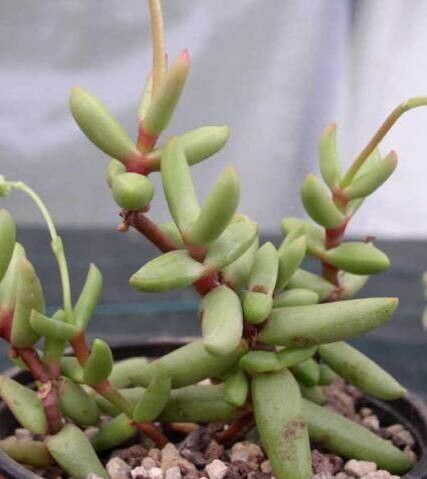
Oh, hello there! Come on in, grab a mug. Let’s chat about a plant I absolutely adore: Crassula grisea. If you’ve ever seen one of these beauties, you’ll know why. They have these wonderfully plump, grey-green leaves that just beg to be touched. And the best part? They’re surprisingly easy to share! Propagating them is a fantastic way to fill your home with more of this understated elegance, or even to give the gift of green to friends. For beginners, I’d say Crassula grisea is a real win. It’s quite forgiving, which is always a great confidence booster when you’re just starting out with cuttings.
The Best Time to Start
When you’re looking to take cuttings or divide your Crassula grisea, the spring and early summer are your best friends. This is when the plant is actively growing, so it’s got all the energy it needs to put out new roots and leaves. You’ll see the most vigorous growth and therefore the highest success rate during this time. Think of it like giving your little ones the best possible start in life!
Supplies You’ll Need
Before we get our hands dirty, let’s gather our tools:
- Sharp pruning shears or a clean knife: For making clean cuts.
- Well-draining potting mix: A cactus or succulent mix is ideal. You can also make your own by combining potting soil with perlite or pumice (about a 50/50 ratio).
- Small pots or containers: Clean ones, please!
- Optional: Rooting hormone: This can speed things up a bit, but it’s not strictly necessary for Crassula grisea.
- Watering can or spray bottle: For gentle watering.
- Patience! This is the most important ingredient.
Propagation Methods
There are a couple of ways to go about this, and both are quite effective for Crassula grisea.
1. Stem Cuttings (My Favorite!)
This is often the quickest and easiest method.
- Select a healthy stem: Look for a stem that’s at least a few inches long and has a good number of leaves.
- Make the cut: Using your sharp shears or knife, make a clean cut just below a leaf node. This is where the roots will emerge.
- Remove lower leaves: Gently pull off the bottom few leaves. This exposes the stem for rooting and prevents any leaves from sitting in the soil and potentially rotting.
- Let it callus: This is crucial! Place your cutting in a dry spot away from direct sunlight for 2-7 days (or even longer). You want the cut end to dry out and form a protective callus. This prevents rot.
- Plant the cutting: Once callused, you can lightly dip the cut end in rooting hormone if you’re using it. Then, stick the callused end into your well-draining potting mix. You don’t need to plant it very deep, just enough to keep it upright.
- Water sparingly: Water very lightly, just enough to moisten the soil. You don’t want it soggy.
2. Leaf Cuttings (A Bit More Patience Needed)
While less common for Crassula grisea than stem cuttings, you can sometimes propagate from individual leaves.
- Gently remove a leaf: Twist or pull a healthy leaf from the stem. Make sure you get the entire leaf base.
- Let it callus: Just like with stem cuttings, let the leaf sit in a dry spot for a few days until the cut end is callused.
- Lay on soil: Place the callused leaf on top of your well-draining potting mix. Don’t bury it.
- Mist occasionally: Keep the soil lightly moist with a misting spray. Roots and tiny new plantlets should eventually emerge from the callused end. This process can take longer, so hang in there!
The “Secret Sauce” (Pro Tips)
Now, for a couple of little tricks I’ve picked up over the years that can really give you an edge.
- Don’t rush the callusing: I cannot stress this enough. That dry, callused end is your cutting’s armor against rot. If you plant a fresh-cut stem or leaf, you’re inviting trouble. Let it breathe and heal.
- Bottom heat can be a game-changer: If you’re propagating in a cooler environment, placing your pots on a gently heated propagation mat can significantly speed up root development. It mimics the warmth of spring and encourages those roots to get moving. Just make sure it’s not too hot; think warm bath, not boiling water!
Aftercare & Troubleshooting
Once you see signs of new growth or roots emerging from the soil, congratulations! You’re on your way to a new plant.
- Gradual watering: Start watering your new plant a little more regularly, but always allow the soil to dry out slightly between waterings. You want the soil to be moist, not soaked.
- Bright, indirect light: Keep your new cuttings in a spot with bright, indirect sunlight. Direct sun can scorch tiny, new plants.
- Potting up: Once your new plant has a decent root system and is showing good growth, you can pot it into its own small pot with fresh succulent mix.
Now, what if things go wrong? The main culprit is usually rot. If your cutting turns mushy and black, it’s likely rotted. This is almost always due to too much moisture and not enough callusing. Don’t be discouraged if a cutting fails! Sometimes it just happens. Try again, and remember those callusing steps. Another sign of an unhappy plant is wrinkled leaves, which can mean it needs a bit more water, or sometimes it’s a sign that the roots haven’t formed yet.
A Encouraging Closing
Growing new plants from cuttings is like magic. It’s a slow, rewarding dance with nature, and watching those tiny roots appear is one of the greatest joys in gardening. Be patient with your Crassula grisea cuttings. Give them the right conditions, a little bit of love, and you’ll soon be surrounded by more of these charming succulents. Happy propagating!
Resource:
https://identify.plantnet.org/k-world-flora/species/Crassula%20grisea%20Schönland/data