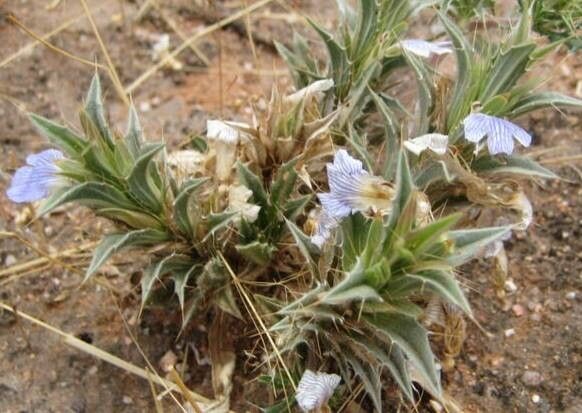
Hello there, fellow plant enthusiasts! It’s so wonderful to have you join me today. We’re going to dive into the delightful world of Blepharis obmitrata, a plant that has captivated me for years with its intricate foliage and elegant presence. If you’re looking for a relatively undemanding yet incredibly rewarding plant to propagate, you’ve come to the right spot. While Blepharis obmitrata isn’t typically a “throw it in a pot and it’ll grow” kind of plant in its early stages, its propagation is quite manageable and oh-so-satisfying when you see those first tiny roots emerge. For beginners, I’d say it’s a solid medium-level challenge but with a good dose of patience, you’ll be celebrating success!
The Best Time to Start
When it comes to getting your Blepharis obmitrata off to a flying start, timing is key. I find the late spring to early summer is absolutely prime time. This is when the plant is in its most vigorous growth phase, putting out those healthy new shoots that are perfect for taking cuttings. You want to be working with stems that are firm and developing, not old, woody ones or brand new, flimsy growth. Think of it as catching the plant at its energetic peak!
Supplies You’ll Need
Gathering your tools beforehand makes the whole process so much smoother. Here’s what I always have on hand:
- Sharp Pruning Shears or a Clean Knife: For making precise cuts, which helps prevent damage and disease.
- Rooting Hormone (Optional but Recommended): A good quality rooting powder or gel can significantly boost your success rate.
- Soilless Potting Mix: I prefer a light, airy mix. A good blend is equal parts perlite, coco coir, and a bit of fine bark. You want excellent drainage.
- Small Pots or Seedling Trays: Small to medium-sized pots, about 4-6 inches, are perfect for cuttings. Ensure they have drainage holes.
- Plastic Bags or a Humidity Dome: To create a mini-greenhouse effect for your cuttings.
- Watering Can with a Fine Rose: For gentle watering.
- Labels and a Marker: To keep track of what you’ve potted and when.
Propagation Methods
Blepharis obmitrata is a joy to propagate primarily through stem cuttings. It’s my go-to method, and I’ve found it to be the most reliable.
Stem Cuttings
- Select Your Source Material: Find a healthy, mature Blepharis obmitrata plant. Look for stems that have new growth but are not overly soft. You want stems that are firm but still flexible.
- Take Your Cuttings: Using your clean shears or knife, take cuttings that are 4-6 inches long. Make your cut just below a leaf node (the point where a leaf grows from the stem). This is where the plant produces hormones that encourage root growth. Remove the lower leaves, leaving at least two or three sets of leaves at the top.
- Prepare the Cuttings: If you’re using rooting hormone, dip the cut end of each stem into the powder or gel. Gently tap off any excess.
- Plant Your Cuttings: Fill your small pots with your prepared soilless mix. Moisten the mix gently until it’s damp but not soggy. Make a small hole in the center of the pot with your finger or a pencil. Insert the prepared cutting into the hole, ensuring the leaf nodes are below the soil surface. Gently firm the soil around the stem.
- Provide Humidity: This is crucial! Water the soil lightly again. Then, cover the pot with a clear plastic bag, ensuring the leaves don’t touch the sides, or place it under a humidity dome. This creates a humid environment that prevents the cutting from drying out before it roots.
- Placement: Keep the pots in a bright, indirect light location. Avoid direct sunlight, which can scorch the fragile cuttings.
The “Secret Sauce” (Pro Tips)
Here are a few things I’ve learned over the years that often make a difference:
- Don’t Let the Leaves Touch the Water: If you opt to try water propagation (which is possible but can be trickier with Blepharis due to rot), ensure that only the stem is submerged. Any leaves sitting in the water will quickly rot and can infect the entire cutting. Stick to soil for higher success!
- Bottom Heat is Your Friend: While not strictly essential, placing your pots on a gentle heat mat can significantly speed up root development. It mimics the warmth of spring soil and gives those root cells a happy nudge.
Aftercare & Troubleshooting
Once you’ve potted your cuttings, patience is your best companion. Keep the soil consistently damp but never waterlogged. You should start to see signs of new growth in 4-8 weeks, which usually indicates that roots are forming. You can gently tug on a cutting – if there’s resistance, it’s rooted!
The biggest challenge you might face is rot. This usually happens if the soil is too wet or the humidity is too high without enough air circulation. If you see a cutting turning black or mushy, it’s best to discard it and try again, ensuring better drainage and perhaps a brief period of ventilation for your covered cuttings. If your cuttings look shriveled and dry, they might need more humidity or are simply not rooting.
A Little Encouragement to Finish
Propagating plants, especially a unique beauty like Blepharis obmitrata, is a journey. It’s about observation, learning, and a little bit of hopeful anticipation. Don’t be discouraged if your first few attempts aren’t perfect. Every gardener has a graveyard of failed cuttings behind them! Embrace the process, celebrate the small wins, and enjoy the satisfaction of creating new life from something you already love. Happy propagating!
Resource:
https://identify.plantnet.org/k-world-flora/species/Blepharis%20obmitrata%20C.B.Clarke/data