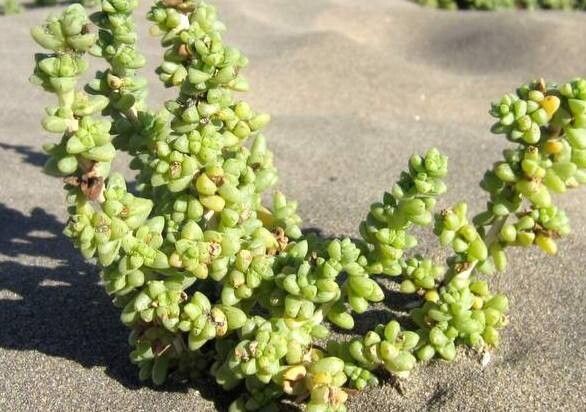
Oh, hello there! Pull up a chair and let’s chat about one of my absolute favorites: Traganum moquinii. If you’ve ever seen this gorgeous plant, you know why it’s so captivating. Its lush, architectural presence can really anchor a garden design. And the best part? It’s surprisingly rewarding to propagate, even for those just dipping their toes into the wonderful world of making more plants. You might find it a touch more involved than a common Pothos, but with a little patience and these steps, you’ll have success.
The Best Time to Start
When it comes to Traganum moquinii, think of it like this: the plant is gearing up for a growth spurt. That means late spring or early summer is your golden ticket. You’re looking for actively growing, but not yet woody, stems. Avoid taking cuttings from old, tough growth, or from brand-new, super-soft shoots. We want that sweet spot of vigorous, but firm, stem tissue.
Supplies You’ll Need
Here’s what you’ll want to gather before we get our hands dirty:
- Sharp Pruning Shears or a Clean Knife: Essential for clean cuts.
- Rooting Hormone (Optional but Recommended): Especially if you’re new to this. Look for one formulated for semi-hardwood cuttings.
- A Well-Draining Potting Mix: A good blend for succulents or cacti works wonders. I often use a mix of equal parts perlite, coarse sand, and coco coir.
- Small Pots or Seedling Trays: Clean pots are key to avoiding disease.
- Watering Can or Spray Bottle: Gentle watering is vital.
- Plastic Bags or a Propagator: To create that humid microclimate.
- A Sunny, Indirect Light Location: Don’t bake them right away!
Propagation Methods
Let’s get down to business! The most reliable way I’ve found to propagate Traganum moquinii is through stem cuttings.
- Select Your Cuttings: Choose a healthy stem that’s about 4-6 inches long. Look for one that has several leaf nodes (where the leaves attach to the stem).
- Make the Cut: Using your clean shears, make a clean cut just below a leaf node. This is where roots are most likely to form.
- Prepare the Cutting: Gently remove the lower leaves from the cutting, leaving just a few at the top. This prevents rot because you won’t have leaves submerged in the soil. If your leaves are quite large, you can even cut them in half horizontally to reduce water loss.
- Apply Rooting Hormone (If Using): Dip the cut end of the stem into your rooting hormone powder. Tap off any excess – you just need a light coating.
- Plant the Cuttings: Fill your clean pots with your prepared potting mix. Make a small hole in the center of the soil with your finger or a pencil. Insert the cut end of the stem into the hole, ensuring at least one leaf node is buried beneath the surface. Gently firm the soil around the cutting.
- Water Gently: Water very lightly, just enough to moisten the soil. You don’t want to drench it.
- Create Humidity: To help your cuttings root, it’s useful to create a humid environment. You can cover the pot with a clear plastic bag, poking a few holes for ventilation, or place the pots inside a clear propagator. Keep the bag from touching the leaves!
The “Secret Sauce” (Pro Tips)
Here are a couple of things I’ve learned over the years that can really make a difference:
- Don’t Drench, Mist! Instead of watering heavily, I prefer to mist the surface of the soil every few days, especially if you’re using that plastic bag or propagator. This keeps the humidity high but prevents the dreaded fungal diseases that can kill cuttings.
- A Little Warmth Goes a Long Way: While direct sun is too much, gentle bottom heat can significantly speed up root development. If you have a seed starting mat, placing your pots on it (on a low setting!) is like giving your cuttings a cozy little spa treatment. This encourages root formation from below.
Aftercare & Troubleshooting
Once your cuttings have taken and you see signs of new growth (which can take anywhere from 4-8 weeks, sometimes longer!), it’s time for a little less fuss.
- Gradually Acclimate: Slowly remove the plastic cover over a week or two, allowing the new plants to get used to the drier air.
- Watering: Water just as you would a mature plant – when the top inch of soil feels dry.
- Light: Gradually move them into brighter, but still indirect, sunlight.
- Signs of Failure: The most common issue is rot. If your cutting turns black and mushy at the base, or the leaves start to yellow and drop rapidly without any signs of new growth, it’s likely succumbing to rot. This usually means it’s been too wet or too cold. Don’t be discouraged; it happens to all of us! Just toss the failed cutting and try again with a fresh one.
A Little Patience, A Lot of Reward
Making more plants is such a satisfying journey. There’s a unique joy in nurturing a tiny cutting into a thriving plant. Be patient with your Traganum moquinii cuttings. They’ll let you know when they’re ready. Enjoy the process, celebrate the little wins, and before you know it, you’ll have a whole new collection! Happy propagating!
Resource:
https://identify.plantnet.org/k-world-flora/species/Traganum%20moquinii%20Webb%20ex%20Moq./data