Oh, hello there! Come on in, grab a mug. Let’s talk about a plant that truly captures my heart: Pterostylis curta, or the Marbled Greenhood as it’s sometimes known.
The Charm of Pterostylis curta
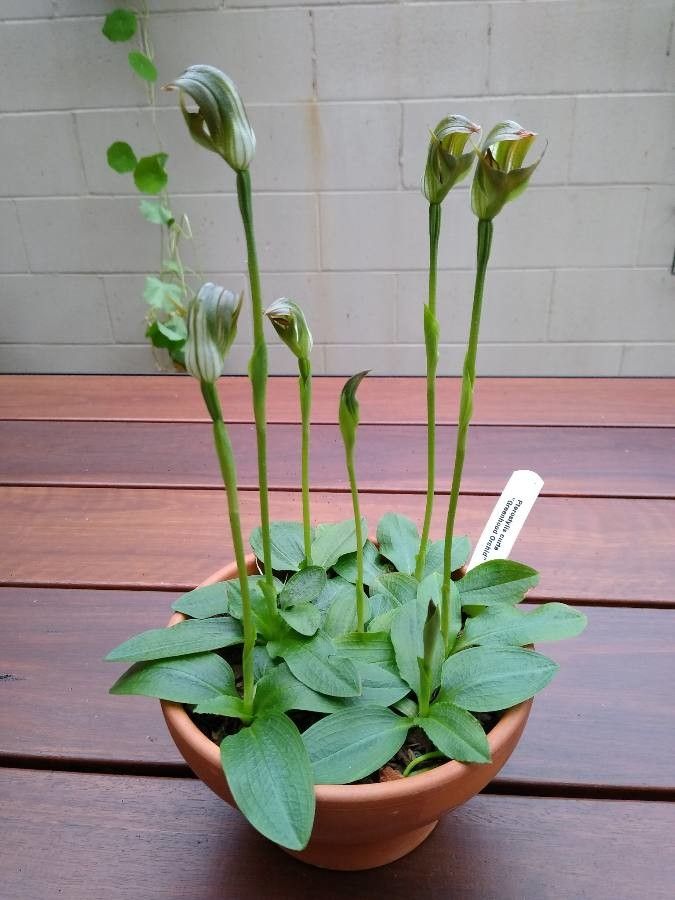
There’s something so unique about these little orchids. Their hooded flowers, resembling tiny emerald jewels with delicate stripes, are just captivating. They bring a touch of wild beauty right into our gardens or even onto our windowsills. Propagating them is such a wonderfully rewarding experience. It’s like unlocking a secret, watching a tiny piece of that magic multiply. Now, should you jump into this as a beginner? Honestly, Pterostylis curta can be a bit of a trickster, a plant that asks for a little patience and understanding. But don’t let that deter you! With the right approach, you’ll be surprised at what you can achieve.
When the Time is Just Right
The absolute best time to get your hands busy with Pterostylis curta is when the plant is actively growing. For most regions, this means once the flowering period has completely finished and the leaves are still lush and green. You’ll want to avoid doing this when the plant is dormant or showing signs of stress. Think of it as catching them at their most energetic, ready to put that energy into making new roots.
What You’ll Need to Get Started
Gathering your supplies beforehand makes the whole process so much smoother. Here’s what I usually have on hand:
- Sterile potting mix: A blend that’s airy and drains well. I often use a mix of orchid bark, perlite, and a little bit of peat moss. For Pterostylis, a slightly grittier mix is better.
- Sharp, sterilized pruning shears or a clean knife: For making precise cuts.
- A small pot or seedling tray: With drainage holes, of course!
- Rooting hormone powder (optional but helpful): This can give your cuttings a real push. Make sure it’s suitable for orchids or herbaceous cuttings.
- A spray bottle: For gentle misting.
- Labels and a marker: To keep track of your precious new plants!
Let’s Talk Propagation: Division is Key!
Now, Pterostylis curta is most effectively propagated through division. These orchids grow from underground tubers, and as they mature, they often produce new tubers – like little offsets or babies.
- Gently excavate: When your plant is in its active growing phase, carefully tease the soil away from the base of the plant. You can do this with your fingers or a small trowel.
- Identify the tubers: Look for the main tuber and any smaller, plump tubers attached to it or nearby. These are your propagation potential! You’ll often find they are connected by a stolon, which is like a little underground stem.
- Make the cut: Using your sterilized shears or knife, carefully separate the smaller tubers from the parent plant. If they are already forming their own little roots, even better! If not, don’t worry, they will form them. Aim to keep at least one eye or bud on each new tuber.
- Potting up: Plant each separated tuber in its own small pot filled with your prepared sterile potting mix. Bury them just deep enough so the top of the tuber is slightly exposed or just covered.
- Water lightly: Give them a very gentle watering. You don’t want to saturate the soil at this stage.
My Little “Secret Sauce” for Success
Over the years, I’ve learned a few tricks that seem to make all the difference.
- Think “airy,” not “damp”: Pterostylis tubers are prone to rot if they sit in soggy soil. Ensure your potting mix is exceptionally well-draining, and don’t overwater, especially in the initial stages. A light misting is often all they need for that first week or two.
- Embrace the warmth: Just like their parent plant thrives in certain conditions, the new divisions appreciate a little warmth to encourage root development. Placing them on a heat mat set to a gentle warmth (around 20-22°C or 70-75°F) can significantly speed up root formation. You can find these at most garden centers.
Aftercare and What to Watch For
Once your divisions are potted, place them in a bright location but out of direct, harsh sunlight. Keep the soil just moist – not wet. You’re looking for signs of new leaf growth. This is your cue that roots are forming!
The biggest challenge you might face is rot. If you see your tuber softening, turning mushy, or developing dark spots, it’s usually a sign of too much moisture. If this happens, gently unpot it, trim away any affected tissue with your sterilized tool, and replant in fresh, dry soil. You might need to increase air circulation around the pot too. Sometimes, it’s just a bit of trial and error, and that’s perfectly okay!
Keep Growing, My Friend!
Propagating Pterostylis curta is a journey, and like any good garden adventure, it requires a dash of patience and a whole lot of observation. Don’t get discouraged if your first attempt isn’t a resounding success. Each plant, each season, teaches us something new. So, get your hands dirty, enjoy the process of nurturing these tiny green wonders, and soon you’ll be sharing their magic with others. Happy growing!
Resource:
https://identify.plantnet.org/k-world-flora/species/Pterostylis%20curta%20R.Br./data