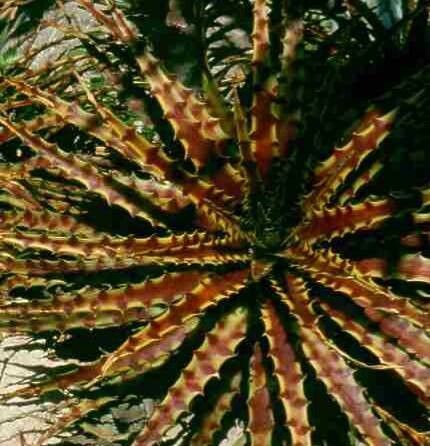
Hey there, fellow plant lovers! I’ve got something really special to share with you today – a guide to propagating Hechtia stenopetala. If you’re looking for a plant that offers striking architectural beauty and a bit of a unique challenge, this is it. Hechtia, with its spiky leaves that form neat rosettes, is a real showstopper in any arid garden or a well-lit indoor space. And the reward of multiplying these beauties? It’s incredibly satisfying. Now, I won’t sugarcoat it entirely; Hechtia can be a bit more of a challenge than, say, a pothos, but that’s what makes the success all the more sweet.
The Best Time to Start
When it comes to Hechtia, timing is everything. The absolute best time to propagate Hechtias is in the spring or early summer. This is when the plant is actively growing and has the most energy reserves to put into creating new roots. Look for the plant to be robust and healthy, and ideally, you’ll see new offsets (baby plants) forming. Trying to propagate when the plant is dormant or stressed is just setting yourself up for disappointment.
Supplies You’ll Need
Before we dive in, let’s make sure you have everything ready. Having your tools at hand makes the whole process much smoother:
- Sharp, clean pruning shears or a sharp knife: For making clean cuts. Sterilize them with rubbing alcohol!
- Well-draining potting mix: A cactus and succulent mix is perfect, or you can create your own blend of potting soil, perlite, and coarse sand.
- Small pots or propagation trays: Make sure they have drainage holes.
- Rooting hormone (optional but recommended): Especially helpful for Hechtia.
- Watering can or mister: For gentle watering.
- Labels and a permanent marker: To keep track of what’s what.
- A warm location: For the cuttings to root.
Propagation Methods
Hechtias are usually propagated through offsets, sometimes called pups. These are the smaller plants that grow from the base of the mother plant. It’s the most reliable and rewarding method for this particular genus.
- Locate the Offsets: Gently examine your Hechtia. You should see small rosettes forming around the base of the mature plant. They might be nestled right against the parent, or sometimes a bit further out on a short stem.
- Prepare for Removal: Wait until the offsets are a decent size, ideally at least a quarter of the size of the mother plant. This gives them a better chance of survival.
- Make the Cut: Using your sterilized pruning shears or knife, carefully cut the offset away from the mother plant. Try to get a clean cut as close to the mother plant as possible. If the offset has its own small roots already attached, that’s a bonus!
- Allow to Callus: This is a crucial step for succulents and most arid plants. Place the separated offset in a dry, airy spot for a few days to a week. You want the cut end to dry out and form a callus. This prevents rot when you plant it. Think of it as giving the wound a chance to heal over.
- Prepare the Potting Mix: Fill your small pots with your well-draining potting mix. Moisten it slightly, but don’t make it soggy.
- Apply Rooting Hormone (Optional): If you’re using rooting hormone, dip the callused end of the offset into it. Tap off any excess.
- Plant the Offset: Make a small depression in the soil and gently place the callused end of the offset into the soil. You might need a chopstick or a finger to firm the soil around it, providing support. Don’t bury it too deep; just enough to keep it upright.
- Initial Watering: Water very sparingly. You want the soil to be slightly moist, not wet. A gentle misting is often enough initially.
The “Secret Sauce” (Pro Tips)
Here are a few little tricks I’ve picked up over the years that really make a difference for Hechtias:
- Bottom Heat is Your Friend: Hechtias are desert dwellers, and warmth really encourages root development. Placing your pots on a gentle seedling heat mat can significantly speed up the rooting process. Just make sure the heat isn’t too intense.
- Don’t Overwater – Ever! This is the cardinal sin with succulents. Once you’ve planted your offset, resist the urge to water daily. Let the soil dry out almost completely between waterings. It’s better for a new cutting to be a little dry than too wet. For the first few weeks, a light misting every 4-7 days might be all they need.
- Watch for the “Pull Test”: After a couple of weeks, you can gently give the offset a very light tug. If you feel resistance, that’s a good sign roots are forming and anchoring it. If it comes out easily, it hasn’t rooted yet, and you’ll need to try again after it calluses.
Aftercare & Troubleshooting
Once your offset has successfully rooted (and you’ll often see new leaf growth starting, which is a great indicator!), you can begin to treat it like a mature Hechtia.
- Watering: Continue with the sparing practice of drying out the soil between waterings. During the growing season, this might be every 1-2 weeks, but reduce it significantly in winter.
- Light: Provide bright, indirect light. They can tolerate some direct sun, but be careful that it isn’t scorching hot, especially for young plants.
- Troubleshooting:
- Rot: This is the biggest threat. If your offset turns mushy, black, or smells funky, it’s likely rotten. This is almost always due to overwatering or not allowing it to callus properly. Unfortunately, heavily rotted plants are usually a lost cause, but sometimes you can salvage a healthy part if caught early.
- No Rooting: If after several weeks, your offset looks healthy but isn’t showing any signs of roots, it might not have rooted properly. You can try carefully removing it, checking the cut end, allowing it to callus again, and replanting. The key is patience!
Happy Planting!
Propagating Hechtias takes a little patience and a keen eye, but there’s such a thrill in seeing those little rosettes establish themselves and grow. Don’t be discouraged if your first attempt isn’t perfect. Each plant, and each propagation, is a learning experience. Enjoy the process, celebrate your successes, and soon you’ll be surrounded by these stunning, spiky beauties! Happy gardening!
Resource:
https://identify.plantnet.org/k-world-flora/species/Hechtia%20stenopetala%20Klotzsch/data