Oh, hello there! It’s so lovely to have you join me in my little corner of the garden. Today, we’re going to dive into the wonderfully rewarding world of propagating Sempervivum staintonii. If you’ve ever admired those perfectly formed rosettes, their vibrant colors, and their almost architectural beauty, you’re not alone. And the best part? Bringing more of these little gems into your life is surprisingly straightforward once you know a few tricks.
Why You’ll Love Propagating Sempervivum Staintonii
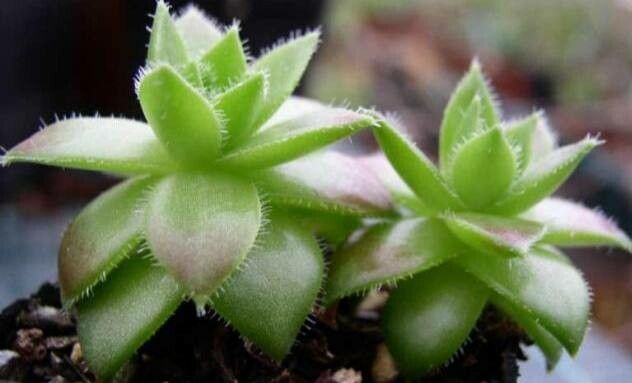
Sempervivum staintonii, often called “Robin Hood,” is a real standout in the succulent family. Its rosettes are a beautiful deep green tinged with bronze, and they produce adorable offsets, or “chicks,” that cluster around the mother plant. Propagating them is a fantastic way to share these beauties with friends, fill up a new pot, or simply expand your collection without spending a fortune. For beginners, I’d say Sempervivum staintonii is wonderfully beginner-friendly. They are quite forgiving and readily produce offsets, making it a joy to watch them grow.
The Perfect Time to Start Your Propagation Adventure
The best time to get your hands dirty with Sempervivum staintonii is during their active growing season, which typically spans from late spring through early to mid-summer. This is when they are full of energy, producing new growth and offsets after the cooler months. You’ll find they root most enthusiastically during this period.
Your Propagation Toolkit
Gathering your supplies beforehand makes the whole process so much smoother. Here’s what you’ll want to have on hand:
- Sharp, clean pruning shears or a small knife: For making clean cuts on offsets.
- Well-draining potting mix: A cactus and succulent mix is ideal. You can also make your own by combining regular potting soil with perlite or pumice (about a 2:1 ratio).
- Small pots or trays: Terracotta pots are great because they breathe, but plastic works too.
- Rooting hormone (optional but helpful): Especially if you like an extra boost.
- Labels and a marker: So you don’t forget what you’ve planted where!
- Watering can with a fine rose: For gentle watering.
Methods for Making More Sempervivum Staintonii
Sempervivum staintonii primarily propagates through its offsets, often called “pups” or “chicks.” It’s a process that feels almost magical when you see them take root.
1. Offset Separation (The Most Common Method)
This is the easiest and most rewarding way to propagate Sempervivum staintonii.
- Wait for offsets to mature: Look for offsets that are at least a quarter to half the size of the parent rosette and have developed their own tiny root system at the base. You’ll usually see them peeking out from beneath the older leaves of the mother plant.
- Gently detach the offset: Use your clean pruning shears or knife to carefully cut the stem connecting the offset to the mother plant. Try to get as close to the mother plant as possible to ensure you’re taking a good piece of the stem.
- Allow the offset to callus: This is a crucial step. Place the detached offsets on a dry surface, away from direct sunlight or water, for 2-3 days. This allows the cut end to dry out and form a protective callus. This prevents rot when you plant it.
- Plant the offset: Once callused, you can plant the offset in your prepared well-draining potting mix. Simply nestle the callused end into the soil, burying the bottom millimeters of the stem. You don’t need to plant it deeply at this stage.
2. Water Propagation (Less Common for Sempervivum, but Possible)
While offsets are the norm, you can sometimes root a small piece of stem with a rosette if you’re careful.
- Take a small rosette with a bit of stem attached, similar to the offset method.
- Crucially, prevent the leaves from touching water. You want only the cut stem end to be submerged. You can achieve this by suspending the cutting in a container so only the stem is in the water column.
- Place it in bright, indirect light.
- Change the water every few days to keep it fresh.
- Once roots appear, carefully transfer it to soil as you would a callused offset.
The “Secret Sauce”: My Insider Tips
Over the years, I’ve learned a few little things that really make a difference.
- Don’t be afraid to trim: Sometimes, the connecting stem between the offset and the mother plant can be quite long. Don’t hesitate to trim it back to about half an inch. This makes it easier to handle and promotes faster rooting. When you plant it, just tuck that little bit of stem into the soil.
- The gentlest watering is key: After planting your callused offsets, hold off on watering for a few more days. When you do water, do so very sparingly. You want the soil to be just barely moist, not soggy. Overwatering is the quickest way to invite rot.
- Bottom heat can be a game-changer: If you’re propagating in cooler weather or want to give your cuttings an extra boost, consider placing your pots on a seedling heat mat set to a low temperature. This gently warms the soil and encourages root development.
Aftercare and What to Watch For
Once your offsets have been in their new pots for a week or two, you can begin to water them more regularly, but still on the conservative side. Water when the soil feels dry to the touch. You’ll know your Sempervivum staintonii has successfully rooted when it feels firm and you see new growth appearing on the rosette.
However, things can go awry. The most common issue is rot. If your offset starts to look mushy, discolored (often turning brown or black), or wilts dramatically, it’s likely rotting. This is almost always due to overwatering or insufficient callus time. If you spot rot, you may be able to salvage a healthy part of the rosette and try again, making sure to callus it properly this time.
A Bit of Patience, A Whole Lot of Joy
Propagating Sempervivum staintonii is such a satisfying way to engage with your garden. It’s about observation, a gentle touch, and a bit of patience. Don’t get discouraged if your first few attempts aren’t perfect. Every gardener has lost a few along the way! Just keep practicing, enjoy the process of nurturing these tiny rosettes, and soon you’ll be a Sempervivum-propagating pro. Happy gardening!
Resource:
https://identify.plantnet.org/k-world-flora/species/Sempervivum%20staintonii%20Muirhead/data