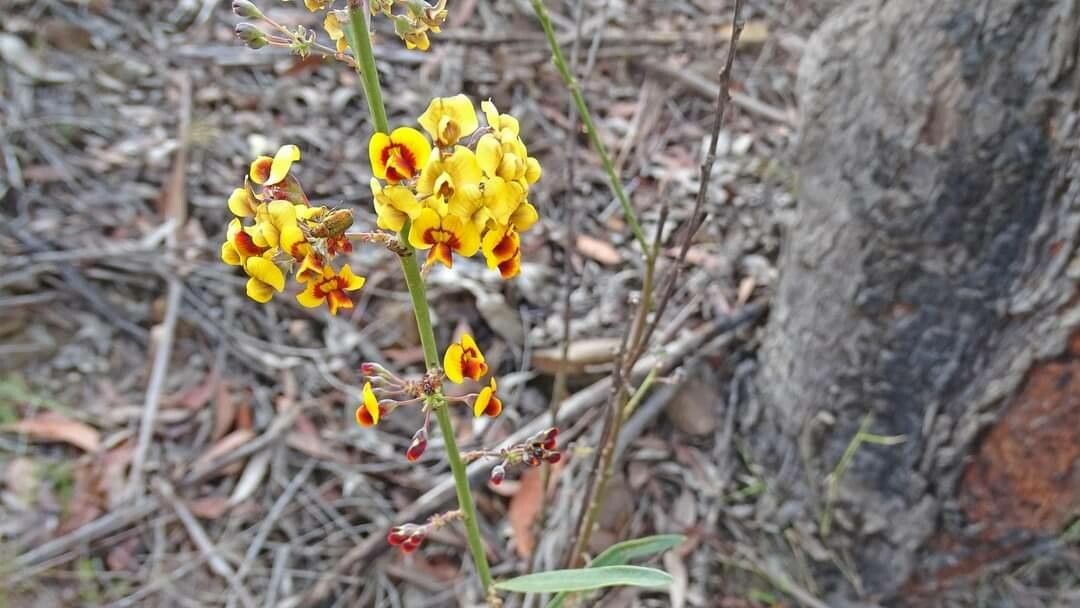
Ah, Daviesia mimosoides! If you’ve ever seen its delicate, almost fern-like foliage and lovely yellow pea flowers, you know why it’s such a special native plant to have in the garden. It adds such a lovely texture and is a magnet for beneficial insects. And let me tell you, successfully propagating something beautiful like this? It’s incredibly rewarding. I’ve found Daviesia mimosoides can be a little bit of a diva sometimes, so while not impossible for beginners, it does require a touch of patience and attention.
The Best Time to Start
For Daviesia mimosoides, I’ve found that spring is the sweet spot. Aim for just as the plant is coming out of its winter dormancy and is gearing up for good, vigorous growth. Late spring, when the weather is consistently warm but not scorching, is also a great time. You want active growth, but you don’t want the plant to be stressed by extreme heat or drought.
Supplies You’ll Need
Gathering your supplies before you start makes the whole process smoother. Here’s what I usually have on hand:
- Sharp, clean pruning shears or secateurs: Essential for making clean cuts.
- Rooting hormone powder or gel: This is a real game-changer for encouraging root development.
- A well-draining potting mix: I often use a mix of coarse sand, perlite, and a good quality potting compost. You want it to drain really well, no soggy roots here!
- Small pots or seed trays: Clean ones are key to preventing disease.
- A spray bottle: For misting your cuttings.
- Labels and a marker: You’ll thank yourself later for knowing what’s what!
- A plastic bag or propagator lid: To create a humid environment.
- Optional: Bottom heat mat: This can significantly speed up root formation.
Propagation Methods
While Daviesia mimosoides can be a bit particular, I’ve had the most success with stem cuttings.
Stem Cuttings:
- Select your parent plant: Choose a healthy, vigorous Daviesia mimosoides.
- Take the cuttings: In spring, look for new, semi-hardwood growth. These are stems that are no longer floppy and green but haven’t hardened off completely into woody brown. Using your clean secateurs, take cuttings about 10-15 cm long. Make the cut just below a leaf node (where a leaf attaches to the stem).
- Prepare the cuttings: Gently strip off the lower leaves, leaving about 2-3 leaves at the tip. If the remaining leaves are very large, you can cut them in half to reduce water loss through transpiration.
- Apply rooting hormone: Dip the cut end of each cutting into your rooting hormone, tapping off any excess. This step is crucial for encouraging robust root growth.
- Plant your cuttings: Fill your small pots with your well-draining potting mix. Make a small hole with a pencil or your finger and insert the cutting, ensuring the rooting hormone-coated end is in good contact with the soil. Gently firm the soil around the cutting.
- Water and cover: Water the pot thoroughly but gently. Then, you can either place the pot inside a plastic bag, ensuring the bag doesn’t touch the leaves, or cover it with a propagator lid. This creates a humid microclimate, which is vital for cuttings to root.
- Place in a bright spot: Find a spot that gets good indirect light. Avoid direct, hot sun, which can scorch the young cuttings.
The “Secret Sauce” (Pro Tips)
Here are a couple of little tricks I’ve picked up over the years that make a real difference with trickier plants like Daviesia:
- Humidity is King (but not Drowning!): While that plastic bag or propagator lid is great for humidity, make sure the air doesn’t become stagnant. Open it up for a few minutes each day to allow for air exchange. And, just as important, ensure your potting mix is damp but never waterlogged. This is probably the biggest reason cuttings fail – they rot.
- Bottom Heat for a Boost: If you can, using a propagation mat set to around 20-22°C under your pots will create an ideal environment for root initiation. It helps the plant focus its energy on root development from below, rather than just leaf growth.
Aftercare & Troubleshooting
Once your cuttings have rooted (you’ll often see new leaf growth or feel a gentle tug when you carefully try to pull on a cutting), it’s time for a little extra care.
- Gradual acclimatization: Start by removing the plastic bag or lid for longer periods each day, allowing the new plant to get used to normal humidity levels.
- Bright but indirect light: Continue to keep them out of harsh, direct sun.
- Watering: Water when the top inch of soil feels dry.
- Common signs of failure: The most common issue is rot. If your cuttings turn black and mushy, that’s usually a sign of too much moisture or poor drainage. Yellowing leaves can also indicate overwatering or a lack of light. If they simply don’t show any signs of life after a few weeks and look shriveled, they may not have rooted. Don’t be discouraged; sometimes it just takes a few tries!
A Little Patience Goes a Long Way
Propagating plants is a journey, and Daviesia mimosoides certainly teaches you a thing or two about patience. But when you see those first tiny roots emerge, or a new shoot unfurl, it’s a moment of pure gardening joy. Enjoy the process, learn from each cutting, and you’ll soon be admiring your own little army of Daviesia mimosoides! Happy propagating!
Resource:
https://identify.plantnet.org/k-world-flora/species/Daviesia%20mimosoides%20R.Br./data