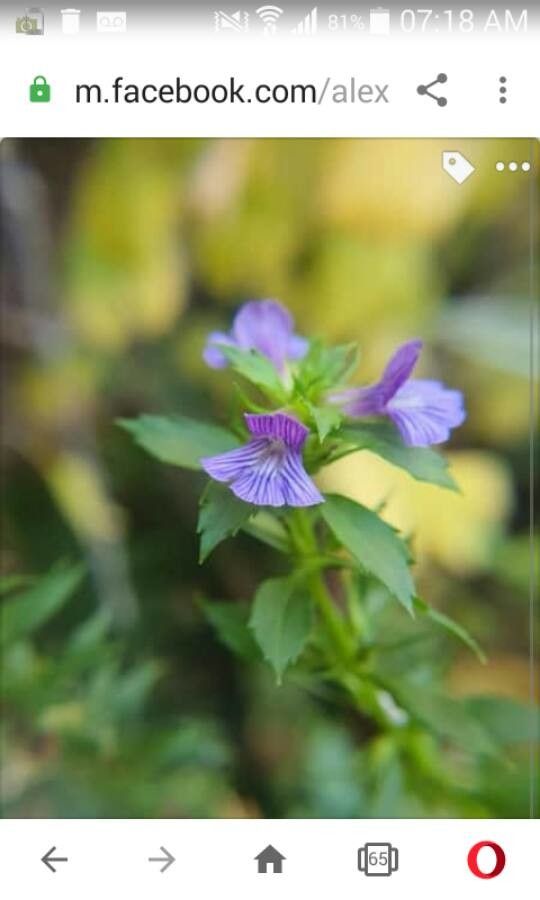
Hello there, fellow plant enthusiasts! Today, I want to chat with you about a gem that often flies under the radar: Stemodia lobelioides. If you adore those delicate, often trailing sprays of lavender-blue flowers that seem to dance in the breeze, you’re in for a treat. Propagating this beauty is incredibly rewarding, and I’m happy to report, it’s not one of those finicky plants that will have you pulling your hair out. Even if you’re just starting your plant journey, you’ll likely find success with this one.
The Best Time to Start
For Stemodia, the sweet spot for propagation is definitely during its active growing season. Think late spring through summer. This is when the plant is full of vigor, and the stems are most likely to readily form roots. Trying to take cuttings in the dead of winter, when growth has slowed considerably, can be a bit of a gamble.
Supplies You’ll Need
Gathering your supplies beforehand makes the whole process so much smoother. Here’s what I usually have on hand:
- Sharp pruning shears or a clean craft knife: For making clean cuts.
- Well-draining potting mix: A good blend of peat, perlite, and a bit of compost works wonders. You can also find specialized seed starting or cutting mixes.
- Small pots or trays: Clean ones, please! This helps prevent disease.
- Rooting hormone (optional but recommended): This little helper can significantly boost your success rate, especially for beginners.
- Plastic bags or a propagator: To create a humid environment.
- Water: For misting and watering.
Propagation Methods
Let’s dive into how we can get more of these lovely plants. Stemodia is practically begging to be propagated, and stem cuttings are my go-to method.
Stem Cuttings:
- Select Healthy Stems: Look for vigorous, non-flowering stems that are about 4-6 inches long. You want stems that are somewhat firm but not woody.
- Make the Cut: Using your sharp shears or knife, take a cutting just below a leaf node (where a leaf attaches to the stem). This is where the magic of root development really kicks in.
- Prepare the Cutting: Gently remove the lower leaves from the cutting, leaving just a few at the top. This prevents them from rotting when they’re in the soil or water and reduces water loss.
- Apply Rooting Hormone (Optional): If you’re using it, dip the cut end of the stem into the rooting hormone powder or gel. Tap off any excess.
- Plant Your Cuttings: Fill your small pots with your well-draining potting mix. Make a small hole with your finger or a pencil, and gently insert the cutting. Firm the soil gently around the base.
- Water and Cover: Water the soil thoroughly but avoid waterlogging. Then, slip the pot into a clear plastic bag or place it in a propagator. This creates that much-needed humid microclimate. Ensure the leaves don’t touch the sides of the bag if possible.
Water Propagation (Another Easy Option):
- Follow steps 1-3 above for preparing your stem cuttings.
- Place in Water: Fill a clean jar or glass with fresh water. Place the cuttings in the water, making sure that the leaf nodes are submerged, but importantly, that the leaves themselves are not touching the water.
- Change Water Regularly: Refresh the water every few days to keep it clean and oxygenated.
- Watch for Roots: You’ll start to see little white roots emerging from the nodes within a few weeks.
The “Secret Sauce” (Pro Tips)
These are the little things I’ve learned over the years that can really make a difference:
- Bottom Heat is Your Friend: If you can, placing your pots on a heat mat designed for seedlings or cuttings can dramatically speed up root formation. That gentle warmth really encourages those roots to take off.
- Don’t Be Afraid to Prune: If the stems you initially select have a lot of flowers, it’s often better to pinch off those blooms before you take the cutting. The plant will then focus its energy on growing roots instead of producing flowers.
- Humidity is Key (But Not Soggy): That plastic bag or propagator is crucial. You want it humid, but avoid condensation that pools excessively. If you see too much moisture on the inside of the bag, open it up for a bit to let it air out.
Aftercare & Troubleshooting
Once you see those lovely new roots (you can gently tug on a cutting to feel for resistance, or if you’re using clear pots, you might see them!), it’s time to give them a little extra care.
- Acclimation: Gradually introduce your newly rooted cuttings to drier air by opening the plastic bag or propagator for increasing amounts of time each day over a week.
- Watering: Water them when the top inch of soil feels dry. They are still young and establishing themselves, so they appreciate consistent moisture but never soggy feet.
- Light: Place them in bright, indirect light. Direct sun can be too harsh for these tender youngsters.
The most common sign of failure is rot. If your cutting turns mushy and black, it’s usually a sign of too much moisture or not enough air circulation. Don’t be discouraged if this happens – it’s part of the learning process! Just toss the rotten cutting and try again with fresh material and slightly adjusted conditions.
A Encouraging Closing
Propagating Stemodia lobelioides is a wonderfully achievable and immensely satisfying task. Be patient with your little green charges, enjoy the process of watching them grow, and soon you’ll have a whole collection of these delightful, free-flowering plants to share or enjoy yourself. Happy propagating!
Resource:
https://identify.plantnet.org/k-world-flora/species/Stemodia%20lobelioides%20Lehm./data