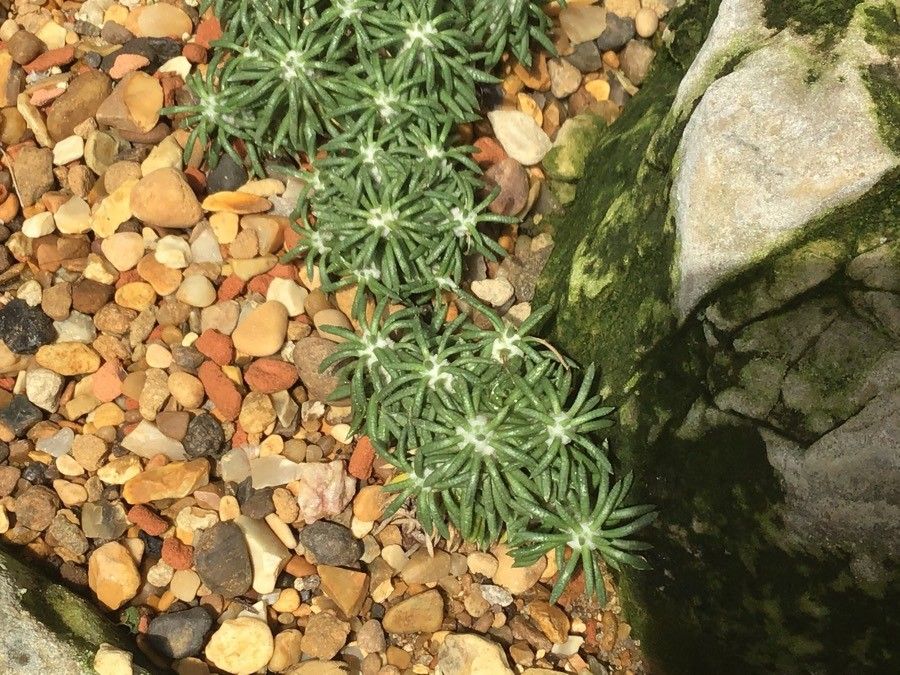
Hello, fellow garden enthusiasts! If you’re like me, you’ve probably fallen head over heels for the woolly charm of Burkartia lanigera. Its delicate, silver-fuzzy leaves are simply captivating, adding a unique texture to any garden bed or container. And the good news? Bringing more of this beauty into your life is incredibly rewarding. While Burkartia lanigera isn’t the absolute easiest plant for a complete beginner to propagate, with a little guidance and patience, you’ll be well on your way to success. Think of it as a delightful challenge!
The Best Time to Start
For the most vigorous growth and therefore the highest chance of success, I always recommend propagating Burkartia lanigera during its active growing season. This typically falls in late spring to early summer. You want to work with healthy, actively growing stems that have plenty of energy to put into developing new roots. Avoid taking cuttings from stressed or dormant plants – they’ll have a much harder time establishing themselves.
Supplies You’ll Need
Gathering your tools beforehand makes the whole process so much smoother. Here’s what I keep on hand:
- Sharp Pruning Shears or a Clean Knife: For making clean cuts.
- Rooting Hormone Powder (Optional but Recommended): This really gives your cuttings a boost.
- Well-Draining Potting Mix: A succulent or cactus mix is ideal, or you can create your own blend of potting soil, perlite, and coarse sand.
- Small Pots or Seedling Trays: With drainage holes, of course!
- Watering Can with a Fine Rose: To water gently without disturbing your cuttings.
- Plastic Bag or Clear Cling Film: To create a mini-greenhouse effect.
- Labels and a Marker: To keep track of what you’ve potted.
Propagation Methods
I’ve found the most reliable way to propagate Burkartia lanigera is through stem cuttings. It’s straightforward and usually yields great results.
- Take Your Cuttings: Using your clean shears or knife, select healthy, non-flowering stems. Look for sections about 3-4 inches long. Make your cut just below a leaf node – that’s the point where a leaf attaches to the stem, and where roots are most likely to form. Remove the lower leaves from the cutting, leaving about two or three at the top.
- Apply Rooting Hormone (If Using): Dip the cut end of the stem into your rooting hormone powder. Gently tap off any excess.
- Plant Your Cuttings: Fill your small pots with your well-draining potting mix. Make a small hole in the center of the soil with your finger or a pencil.
- Insert the Cuttings: Place the treated end of each cutting into the hole and gently firm the soil around it. Don’t crowd too many cuttings into one pot; give them a little space.
- Water Gently: Water the soil thoroughly but gently. You want the soil to be moist, not waterlogged.
The “Secret Sauce” (Pro Tips)
Here are a couple of things I’ve learned over the years that can really make a difference:
- Let Cuttings Callous: Before you even pot them up, after taking your cuttings (and applying hormone, if you do), let them sit out of direct sun for a day or two. This allows the cut end to dry and form a callous. This step is crucial for preventing rot, especially in plants with succulent-like tendencies.
- Embrace Bottom Heat: Burkartia lanigera absolutely loves a bit of warmth from below. Placing your potted cuttings on a heat mat designed for seedlings can significantly speed up root development. It mimics the conditions they’d find in their natural environment.
Aftercare & Troubleshooting
Once your cuttings are planted, it’s time to create a nurturing environment.
- Create a Humid Environment: Cover your pots with a clear plastic bag or cling film. This traps moisture and creates a humid microclimate for your cuttings, which is essential for root formation. Ensure the leaves don’t touch the plastic if possible; if they do, gently pull it away.
- Provide Bright, Indirect Light: Place your creations in a bright spot, but out of harsh, direct sunlight, which can scorch young cuttings.
- Water Sparingly: Check the soil moisture regularly. Water only when the top inch of soil feels dry. Overwatering is the quickest way to undo all your hard work.
You’ll know your cuttings are rooting when you see new leaf growth or feel a gentle resistance when you lightly tug on the stem. This usually takes anywhere from 3 to 6 weeks, sometimes longer.
If you notice your cuttings going limp and mushy, or developing black, water-soaked stems, that’s a sure sign of rot. This is usually due to too much moisture and/or a lack of air circulation. Unfortunately, often these cuttings can’t be saved. Don’t be discouraged though! It’s a learning process. Next time, try letting them callous longer, using even better-draining soil, or watering a bit less often.
A Little Patience Goes a Long Way
Propagating plants is a wonderful dance with nature. It requires a bit of observation, a touch of intuition, and plenty of patience. Seeing a tiny cutting transform into a thriving new plant is one of the most fulfilling experiences a gardener can have. So, gather your supplies, get your hands a little dirty, and enjoy the journey of growing your own Burkartia lanigera. Happy propagating!
Resource: