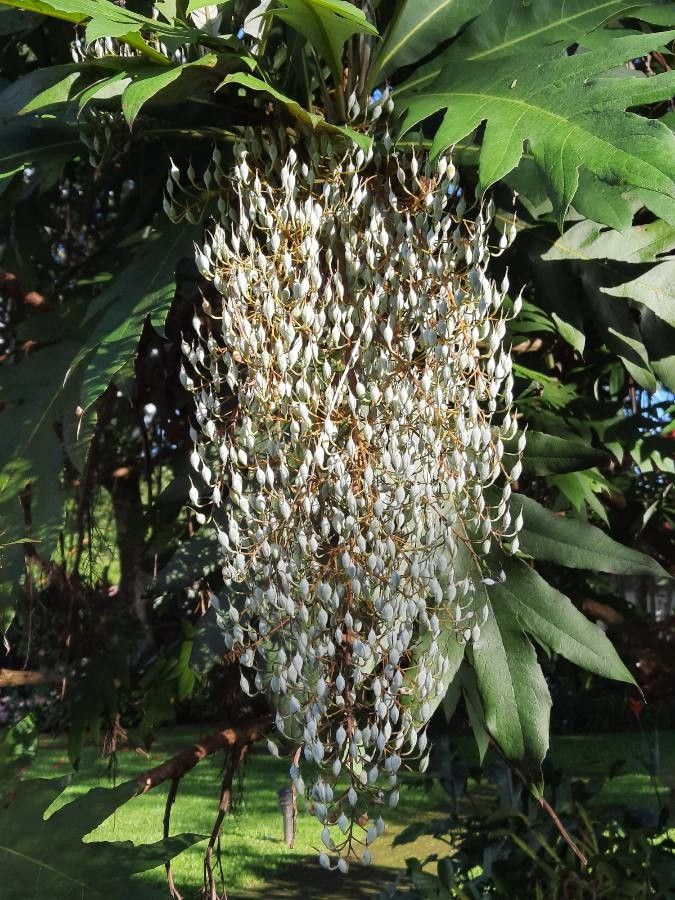
Hello fellow garden enthusiasts! It’s so lovely to connect with you today. We’re going to dive into something truly special: Bocconia frutescens, often called Tree Mallow or Coral Tree. This plant is a bit of a showstopper with its feathery, dramatic foliage and elegant, airy flower plumes. It brings such a lush, almost tropical feel to the garden, and trust me, propagating it is a wonderfully rewarding endeavor.
Now, if you’re new to the plant propagation game, you might be wondering if this is a good place to start. I’m happy to say that Bocconia frutescens is generally quite forgiving and a fantastic plant for beginners to try their hand at multiplying. It’s a bit like sharing a secret with your garden – watching a new life emerge from a piece of the old is pure magic!
The Best Time to Start
For the highest success rate, I always recommend starting your Bocconia frutescens propagation efforts in the late spring or early summer. This is when the plant is actively growing and has plenty of energy to put into developing new roots. Look for stems that are firm but not woody. You want that fresh, vibrant growth that snaps cleanly when bent, rather than just flopping over.
Supplies You’ll Need
Gathering your supplies beforehand makes the whole process smoother. Here’s what I usually have on hand:
- Sharp Pruning Shears or a Knife: Clean cuts are key to preventing disease.
- Rooting Hormone (Optional but Recommended): This can give your cuttings an extra boost. I prefer a powdered form.
- Potting Mix: A well-draining mix is essential. I like a blend of equal parts peat moss or coco coir, perlite, and a good quality potting soil.
- Small Pots or Trays: Clean pots with drainage holes are a must.
- Watering Can or Mister: Gentle watering is important.
- Plastic Bags or a Propagation Dome: To create a humid environment.
- Labels: To keep track of your precious new plants!
Propagation Methods
There are a few ways to get new Bocconia frutescens plants going, but my two favorites are stem cuttings and division.
Stem Cuttings
This is my go-to method for Bocconia. It’s straightforward and usually yields great results.
- Take Cuttings: Using your clean shears, snip off pieces of stem that are about 4-6 inches long. Make the cut just below a leaf node (where a leaf attaches to the stem).
- Prepare the Cuttings: Gently remove the lower leaves. You want to leave just a couple of sets of leaves at the top. If the leaves are quite large, you can cut them in half to reduce water loss.
- Apply Rooting Hormone (Optional): Dip the cut end of the stem into your rooting hormone, tapping off any excess.
- Plant the Cuttings: Fill your small pots with your prepared potting mix. Make a small hole with your finger or a pencil and insert the cut end of the Bocconia stem. Gently firm the soil around the stem.
- Water Gently: Water the soil thoroughly but avoid waterlogging.
- Create Humidity: Place the potted cuttings inside a plastic bag or cover them with a propagation dome. This traps moisture and creates a mini-greenhouse effect, which is perfect for root development. Make sure the leaves aren’t touching the plastic directly if possible.
Division
If you have a more established Bocconia, division is a fantastic way to get more plants and also rejuvenate the parent plant!
- Dig Up the Plant: In the spring or fall, carefully dig up the entire Bocconia frutescens plant. Try not to damage the root ball too much.
- Inspect the Roots: Gently shake off excess soil to get a good look at the root system. You’ll likely see multiple shoots or crowns emerging from the base.
- Separate the Divisions: Using your hands or a clean trowel, gently pull or cut the root ball apart. Aim for divisions that have at least one or two healthy shoots and a good portion of roots attached.
- Replant Immediately: Plant each division into its own pot filled with well-draining potting mix, or directly into a prepared spot in your garden. Water well.
The “Secret Sauce” (Pro Tips)
Here are a couple of things I’ve learned over the years that really make a difference:
- Bottom Heat is Your Friend: For stem cuttings, placing your pots on a gentle heat mat can significantly speed up root formation. Just a touch of warmth encourages those roots to get going.
- Don’t Overwater: It sounds simple, but overwatering is the fastest way to kill a cutting. The soil should feel moist but not soggy. Let the top inch of soil dry out slightly between waterings, especially once you’ve created that humid environment. It’s better to err on the side of slightly too dry than too wet.
Aftercare & Troubleshooting
Once you see signs of new growth, like tiny leaves unfurling or the stem looking firm and healthy after a few weeks, you’re likely on your way to success!
- Gradual Acclimation: Once those cuttings have developed a good root system (you can check by gently tugging – there should be resistance), start to gradually acclimate them to drier air. Open the plastic bag a little each day for a week, or lift the dome for increasing periods.
- Moving to Larger Pots: When they’re robust enough, you can transplant them into slightly larger pots with fresh potting soil.
- Common Signs of Failure: The most common issue is rot. If your cuttings turn black and mushy, it’s a sign of too much moisture and not enough air circulation. Another sign is wilting that doesn’t perk up or drooping leaves that are yellowing. If this happens, don’t despair! Sometimes it takes a few tries to get it right.
A Encouraging Closing
Propagating Bocconia frutescens is such a rewarding way to fill your garden with its beauty or share its charm with friends. Be patient with the process. Some cuttings take longer than others to root, and that’s perfectly normal. Just keep tending to them with a little love and care, and before you know it, you’ll have a small forest of these gorgeous plants to enjoy! Happy gardening!
Resource:
https://identify.plantnet.org/k-world-flora/species/Bocconia%20frutescens%20L./data