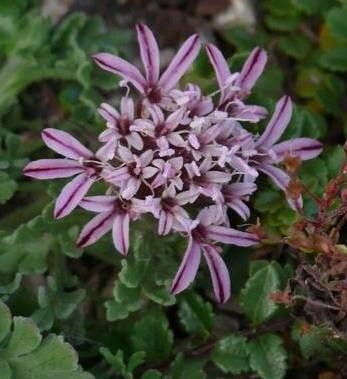
Oh, hello there! Grab a mug, settle in. We’re going to talk about a little gem of a plant today: Pterocephalus depressus. If you haven’t met it yet, imagine a low-growing, mat-forming beauty with a fuzzy charm and delicate, pincushion-like flowers that look like they’ve tumbled straight from a fairy garden. It’s just delightful, and honestly, propagating it yourself is one of the most satisfying things you can do. For us garden folk, anyway!
Now, is it a walk in the park for a brand-new gardener? I’d say it’s moderately easy. It’s not like propagating a rose bush from a cutting, which can sometimes feel like a gamble. But with a little attention, you’ll be rewarded with plenty of new plants to fill in those bare spots or share with your fellow plant-loving friends. It’s definitely a rewarding project.
The Best Time to Start
Timing is everything, right? For Pterocephalus depressus, the sweet spot for propagation is late spring to early summer. This is when the plant is actively growing, full of vigor, and ready to put that energy into new roots. You want to take cuttings from healthy, non-flowering stems. If a stem is already pushing out a bloom, it’s likely too focused on reproduction in its own way, and that energy won’t be directed towards forming roots as effectively.
Supplies You’ll Need
Gathering your tools before you start makes the whole process so much smoother. Here’s what you’ll want to have on hand:
- Sharp Pruning Shears or a Clean Knife: For making clean cuts.
- Rooting Hormone (Powder or Gel): This is optional, but it gives your cuttings a good boost.
- Propagating Medium: A well-draining mix is key. I like a blend of perlite and seed-starting mix (about 50/50). You can also use coarse sand.
- Small Pots or Seedling Trays: Clean ones, please!
- Plastic Bags or a Clear Dome: To create a mini-greenhouse effect.
- Watering Can with a Fine Rose: For gentle watering.
- Labels and a Pen: You’ll thank me later when you’ve forgotten which cutting is which!
Propagation Methods
Pterocephalus depressus is a pretty adaptable plant, and it responds well to a couple of common propagation techniques.
Stem Cuttings: My Go-To Method
This is where you’ll see the best results most consistently.
- Take Your Cuttings: Head out to your Pterocephalus depressus during its active growing season. Look for healthy, non-woody stems that are about 3-4 inches long. Use your sharp shears or knife to make a clean cut just below a leaf node (where a leaf grows out of the stem). You want to take several cuttings, as not all of them will necessarily take.
- Prepare the Cuttings: Gently remove the lower leaves from the cutting. You want to expose the leaf nodes, as this is where roots will emerge. You can leave a couple of leaves at the top. If your leaves are quite large, you can even cut them in half to reduce water loss.
- Apply Rooting Hormone: Dip the cut end of each stem into your rooting hormone. Tap off any excess.
- Plant the Cuttings: Fill your small pots or seedling trays with your pre-moistened propagating medium. Make a small hole with your finger or a pencil, and carefully insert the prepared cuttings. Gently firm the medium around the base of each cutting to ensure good contact.
- Create a Humid Environment: Water the medium gently. Then, cover the pots with a plastic bag or place them under a clear dome. This traps humidity, which is crucial for cuttings to form roots before they dry out.
- Provide Bright, Indirect Light: Place your newly planted cuttings in a spot that gets bright, indirect light. Avoid direct sun, which can scorch the delicate cuttings.
Water Propagation (with a Caveat!)
While it can work, I find stem cuttings in a soil mix generally give me a higher success rate for Pterocephalus depressus. If you want to try water propagation:
- Prepare your cuttings as described above (remove lower leaves).
- Place the cuttings in a small jar or glass of clean water.
- Crucially, do not let the leaves touch the water. Roots will form from the nodes, and if leaves are submerged, they will rot quickly, potentially taking the whole cutting down with them.
- Change the water every few days to keep it fresh.
- Once you see visible root growth, you can then carefully transplant them into your soil mix. Be gentle; nascent roots are fragile!
The “Secret Sauce” (Pro Tips)
Here are a couple of things I’ve learned that really help these little guys thrive:
- Bottom Heat is Your Friend: If you have a heat mat designed for propagation, place your pots on it. Bottom heat encourages root formation significantly. It mimics the warmth of spring soil and gives your cuttings a real advantage.
- Don’t Rush the Transplant: When you see roots poking out the bottom of the pot or you gently tug on a cutting and feel resistance, that’s a good sign. But don’t rush to move it to a bigger pot immediately. Let it establish itself in its initial pot for a couple more weeks. This allows the root system to develop a bit more strength before the stress of transplanting.
Aftercare & Troubleshooting
Once your cuttings have happily developed roots, it’s time to treat them like mini versions of the parent plant.
- Gradually Acclimate: If you used a plastic bag or dome, start by opening it up for increasingly longer periods each day for a few days. This helps them adjust to normal humidity levels.
- Watering: Water them when the top inch of soil feels dry. Don’t let them sit in soggy soil, as this is a fast track to rot.
- Light: Continue to provide bright, indirect light.
- Transplanting: Once they are a few inches tall and have a decent root ball, you can pot them up into slightly larger containers with a well-draining potting mix.
The most common sign of trouble is rot. If your cutting turns black and mushy, or the leaves start to yellow and wilt despite adequate watering, it’s likely rot. This is often caused by too much moisture, poor drainage, or lack of airflow. If you see rot, discard the affected cutting immediately to prevent it from spreading. Sometimes, a cutting might just fail to root – don’t be discouraged! It happens to all of us. Just try again with new cuttings.
A Gentle Wrap-Up
Propagating Pterocephalus depressus is a wonderful way to multiply your enjoyment of this charming plant. Be patient, nurture your little cuttings, and celebrate each tiny root that forms. Think of it as a plant-nurturing ritual. Before you know it, you’ll have a whole little posse of these beauties, ready to grace your garden or become treasured gifts. Happy propagating!
Resource: