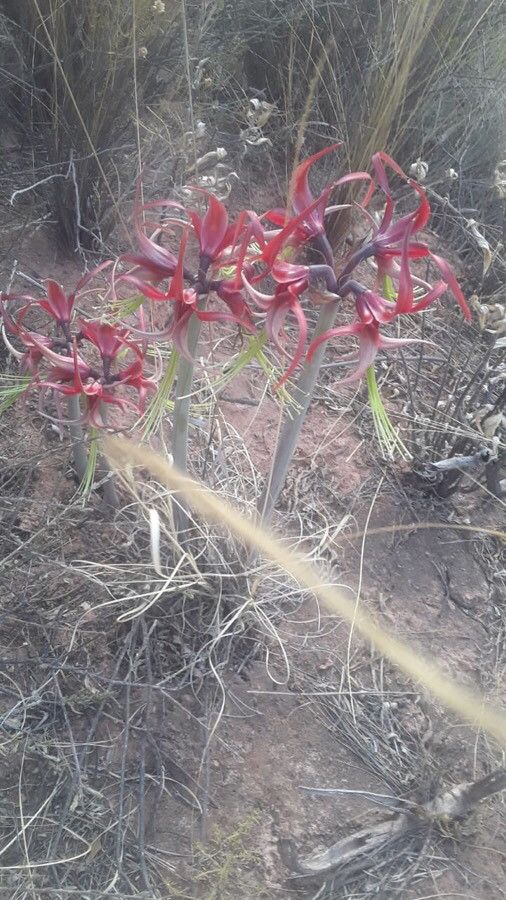
Hello, fellow plant lovers! There’s a certain magic to coaxing a new life from an existing one, isn’t there? And when it comes to the elegant, whip-like blooms of Hippeastrum cybister, or Spider Lilies, propagating them is a deeply satisfying journey. These beauties, with their slender petals and exotic charm, add a touch of wild grace to any collection. If you’re new to the world of propagation, Hippeastrum cybister might be a tad more considered than a common succulent, but with a little patience and my guidance, you’ll be well on your way to success!
When to Get Your Hands Dirty
The absolute best time to think about propagating your Hippeastrum cybister is after it has finished blooming and the foliage begins to yellow and die back. This is usually in late spring or early summer. The bulb is then in a dormant or semi-dormant state, and it’s less stressed by the process. Crucially, this is when it’s storing energy, making it more receptive to division.
Your Propagation Toolkit
Here’s what you’ll want to have on hand before you begin:
- Sharp, clean pruning shears or a sturdy knife: For making precise cuts. Sterilize them with rubbing alcohol to prevent disease.
- Well-draining potting mix: A blend of equal parts peat moss, perlite, and compost works wonders. You can also find specialized bulb potting mixes.
- A shallow tray or pot with drainage holes: For housing your new propagations.
- Rooting hormone (optional but recommended): This can give your cuttings a helpful boost. Look for one formulated for bulbs or general use.
- Small labels and a waterproof marker: To keep track of what you’ve done and when.
- A misty spray bottle: For keeping the environment humid.
The Art of Division: Our Primary Method
For Hippeastrum cybister, division of the bulb is the most straightforward and successful method. These bulbs naturally produce offsets, or “daughter bulbs,” that grow around the base of the parent bulb.
- Gently excavate: Carefully remove the entire bulb from its pot. You might need to pry it loose if it’s tightly packed.
- Clean the bulb: Gently brush away as much of the old soil as you can. You want to clearly see the structure of the bulb and its offsets.
- Identify the offsets: Look for smaller bulbs attached to the main bulb. They’ll often have their own set of roots.
- Separate with care: Using your clean knife or shears, carefully cut or twist the offsets away from the mother bulb. Make sure each offset has at least one small root attached. If you can’t get a clean separation, it’s okay to lose a few roots – just be gentle!
- Allow to cure (optional but good practice): Let the separated bulbs sit in a dry, airy spot for a day or two. This allows any cut surfaces to callus over, reducing the risk of rot.
- Plant your new babies: Pot each offset into its own small container with your well-draining potting mix. Bury the bulb about halfway, leaving the tip exposed.
- Water sparingly: Give them a good watering initially, then allow the soil to dry out slightly between waterings.
My “Secret Sauce” for Success
These are little tricks I’ve picked up over the years that really make a difference:
- Never leave leaves submerged. If you happen to try a water propagation – which is less common for these bulbs but possible with a very carefully managed offset – the absolute golden rule is to keep the bulb base out of the water. Only the emerging roots should touch the water. Rot is the enemy, and soggy leaves are an invitation for it.
- Consider a touch of warmth. While not strictly necessary for division, if you’re trying to root a seemingly shy offset or are attempting a particularly challenging separation, placing the pots on a gentle heating mat set to a low temperature can encourage faster root development. Just a little warmth from below, like a cozy blanket for your bulbs!
Keeping Them Happy: Aftercare and What to Watch For
Once you’ve potted your new Hippeastrum cybister offsets, consistency is key.
- Light: Give them bright, indirect light. Too much direct sun can scorch their delicate new foliage.
- Watering: Water when the top inch of soil feels dry. Overwatering is the most common mistake and a fast track to rot. It’s better to be a little underwatered than too wet.
- Patience is paramount: These little guys take time. Don’t expect blooms for at least a year, and sometimes two. They need to establish a strong root system and build up their energy reserves.
If you notice your offsets developing mushy, brown spots, especially around the base, that’s a sign of rot. Unfortunately, this is often difficult to recover from. This usually means it was kept too wet. If you catch it early, you can try removing the affected parts with a clean knife and repotting in fresh, dry soil, but don’t be too disheartened if it doesn’t pull through.
Go Forth and Propagate!
Creating new life from your beloved plants is a truly rewarding experience. Be patient with your Hippeastrum cybister offsets, give them the right conditions, and I’m confident you’ll have many more of these stunning blooms to enjoy in the years to come. Happy gardening!
Resource: