Well hello there, fellow plant enthusiast! It’s so good to share this little corner of the gardening world with you today. We’re going to dive into the wonderful world of propagating Angraecum compactum.
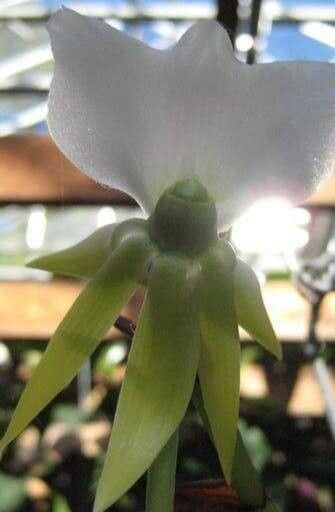
If you’re drawn to orchids that have a bit of an architectural flair, you’ll adore Angraecum compactum. Its fleshy, succulent-like stems and beautiful, often star-shaped blooms are truly captivating. And the best part? Creating more of these beauties yourself is incredibly rewarding. Now, I’ll be honest, while not as tricky as some of its more delicate orchid cousins, Angraecum compactum can be a tad more challenging for absolute beginners compared to, say, a pothos. But don’t let that deter you! With a little patience and these tips, you’ll be well on your way.
The Best Time to Start
For Angraecum compactum, the prime time to think about propagation is during its active growth period. This typically falls in late spring through summer. You’ll see new roots or shoots emerging, and the plant is full of vigor. Trying to propagate when it’s resting will often lead to disappointment, as the plant doesn’t have the energy to put into developing new roots. Pick a healthy, mature stem that has at least a couple of segments.
Supplies You’ll Need
Gathering your tools before you begin makes the whole process smoother. Here’s what you’ll want to have on hand:
- Sharp, sterilized pruning shears or a clean hobby knife: We want clean cuts to prevent disease.
- Rooting hormone (optional, but recommended): This gives your cuttings a helpful boost. Look for one formulated for orchids or use a willow water soak.
- Potting medium: A well-draining orchid mix is essential. Think bark chips, perlite, and a bit of sphagnum moss. You want something that drains fast but still holds a little moisture.
- Small pots or propagation trays: Terracotta pots are great because they breathe.
- Clear plastic bags or a propagation dome: This helps to maintain humidity around your cuttings.
- Watering can or spray bottle: For gentle watering.
- Labeling stakes: You’ll thank me later for remembering which is which!
Propagation Methods
There are a couple of ways we can go about this, but I find stem cuttings to be the most reliable for Angraecum compactum.
Stem Cuttings:
- Select your cutting: Find a healthy, mature stem on your Angraecum compactum. It should have at least two good nodes (these are the little bumps where leaves emerge or where aerial roots can form). Aim for a cutting that’s about 4-6 inches long.
- Make the cut: Using your sterilized shears or knife, make a clean cut just below a node. You can also take a longer piece and then cut it into sections, ensuring each section has at least one node.
- Prepare the cutting: Gently remove any lower leaves that might rot if they were to sit in the potting mix. I usually leave the top two or three leaves.
- Apply rooting hormone (if using): Dip the cut end of the stem into your rooting hormone. Tap off any excess. Some folks prefer to use freshly brewed willow water as a rooting stimulant.
- Plant the cutting: Lightly dampen your chosen potting medium. Insert the cut end of the stem into the medium, making sure the node(s) are buried. If you have a cutting with two nodes, you can bury one and leave the other exposed.
- Create a humid environment: Water gently. Then, place the pot inside a clear plastic bag (puff some air into it first) or cover it with a propagation dome. This creates a mini-greenhouse.
The “Secret Sauce”
Here are a couple of tricks I’ve learned over the years that can really give your propagation efforts a boost:
- Don’t let leaves touch water: If you’re water propagating a leaf, make sure the cut end is in the water, but the leaf itself stays dry. Rotting leaves are a quick way to spell disaster.
- Bottom heat is your friend: If you can, place your pots on a heat mat set to a gentle warmth (around 70-75°F / 21-24°C). This warmth encourages root development from below, mimicking what happens in nature.
Aftercare & Troubleshooting
Once your cutting is planted and feeling cozy in its humid little world, give it a spot with bright, indirect light. Avoid direct sun, which can scorch those tender new leaves. Keep the potting mix lightly moist, but never soggy. You want it to feel like a damp sponge.
Check for roots regularly. You might start to see new growth or even small aerial roots emerging from the nodes. This is a good sign! You can usually tell if it’s rooted when it feels more stable in the pot and starts to show new leaf development.
The biggest thing to watch out for is rot. If you notice mushy, black stems or leaves, it’s usually a sign of too much moisture and not enough air circulation. Don’t despair! You might be able to salvage a healthy section of the stem. Remove the rotten part cleanly, let the salvaged piece air dry for a day or two to callous over, and then try re-potting it.
A Little Patience Goes a Long Way
Propagating orchids can be a journey, not a sprint. Be patient with your Angraecum compactum cuttings. It can take several weeks, or even months, for roots to establish. Celebrate the small victories – a new leaf, a tiny aerial root starting to form. Enjoy the process of nurturing these new plants. Happy growing!
Resource:
https://identify.plantnet.org/k-world-flora/species/Angraecum%20compactum%20Schltr./data