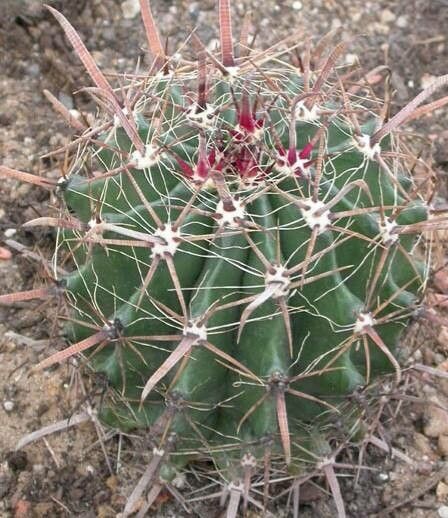
Let’s talk about Ferocactus peninsulae! These barrel cacti, with their stunning, often colorful spines and impressive size, are true desert showstoppers. Growing them from seed or offsets is such a rewarding journey. It feels like you’re coaxing a little piece of the desert landscape into your own hands. Now, are they a walk in the park for absolute beginners? Well, barrel cacti can be a tad more patient than, say, a pothos, but I promise, with a few key pointers, you’ll be well on your way to success.
The Best Time to Start
My go-to time for propagating Ferocactus peninsulae is in the late spring or early summer. This is when the plant is actively growing and has the most energy to put into developing new roots. You’ll want to start with healthy material that’s clearly in its robust growth phase.
Supplies You’ll Need
Gathering your supplies beforehand makes the whole process so much smoother. You’ll want:
- Sharp, clean pruning shears or a sharp knife: For making clean cuts that heal faster.
- Rooting hormone (optional but recommended): This gives your cuttings a helpful boost. Look for one formulated for succulents or cacti.
- Well-draining potting mix: A good cactus or succulent blend is perfect. I often amend mine with extra perlite or pumice to ensure it drains like a sieve.
- Small pots or trays: Enough to house your new propagations. Terracotta pots are wonderful as they allow the soil to dry out more effectively.
- Watering can or spray bottle: For gentle watering.
- A tray or saucer: To catch excess water and keep your surfaces clean.
- Gloves: Optional, but those spines can be formidable!
Propagation Methods
For Ferocactus peninsulae, the easiest and most common methods I rely on are offsets (pups) and stem cuttings. Seeds are certainly possible, but they require a lot more patience.
Propagating from Offsets (Pups)
This is my favorite way to go because you’re essentially taking a baby cactus that’s already started its own root system.
- Identify and Gently Separate: Look for small, bulbous growths, called offsets or pups, emerging from the base of the parent plant. Carefully use your sharp knife or pruning shears to slice the offset away from the mother plant, making sure to get a bit of its base where roots will form.
- Allow to Callus: This is a CRUCIAL step! Place the offset on a dry paper towel in a bright, dry spot for several days to a week. You want the cut surface to completely dry and form a hard callus. This prevents rot when you plant it.
- Planting Time: Once callused, prepare a small pot with your well-draining cactus mix. You can lightly dust the callused end with rooting hormone if you’re using it. Gently tuck the offset into the soil, just deep enough to keep it upright.
- Initial Watering (or Not): I usually wait another week after planting before watering. This gives any tiny, residual cuts a chance to heal. When you do water, do it sparingly.
Propagating from Stem Cuttings
This method is for when you might need to take a bit off the top of a larger cactus or want to start a new one from a healthy section.
- Make a Clean Cut: Using your sharp, clean knife or shears, take a healthy section of the barrel cactus. Aim for a piece that’s at least a couple of inches long, with a good number of spines.
- Callus, Callus, Callus! Just like with offsets, letting this cutting dry and callus is non-negotiable. Place it in a bright, airy spot for at least one to two weeks, until the cut end is entirely dry and firm.
- Planting the Cutting: Fill a pot with your cactus mix. You can dip the callused end in rooting hormone. Gently insert the cutting into the soil, burying it an inch or so deep, enough to support it.
- Hold Off on Water: Again, resist the urge to water immediately. Wait at least a week, maybe even two, for the cutting to settle in before you lightly water.
The “Secret Sauce” (Pro Tips)
After years of wrestling with reluctant roots, I’ve learned a few tricks:
- Don’t Overcrowd the Pots: When planting multiple offsets or cuttings, give them plenty of space. They need air circulation and room for roots to develop without competing too much. Overcrowding is a fast track to rot.
- Wiggle Test = Root Test: After a few weeks, you can gently try to wiggle the cutting or offset. If there’s resistance, congratulations, roots are forming! If it still feels loose and wobbly, it needs more time.
- Bottom Heat is Your Friend (Sometimes): For really stubborn cuttings, a little gentle bottom heat can work wonders. Placing your pots on a propagation mat set to a low temperature can encourage root development, especially if your starting conditions are a bit cool. Just make sure the heat isn’t too intense – we’re coaxing, not cooking!
Aftercare & Troubleshooting
Once your little barrel cactus starts showing signs of growth, like plumpness or even a tiny flower bud, you know roots are forming!
- Watering: Water sparingly. Let the soil dry out completely between waterings. Overwatering is the number one killer of young cacti. I usually water when the soil is bone dry about an inch or two down.
- Light: Place your new propagations in bright, indirect light initially. As they establish, you can gradually introduce them to more direct sunlight, just as you would with a mature barrel cactus.
- Signs of Trouble: The most common issue is rot. If your cutting or offset looks mushy, discolored, or simply collapses, it’s likely rotted. This is usually due to too much moisture and insufficient callusing. If you catch rot early and it’s just the very tip, you might be able to cut away the rotted part and let the healthy portion callus again, but it’s often best to start fresh. Another sign something isn’t right is a cutting that just keeps looking sad and shriveled with no sign of roots after a long time. This could be due to a lack of moisture or simply a cutting that wasn’t viable.
A Encouraging Closing
Propagating Ferocactus peninsulae is a journey of patience and observation. Don’t be discouraged if your first attempt isn’t a resounding success. Each cactus is unique, and they each have their own timeline. Just keep trying, observe what works best in your environment, and enjoy the process of nurturing these incredible desert gems. Happy gardening!
Resource: