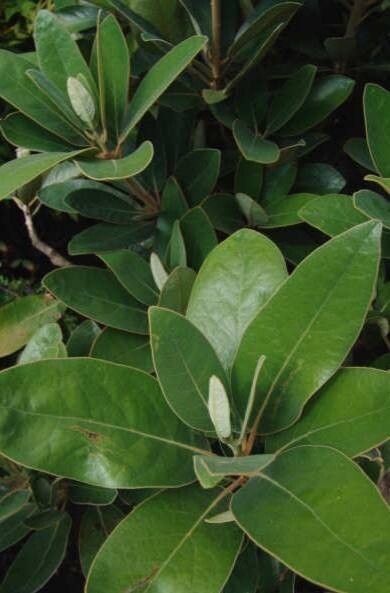
Hello, fellow plant enthusiasts! Today, I want to chat about a gem that’s stolen a little piece of my heart: Litsea ferruginea. If you’re looking for a plant with gorgeous, velvety leaves and a graceful, spreading habit, you’re in for a treat. Maybe you’ve seen one at a friend’s house or in a botanical garden and thought, “Wow, I’d love one of those!” The good news is, propagating Litsea ferruginea isn’t just possible; it’s incredibly rewarding. It’s a project that lets you share the love and fill your space with more of what brings you joy. For beginners, I’d say this one falls into the “moderately achievable” category. It’ll require a bit of attention, but with these tips, you’ll be well on your way.
The Best Time to Start
My experience tells me that the sweet spot for propagating Litsea ferruginea is late spring through early summer. This is when the plant is actively growing, or in that vigorous phase right after its main burst of growth. You’re essentially taking advantage of the plant’s natural energy reserves. Cuttings taken at this time are more likely to root quickly because they have plenty of stored energy to fuel root development.
Supplies You’ll Need
Before we dive in, let’s gather our tools. Having everything at the ready makes the process so much smoother.
- Sharp pruning shears or a clean knife: For making clean cuts.
- Rooting hormone (optional, but recommended): A powder or gel to encourage root growth. Look for one specifically for stem cuttings.
- Well-draining potting mix: A blend of perlite, peat moss, and a bit of compost works beautifully. I often use a 50/50 mix of perlite and peat.
- Small pots or seed trays: Clean containers with drainage holes are essential.
- Plastic bags or a propagator lid: To create a humid environment.
- Water: For misting and watering.
- Small watering can or spray bottle: For gentle watering.
Propagation Methods
I’ve had the most success with stem cuttings for Litsea ferruginea. It’s my go-to method because it’s straightforward and yields great results.
Stem Cuttings:
- Select your parent plant: Choose a healthy, vigorous Litsea ferruginea. Look for stems that are mature but not woody yet – they should be somewhat bendy.
- Take a cutting: Using your sharp shears or knife, make a clean cut just below a leaf node (where a leaf attaches to the stem). Aim for cuttings that are about 4-6 inches long.
- Prepare the cutting: Gently remove the lower leaves, leaving only a couple of leaves at the very top. This prevents the lower leaves from rotting in the soil. If the remaining leaves are very large, you can trim them in half.
- Apply rooting hormone (optional): Dip the cut end of the stem into your rooting hormone powder or gel, tapping off any excess.
- Potting up: Fill your small pots with your well-draining potting mix. Make a small hole in the center of the soil with your finger or a pencil.
- Insert the cutting: Gently place the cut end of the Litsea ferruginea cutting into the hole. Firm the soil gently around the stem to ensure good contact.
- Water thoroughly: Water the soil until it’s evenly moist but not waterlogged.
- Create humidity: This is crucial! Place the potted cutting inside a clear plastic bag, sealing it loosely around the pot, or cover it with a propagator lid. This traps moisture and mimics the humid environment the cutting needs to thrive. You can also place the pots in a tray and mist the inside of the bag daily.
- Placement: Put the pot in a bright spot that gets indirect light. Avoid direct sun, which can scorch the delicate cutting.
The “Secret Sauce” (Pro Tips)
Here are a couple of things that have really made a difference in my propagation journey with Litsea ferruginea.
- Never let the leaves touch the water: If you choose water propagation (which I find a bit less reliable for this particular plant, but it can work!), make absolutely sure that the leaves are above the water line. Any submerged foliage is a prime candidate for rot.
- Bottom heat is your friend: If you can, place your pots on a heated propagator mat. This gentle warmth from below encourages root development and significantly speeds up the rooting process. It’s like a little spa day for your cuttings!
- Don’t be tempted to peek too soon: Resist the urge to constantly pull the cuttings out to check for roots. Every time you disturb them, you risk damaging delicate new growth. Give it at least 4-6 weeks before you gently tug on a cutting to feel for resistance.
Aftercare & Troubleshooting
Once you see signs of new growth, like tiny leaves unfurling or the cutting feeling firmly rooted when gently tugged, you’re almost there! Gradually introduce your new plant to less humid conditions by opening the plastic bag or propagator lid a little more each day over a week. Continue to water when the top inch of soil feels dry.
The most common sign of failure is rot. If your cutting turns mushy, black, or just looks generally sad and wilts without recovery, it’s likely rotted. This is usually due to:
- Too much moisture in the soil.
- Poor drainage.
- Lack of airflow.
If you spot rot, unfortunately, that particular cutting is probably lost. The best course of action is to inspect your other cuttings, ensure the soil is draining well, and maybe even consider increasing airflow slightly. Better luck next time!
A Little Patience Goes a Long Way
Propagating any plant is a beautiful act of patience and optimism. Watching a tiny cutting transform into a robust, healthy plant is incredibly satisfying. Don’t get discouraged if your first attempt isn’t perfect. Each try is a learning experience, and the joy of creating new life from your own garden is truly special. So grab your shears, get your hands in the soil, and happy propagating!
Resource:
https://identify.plantnet.org/k-world-flora/species/Litsea%20ferruginea%20(Blume)%20Blume/data