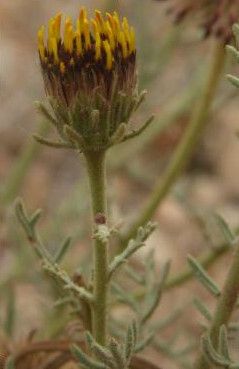
Hey there, fellow plant lovers! I’m so excited to chat with you today about a truly special plant: Perralderia coronopifolia. If you’re not already familiar, you’re in for a treat. This beauty boasts these wonderfully intricate, deeply lobed leaves that add such a unique texture and visual interest to any space, indoors or out. Honestly, seeing a mature plant cascading or unfurling new growth just makes me smile.
And the best part? Propagating Perralderia coronopifolia is absolutely doable and incredibly rewarding. Now, I wouldn’t call it a beginner’s push-button plant, but with a little care and a few key steps, you’ll be well on your way to having tiny versions of this gorgeous specimen to share or to fill your own home with. It’s a fantastic way to get more bang for your buck and feel that deep satisfaction of nurturing life from a small piece.
The Best Time to Start
Here’s my golden rule for getting the best results: aim for active growth periods. For Perralderia coronopifolia, this usually means late spring or early summer. The plant is energized and pushing out new growth, which gives your cuttings or divisions the best chance to root and establish themselves quickly. Trying to propagate when the plant is dormant is like asking someone to run a marathon on an empty stomach – it’s just not going to go as well!
Supplies You’ll Need
Before we get our hands dirty, let’s gather our tools. Having everything ready makes the process so much smoother:
- Sharp Pruning Shears or a Clean Knife: Essential for making clean cuts, which helps prevent disease.
- Potting Medium: A well-draining mix is absolutely crucial. I love a blend of half potting soil and half perlite or coarse sand. For stem cuttings, you can even go with a lighter mix like coco coir and perlite.
- Small Pots or Seed Trays: Clean pots are a must. Small ones are perfect for baby plants.
- Rooting Hormone (Optional but Recommended): This stuff can really give your cuttings a boost. I prefer a powder form, but gel works too.
- Plastic Bags or a Propagator: To create a humid environment for cuttings. Clear bags are great because you can still see what’s going on.
- Watering Can or Spray Bottle: For gentle watering.
Propagation Methods
Let’s dive into the most reliable ways to get new Perralderia coronopifolia plants.
1. Stem Cuttings: My Go-To Method
This is generally the most straightforward and successful approach for this plant.
- Step 1: Take the Cuttings. Look for healthy, non-flowering stems. You want to select pieces that have at least 2-3 sets of leaves. Using your clean shears or knife, make a cut just below a leaf node (where a leaf emerges from the stem). Aim for cuttings about 3-6 inches long.
- Step 2: Prepare the Cuttings. Gently remove the lower leaves from the cutting, leaving at least two sets of leaves at the top. This prevents the submerged leaves from rotting.
- Step 3: Apply Rooting Hormone (Optional). Dip the cut end of the stem into your rooting hormone powder, tapping off any excess.
- Step 4: Pot Them Up. Fill your small pots with your prepared potting mix. Make a small hole in the center of the soil with your finger or a pencil. Insert the cut end of the Perralderia cutting into the hole and gently firm the soil around it.
- Step 5: Create Humidity. Water the soil gently. Then, carefully place the pot into a clear plastic bag or cover it with a propagator lid. Seal it loosely to trap humidity. Place it in a bright spot, but out of direct sunlight.
2. Water Propagation: Seeing the Roots Grow!
Some folks just love watching roots develop in water, and Perralderia coronopifolia can often oblige!
- Step 1: Prepare Your Cuttings. Follow Steps 1 and 2 from the stem cutting method above.
- Step 2: Place in Water. Find a clean glass or jar. Fill it with fresh water and insert your cuttings, making sure no leaves are submerged below the water line. Trim any leaves that would be in the water.
- Step 3: Find a Spot. Like stem cuttings, place your water propagation setup in bright, indirect light.
- Step 4: Change the Water. This is key! Change the water every few days to keep it fresh and prevent bacterial growth. You’ll start to see tiny white roots appear within a few weeks. Once the roots are about an inch long, you can transplant them into soil.
The “Secret Sauce” (Pro Tips)
Alright, here are a few things I’ve learned over the years that can make a real difference:
- Bottom Heat is Your Friend: Perralderia coronopifolia loves a little warmth from below to encourage root development. If you have a heat mat designed for seedlings, place your pots on it. It makes a noticeable difference, especially in cooler conditions.
- Don’t Overwater: This is the most common killer of cuttings. The soil should be consistently moist, but never waterlogged. Check the moisture level by sticking your finger about an inch into the soil. If it feels dry, give it a gentle watering.
- Be Patient with Water Propagation: Sometimes, the roots take their sweet time to form. Resist the urge to fiddle too much. Just keep that water fresh and the light consistent. If a cutting looks like it’s not doing anything after a month or two, it might just be a shy one!
Aftercare & Troubleshooting
Once you see those promising little roots peeking out from the drainage holes or a good root system forming in water, it’s time to give your new Perralderia some TLC.
- Acclimatization: If you used a plastic bag or propagator, gradually introduce your new plant to normal household humidity over a week or two. Slightly open the bag each day, or remove the lid for longer periods.
- Watering: Continue to water when the top inch of soil feels dry. As the plant grows, you can start watering more thoroughly.
- Light: Keep your new plant in bright, indirect light. As it matures, you can slowly introduce it to more light if needed, but avoid harsh, direct sun that can scorch its leaves.
- Signs of Trouble: The most common issue is rot. If you notice mushy stems or blackening at the base, it’s usually a sign of overwatering. If you catch it early, you might be able to save the cutting by removing the rotted parts and repotting in fresh, drier soil. Yellowing leaves can be a sign of too much or too little water, or sometimes insufficient light.
A Little Encouragement to Close
Propagating plants is such a beautiful journey. It teaches us patience, observation, and the incredible resilience of nature. Don’t be discouraged if not every single cutting makes it. Every attempt is a learning experience, and each success is a tiny victory to celebrate. So go ahead, grab your pruners, and have fun creating more of these gorgeous Perralderia coronopifolia plants. I promise, the joy of watching them grow from a humble cutting is truly unmatched! Happy gardening!
Resource:
https://identify.plantnet.org/k-world-flora/species/Perralderia%20coronopifolia%20Coss./data