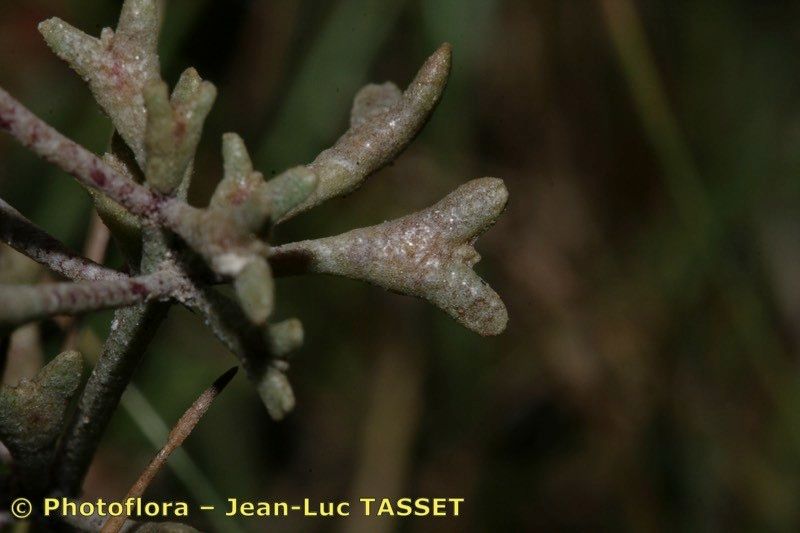
Oh, hello there! I’m so glad you’re curious about Atriplex pedunculata. I’ve been growing and admiring this beauty for years, and let me tell you, it’s got a certain understated charm that really grows on you. Its silvery foliage can add such a lovely texture to a garden, especially when it catches the light. Plus, the satisfaction of coaxing a brand new plant into existence from a tiny cutting or a division? Well, that’s just pure gardening joy, isn’t it?
Now, I know some propagation can feel a bit daunting, but Atriplex pedunculata is genuinely quite forgiving. While I wouldn’t say it’s a zero-effort plant for a complete novice, it’s definitely not a difficult one. With a little patience and these tips, I think you’ll find it a very rewarding experience.
The Best Time to Start
For Atriplex pedunculata, I find spring is absolutely the prime time. Think of it as giving your new plant the longest possible growing season to establish itself. Aim for late spring or early summer, when the plant is actively growing and the days are getting longer and warmer. This gives your cuttings the best chance to root happily.
Supplies You’ll Need
Here’s what you’ll want to have on hand:
- Sharp, clean pruning shears or a sharp knife: Essential for clean cuts, which helps prevent disease.
- A good-quality potting mix: I like a mix that drains well. Something with perlite or vermiculite is perfect. You can also add a bit of coarse sand.
- Rooting hormone (optional but recommended): This can give your cuttings a helpful boost. Look for one specifically for softwood or semi-hardwood cuttings.
- Small pots or trays: Clean ones, of course! Small 3-4 inch pots are usually ideal.
- A plastic bag or clear dome: To create a humid environment.
- Spray bottle: For misting.
- Labels: Don’t forget to label your projects! You’ll thank yourself later.
Propagation Methods
I find stem cuttings to be the most reliable and straightforward method for Atriplex pedunculata. Here’s how I do it:
- Select Your Cuttings: Look for healthy, non-flowering shoots on your parent plant. You want stems that are pliable but not too soft and new. Aim for cuttings that are about 4-6 inches long.
- Make the Cut: Using your clean shears or knife, make a cut just below a leaf node (where a leaf joins the stem). These nodes are packed with growth hormones and are where roots are most likely to form.
- Prepare the Cutting: Gently remove the lower leaves from the cutting, leaving just a few at the top. This prevents them from rotting in the soil and reduces water loss.
- Apply Rooting Hormone (If Using): Dip the cut end of the stem into your rooting hormone powder or gel. Tap off any excess.
- Plant Your Cuttings: Fill your small pots with your potting mix. Make sure it’s moist but not soggy. Use your finger or a pencil to poke a hole in the soil for each cutting. Gently insert the cut end of the cutting into the hole, up to the first set of remaining leaves. Firm the soil gently around the base.
- Provide Humidity: Water the soil lightly, then place the pot inside a clear plastic bag, sealing it with a twist tie. You can trim the bag if it’s too large. Alternatively, you can use a clear propagation dome. The goal is to create a mini-greenhouse effect.
- Find a Bright Spot: Place your cuttings in a bright location, but avoid direct, harsh sunlight, which can scorch the tender new growth and heat up the humidity dome too much. A bright windowsill is usually perfect.
The “Secret Sauce” (Pro Tips)
Here are a couple of things I’ve learned over the years that often make a difference:
- Don’t Drown Your Leaves: If you’re doing water propagation (which I generally don’t recommend for this one as it’s more prone to rot), make sure absolutely no leaves are submerged in the water. Roots will form above the water line, and you don’t want those leaves decaying and fouling the water. For soil cuttings, ensure no leaves are touching the soil surface either.
- Bottom Heat is Your Friend: While not strictly necessary, if you have a seedling heat mat, placing your propagation tray on it can significantly speed up rooting. That gentle warmth encourages root development without drying out the leaves too much. Just make sure it’s not too hot – think cozy, not scorching.
Aftercare & Troubleshooting
Once your cuttings have rooted, you’ll start to see new growth appearing at the tips. This is a great sign! You can gently tug on a cutting; if there’s resistance, you’ve got roots. Carefully unseal the plastic bag or remove the dome for a few days to acclimate them to drier air, then remove it completely.
Watering is key. Keep the soil consistently moist, but never waterlogged. Let the top inch of soil dry out slightly between waterings. Continue to keep them in a bright spot away from direct sun.
The most common problem you might encounter is rot. This usually happens if the cuttings are kept too wet and without enough air circulation. If you see a cutting turning black and mushy, sadly, it’s likely beyond saving. Remove it immediately to prevent it from spreading to other cuttings. Sometimes, if you’ve made multiple cuttings, losing one or two is just part of the process.
A Encouraging Closing
Growing new plants is a journey, and sometimes it feels like you’re just waiting and wondering. Be patient with your Atriplex pedunculata cuttings. Trust the process, keep them in good conditions, and celebrate those tiny signs of new life. Before you know it, you’ll have a whole new patch of these lovely silver beauties to enjoy or share. Happy propagating!
Resource:
https://identify.plantnet.org/k-world-flora/species/Atriplex%20pedunculata%20L./data