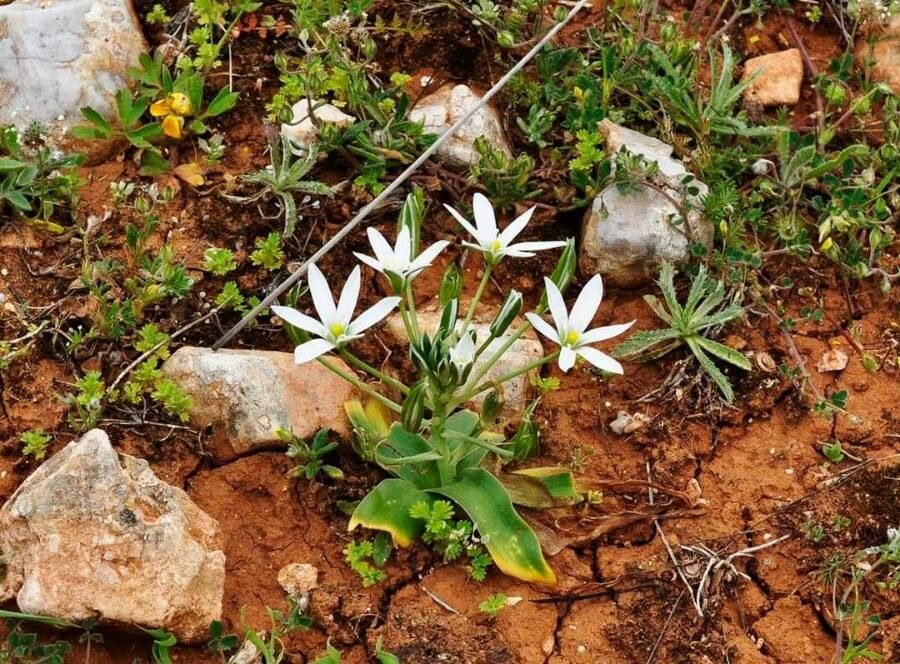
Pulling another glorious clump of Ornithogalum atticum from the earth, its starry white blossoms still faintly perfuming the air, always fills me with a quiet joy. This Mediterranean beauty, with its elegant, star-shaped flowers held aloft on slender stems, is truly a gem in any garden. And the best part? It’s surprisingly rewarding to multiply! If you’re looking to expand your collection or share these cheerful blooms with friends, propagating Ornithogalum atticum is a wonderful journey. Don’t let the fancy name fool you; while it requires a little attention, it’s a very achievable project for most gardeners, even if you’re just starting out.
The Best Time to Start
The sweet spot for tackling propagation of Ornithogalum atticum is late spring to early summer, right after the plant has finished its glorious bloom cycle. You’ll notice the foliage starting to naturally yellow and die back. This is when the bulb is sending its energy downwards, making it a perfect time to either divide the existing plant or to take cuttings from its developing offshoots. Waiting too long means the plant will be actively storing energy for its next season, and you don’t want to disrupt that significantly.
Supplies You’ll Need
Gathering your tools beforehand makes the process so much smoother. Here’s what I like to have on hand:
- Sterilized pruning shears or a sharp knife: Cleanliness is key to preventing disease.
- Well-draining potting mix: I usually use a blend of potting soil, perlite, and a bit of coarse sand. Think gritty!
- Small pots or seed trays: Whatever you have that’s clean and has drainage holes.
- Rooting hormone (optional but helpful): This can give your cuttings a little extra boost.
- Watering can with a fine rose: For gentle watering.
- Labels and a marker: To keep track of what you’ve planted.
Propagation Methods
For Ornithogalum atticum, my go-to methods are division and stem cuttings.
Method 1: Division – Multiplying from the Roots
This is likely the easiest and most successful way for beginners.
- Gently excavate your Ornithogalum atticum plant using a trowel or spade. Try to get the entire root ball.
- Carefully brush away as much of the soil as you can from the roots with your hands. You’re looking for the main bulb and any smaller bulbs or offsets attached to it.
- Using your sterilized pruning shears or knife, gently separate the offsets from the parent bulb. Each offset should have at least one small bulb and a few tiny roots.
- If the offsets have very long, straggly roots, you can trim them back slightly, but avoid removing too much.
- Plant each offset into its own small pot filled with your well-draining potting mix. Ensure the top of the bulb is just at or slightly below the soil surface.
- Water lightly to settle the soil around the roots.
Method 2: Stem Cuttings – A Bit More Advanced
This method takes a bit more patience but can be very rewarding.
- Once the flower stalks have faded, look for new green shoots emerging from the base of the parent plant. These are your best bet for cuttings.
- Using your sterilized shears, carefully cut a healthy shoot just above the soil line. Make sure it has a few leaves.
- Remove the lower leaves from the cutting, leaving just a couple at the tip. If the cutting is long, you can even cut it in half horizontally to create two potential cuttings.
- Dip the cut end of each cutting into rooting hormone, if you’re using it. Tap off any excess.
- Insert the cut end about an inch deep into a pot filled with your well-draining potting mix. You can place several cuttings in one pot, leaving a little space between them.
- Mist the cuttings lightly and cover the pot loosely with a clear plastic bag or dome to create a humid environment.
The “Secret Sauce” (Pro Tips)
- Don’t overwater! This is probably the biggest pitfall. Ornithogalum atticum, especially its bulbs, dislikes soggy feet. Water only when the top inch of soil feels dry.
- Bottom heat is your friend for cuttings. If you have a small propagator with a heat mat, placing your pots of cuttings on it can significantly speed up root development. It mimics the warmth of spring soil perfectly.
- Be patient with divisions. Sometimes, a divided offset might look a little sad for a week or two as it settles in. Trust the process! As long as the bulb isn’t mushy, it’s likely just recalibrating.
Aftercare & Troubleshooting
Once you see signs of new growth, you’re on the right track! For divided bulbs, continue to water sparingly and provide bright, indirect light. Repot them into slightly larger containers as they grow. For stem cuttings, keep them in their humid environment until you gently tug on a leaf and feel resistance – that’s a good sign roots have formed. Then, slowly acclimate them to normal humidity by gradually lifting the plastic cover over a few days.
The most common issue is rot, which usually stems from overwatering or poor drainage. If you notice your bulbs or cuttings becoming mushy, brown, or developing a foul smell, it’s likely rot. Unfortunately, this is often the end of the line for that particular plant. Prevention is always better!
A Encouraging Closing
So, there you have it – a straightforward path to multiplying your Ornithogalum atticum. Gardening is all about experimentation and learning, so don’t be discouraged if every single attempt doesn’t sprout. Enjoy the quiet satisfaction of nurturing these little bits of life, and remember that patience is one of the gardener’s most valuable tools. Happy propagating!
Resource: