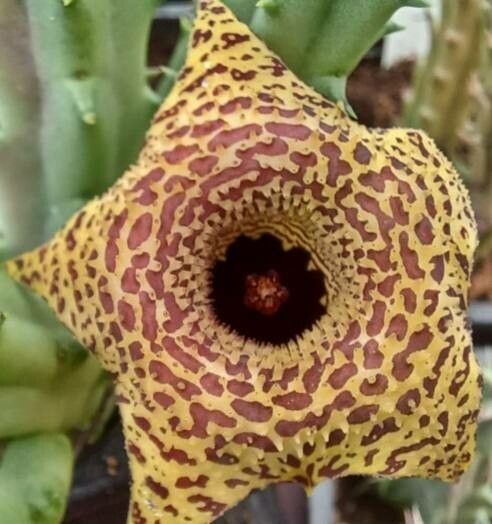
Ah, the Huernia mccoyi! If you’re drawn to the wonderfully weird and unique world of succulents, then this plant is likely to steal your heart. Its star-shaped flowers, often with a delightful star-like pattern and sometimes a subtle fragrance, are just captivating. Propagating them yourself is incredibly rewarding, like conjuring a new little marvel from a piece of the old. And good news for you beginners out there – yes, this is a really quite forgiving plant to multiply. You’ll be sharing these beauties before you know it!
When is the Best Time to Start?
For the best odds of success, I always reach for my snipping shears in the warmest months. Think late spring through summer, when your Huernia is actively growing. This energy boost means the cuttings are more likely to establish themselves quickly. Avoid trying to propagate in the dead of winter when everything is naturally slowing down.
What You’ll Need to Get Started
Gathering your supplies before you begin makes the whole process so much smoother. Here’s what I recommend having on hand:
- Sharp, clean pruning shears or a sharp knife: This is crucial for clean cuts that heal well.
- A well-draining potting mix: For succulents, this means something gritty. I like a blend of potting soil and perlite or pumice, about a 50/50 mix. You can also find pre-made cactus and succulent mixes.
- Small pots or trays: Terracotta pots are my go-to because they breathe, which helps prevent soggy soil.
- Rooting hormone (optional but helpful): This can give your cuttings a little nudge.
- A watering can with a fine spout or a spray bottle: Delicate cuttings need a gentle touch.
- Labels and a marker: You’ll want to keep track of what you’ve planted!
Let’s Get Propagating!
There are a couple of easy ways to increase your Huernia mccoyi collection.
Stem Cuttings: My Favorite Method
This is my most reliable and frequently used method.
- Select a healthy stem: Look for a mature, sturdy stem that’s at least a few inches long.
- Make a clean cut: Using your clean shears or knife, cut the stem cleanly where it meets another segment or the main body of the plant.
- Let it callous: This is super important. Place the cutting in a dry, bright spot away from direct sun for 2-7 days. You want the cut end to dry out and form a callus. This prevents rot when you plant it.
- Plant the cutting: Once calloused, gently poke the dry end into your prepared well-draining potting mix. You don’t need to bury it too deep, just enough for it to stand upright.
- Water sparingly: Wait a few days after planting before giving it its first light watering. You want the soil to be just slightly moist, not wet.
Water Propagation: A Visible Treat
This method lets you watch the roots grow, which is pretty neat!
- Prepare your cutting: Follow steps 1 and 2 above to take a healthy stem cutting. Skipping the callousing step here is okay for water propagation, but I still let it sit for a day just to be safe.
- Place in water: Put the cutting in a clean jar or glass with fresh water. Make sure only the cut end touches the water, or just barely kisses it. Don’t submerge the entire stem.
- Change the water regularly: Every few days, refresh the water to keep it clean and oxygenated.
- Wait for roots: You should start to see tiny roots emerging from the cut end within a few weeks.
- Pot it up: Once the roots are about an inch long, carefully transplant the cutting into your well-draining potting mix, treating it like a fresh cutting.
The “Secret Sauce” for Success
Over the years, I’ve picked up a few tricks that really seem to make a difference.
- Don’t let the leaves touch the water in water propagation. I’ve seen many a cutting succumb to rot when the stem sat in stagnant water. Just the cut end is key!
- Bottom heat can be a game-changer. If you’re propagating stem cuttings, placing the pots on a gentle seedling heat mat can really speed up root development. It mimics the warmth of summer.
- Be patient with the callousing. I know it’s tempting to rush, but that dry callus is your best defense against rot. Skipping this step is often where beginners run into trouble.
Aftercare and When Things Go Wrong
Once your cuttings have rooted (you can gently tug on them after a few weeks – if there’s resistance, you have roots!), you can start treating them like any other young Huernia.
- Water when the soil is dry. Stick your finger into the soil; if it feels dry about an inch down, it’s time for a drink.
- Provide bright, indirect light. Too much intense sun can scorch young, tender plants.
- Watch out for rot! The most common problem you’ll encounter is rot. If a cutting turns mushy, dark, or smelly, sadly, it’s likely a goner. Make sure your soil is draining well and you’re not overwatering. It’s a common beginner mistake!
Keep Growing!
Propagating Huernia mccoyi is such a delightful way to expand your collection and share the joy of these unique plants. Don’t be discouraged if a cutting doesn’t make it – it happens to all of us! Just remember to be patient, give them good drainage, and enjoy the process of watching new life emerge. Happy gardening!
Resource:
https://identify.plantnet.org/k-world-flora/species/Huernia%20mccoyi%20Plowes/data