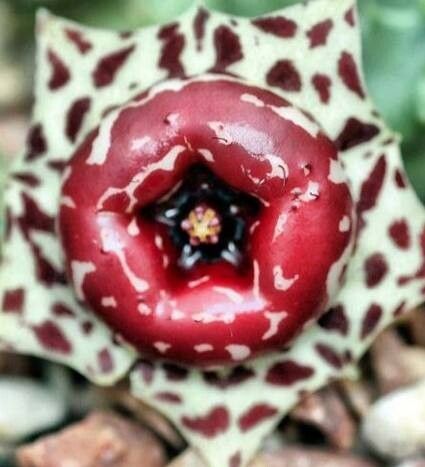
Oh, Huernia plowesii! If you’re looking for a plant that’s a little bit quirky, a whole lot of fascinating, and surprisingly low-maintenance once it gets going, you’ve found a real gem. They’re the stars of the succulent world for their bizarre, star-shaped blooms that often have a wonderfully earthy, not-so-sweet fragrance (a delightful surprise for the senses, I always say!). And the best part? Propagating them is a joy, and something even those just dipping their toes into the gardening pool can master with a little guidance. I find it exceptionally rewarding to watch a tiny cutting transform into a thriving new plant.
The Best Time to Start
When it comes to Huernia plowesii, think about when things are really pushing growth. Spring and early summer are your golden tickets. This is when the plant is actively growing, and cuttings taken during this period have the best chance of establishing roots quickly. Avoid propagating during the plant’s dormant period in winter. Patience is key here; you want a lively plant to work with!
Supplies You’ll Need
Gathering your tools beforehand makes the whole process so much smoother. Here’s what I always have on hand:
- Well-draining potting mix: A cactus or succulent mix is perfect. You can also make your own by combining equal parts potting soil, perlite, and coarse sand.
- Sharp, clean pruning shears or a knife: A clean cut is crucial to prevent disease and encourage good rooting.
- Rooting hormone (optional, but recommended): This can give your cuttings an extra boost, especially if you’re a newer propagator.
- Small pots or propagation trays: Make sure they have drainage holes!
- Watering can or spray bottle: For gentle watering.
- Gloves (optional): Some succulents have a milky sap that can be irritating.
Propagation Methods
Huernia plowesii are wonderfully amenable to propagation from stem cuttings. It’s straightforward, and you usually get great results.
1. Taking Stem Cuttings:
Start by finding a healthy, mature stem on your Huernia. Look for a segment that’s at least a few inches long. Using your sharp, clean shears or knife, make a cut just above an areole (the little bumps where leaves or flowers emerge). You want to take a piece that has at least two or three segments.
2. Letting Cuttings Callus:
This is a vital step. Don’t be tempted to pot them up right away! Place your cuttings in a dry, airy spot out of direct sunlight for several days to a week, or until the cut end has dried and callused over. This prevents rot when the cutting is planted. It looks a bit like a dry scab forming.
3. Planting Your Cuttings:
Once callused, you can insert the cut end into your prepared well-draining potting mix. The goal is to have the bottom segment or two buried. Don’t pack the soil too tightly; you want air to circulate. If you’re using rooting hormone, dip the callused end into the powder before planting.
4. Watering Gently:
After planting, give the soil a light watering. You want it to be moist, but not soggy. Don’t drench it! I often use a spray bottle for the first few waterings to avoid disturbing the cutting.
The “Secret Sauce” (Pro Tips)
Over the years, I’ve learned a few tricks that can really tip the scales for success.
- Think “warm toes”! Huernias love a bit of warmth from below, especially when they’re trying to root. If you have a seedling heat mat, placing your pots on it can significantly speed up root formation. This is especially helpful in cooler climates.
- Less is often more with water. When watering cuttings, err on the side of caution. It’s much easier to revive an underwatered succulent than to save one from rot. Wait until the soil is dry to the touch before watering again.
- Don’t be afraid to wiggle (gently!). After a few weeks, you can give a gentle tug on a cutting. If there’s resistance, roots are forming! Don’t pull it out entirely to check; a tiny wiggle is usually enough to tell.
Aftercare & Troubleshooting
Once you start seeing signs of new growth or feel that resistance when wiggling, congratulations! You’ve got roots.
Continue to water only when the soil is dry. You can gradually introduce your new plants to brighter light, but avoid direct midday sun for the first few months, as they can scorch. Acclimate them slowly.
The biggest problem you’ll likely encounter is rot. This usually happens if the cuttings are overwatered, kept in soil that doesn’t drain well, or if they haven’t callused properly. If a cutting looks mushy, black, or smells foul, it’s unfortunately a goner. Pull it out and discard it to prevent it from affecting other cuttings. Sometimes, a stem cutting might not root. Don’t be discouraged! Just try again with another piece. Often, a bit of rot can be a sign of too much moisture, so let those remaining cuttings dry out a bit more before planting.
A Encouraging Closing
Propagating Huernia plowesii is such a rewarding way to expand your collection or share these fascinating plants with friends. Trust the process, be patient with your little cuttings, and enjoy watching them take hold. Every successful propagation feels like a small victory, and I’m excited for you to experience that! Happy gardening!
Resource:
https://identify.plantnet.org/k-world-flora/species/Huernia%20plowesii%20L.C.Leach/data