Hello fellow plant lovers! It’s so good to have you here. Today, we’re diving into the fascinating world of Haworthia semiviva, a little succulent gem that’s captured my heart over the years. If you’re drawn to intricate leaf patterns and that satisfying feeling of nurturing life from a tiny piece of a plant, then you’re in for a treat. Propagating these beauties is incredibly rewarding, and I’m thrilled to guide you through it.
Why Haworthia Semiviva Steals the Show
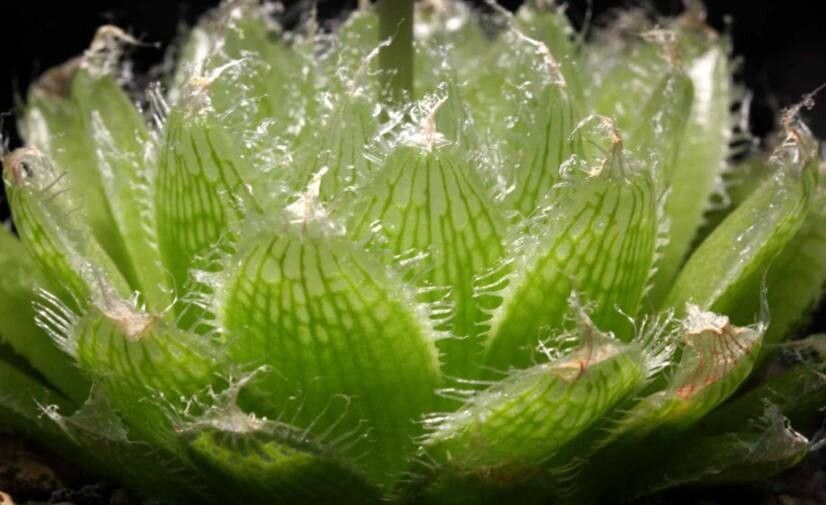
Haworthia semiviva, with its delicate, jewel-like leaves, looks like it’s been plucked straight from a fairytale. The translucent “windows” on the leaf tips are simply mesmerizing. And the best part? Bringing new Haworthias into the world from existing ones is surprisingly achievable! For beginners, I’d say Haworthia semiviva is moderately easy to propagate. It requires a little attention to detail, but once you get the hang of it, you’ll be hooked.
The Prime Time to Propagate
My favorite time to start propagating Haworthias, including our semiviva friend, is during their active growing season. This generally falls in the spring and early summer. You’ll see new growth really kicking in, and this vigorous energy translates beautifully into successful propagation. Wait until your parent plant is looking healthy and well-established before you start.
Your Propagation Toolkit
Gathering the right tools makes all the difference. Here’s what I always have on hand:
- Well-draining soil mix: A cactus or succulent mix is a must. I often add extra perlite or pumice for even better aeration.
- Clean, sharp pruning shears or a sharp knife: For making clean cuts.
- Small pots or trays: Terracotta pots are fantastic because they breathe.
- Rooting hormone (optional but helpful): A little dab can boost root development.
- String or twine (for stem cuttings): Useful for securing them if needed.
- Spray bottle: For gentle watering.
- Patience! This is the most crucial tool.
Bringing New Haworthias to Life
There are a couple of main ways to get more Haworthia semiviva, and I find division to be the most straightforward and successful for this particular variety.
Method 1: The “Offshoot” Harvest (Division)
Haworthia semiviva often produces cute little baby plants, called pups or offshoots, around its base.
- Gently remove the plant from its pot. Turn it on its side and carefully ease it out.
- Inspect the base. Look for smaller rosettes that have their own roots where they connect to the mother plant.
- Separate the pups. Using your clean knife or pruning shears, carefully cut or gently pull away the pup from the mother plant. Try to get as many of its own roots as possible. If a pup doesn’t have roots yet, don’t worry, it will grow them!
- Let them callous. This is a super important step! Place the separated pups in a dry, bright spot away from direct sun for 2-3 days. This allows the cut end to dry out and form a protective scab, preventing rot.
- Pot them up. Fill your small pots with your well-draining soil mix. Make a little divot in the center and plant the calloused pup. If it has roots, gently spread them out. If not, just bury the base slightly.
- Water sparingly. Wait a few days after potting before giving them their first light watering. Then, water only when the soil is completely dry.
The “Secret Sauce”: My Insider Tips
Here are a couple of things I’ve learned through trial and error that really make a difference:
- Don’t overwater newly potted cuttings: This is the number one killer of succulent propagation. They have no roots yet to absorb moisture, so sitting in wet soil is a recipe for rot. Err on the side of too dry rather than too wet.
- Provide a little warmth: If you’re propagating in cooler months or want to give things a boost, placing your pots on a seedling heat mat can significantly speed up root development. Just the gentle warmth encourages growth.
Nurturing Your New Sprouts
Once your new Haworthias start to show signs of rooting – you might see tiny roots peeking out of the drainage holes or the plant will feel more secure when gently tugged – you can begin to treat them a bit more like mature plants.
- Watering: Continue to water only when the soil is completely dry. As they grow stronger, they’ll tolerate slightly more frequent watering, but always check the soil first.
- Light: They’ll need bright, indirect light. Too much direct sun can scorch their delicate leaves.
- Troubleshooting: The most common issue is rot, which looks like mushy, discolored leaves, often starting at the base. This is almost always due to overwatering. If you suspect rot, immediately stop watering, allow the soil to dry out completely, and if possible, remove the affected plant and let it air dry for a few days before repotting in fresh, dry soil. Another sign of failure is a cutting that just shrivels and never roots – this can happen if it’s too dry or simply not viable.
Happy Propagating!
Growing new plants from cuttings is a magical experience. It takes a little patience, a touch of observation, and a whole lot of love, but the result is so worth it. Seeing those tiny leaves unfurl and a new little Haworthia semiviva take hold is truly one of gardening’s greatest joys. Go ahead, give it a try – you’ve got this!
Resource: