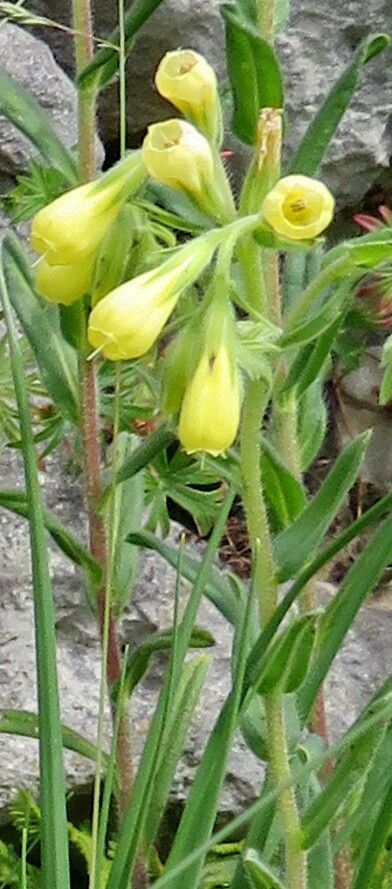
Oh, hello there, fellow plant lover! It’s so lovely to have you join me at my virtual kitchen table. Today, we’re diving into the charming world of Onosma pseudoarenaria, also known as a delightful creeping Speedwell. If you’ve ever seen those gorgeous, low-growing mats adorned with dainty blue flowers, you know exactly why this plant captures our hearts. It’s incredibly rewarding to witness its delicate blooms carpet a garden bed or spill out of a pot.
Now, about propagating it. Is it a walk in the park or a bit of a challenge? Honestly, I’d say Onosma pseudoarenaria falls into the “moderately easy” category. With a little patience and the right approach, you’ll be well on your way to a whole collection of these beauties!
The Best Time to Start
For the highest success rate with Onosma pseudoarenaria, I always reach for my trusty pruning shears in late spring or early summer. This is when the plant is actively growing and has plenty of fresh, healthy stems to work with. Waiting until the new growth has become slightly firm, but not woody, is key. Think of it as the “just right” stage – not too soft and floppy, but not stiff and old.
Supplies You’ll Need
Gathering your tools beforehand makes the whole process so much smoother. Here’s what I always have on hand:
- Sharp Pruning Shears or a Craft Knife: Clean cuts are crucial for preventing disease.
- A Good Quality Potting Mix: I prefer a well-draining mix. A blend of peat moss, perlite, and a little bit of compost works wonders. You can also buy specialized seedling mixes.
- Small Pots or Seed Trays: Choose containers with drainage holes! This is non-negotiable.
- Rooting Hormone (Optional but Recommended): A little dip in rooting hormone can significantly speed up the process and improve your success rate.
- Watering Can with a Fine Rose: Gentle watering is essential for newly propagated plants.
- Clear Plastic Bag or Propagator Lid: This helps maintain humidity.
- Labels: Don’t skip this! You’ll thank yourself later when you have multiple new plants.
Propagation Methods
Onosma pseudoarenaria is happiest when propagated from stem cuttings. It’s a tried-and-true method that gives you a great start.
- Take Your Cuttings: Gently select healthy, non-flowering stems from your established plant. Using your clean shears or craft knife, cut sections about 4-6 inches long. Make your cuts just below a leaf node (where a leaf attaches to the stem).
- Prepare the Cuttings: Remove the lower leaves from each cutting, leaving just a couple at the very top. This prevents the leaves from rotting when they’re buried or sitting near moisture. If you’re using rooting hormone, dip the cut end into it now.
- Plant Your Cuttings: Fill your small pots or trays with your prepared, well-draining potting mix. Insert the cuttings about 1-2 inches deep into the soil, ensuring the leaf nodes are covered. Gently firm the soil around them.
- Create a Humid Environment: Water the soil thoroughly but gently. Then, cover the pots with a clear plastic bag or a propagator lid to create a mini-greenhouse. This humidity is vital for encouraging root development.
The “Secret Sauce” (Pro Tips)
Now for a couple of little tricks I’ve picked up over the years. These small adjustments can make a big difference!
- Bottom Heat is Your Best Friend: While not strictly necessary, placing your pots on a heat mat can significantly speed up root formation. Onosma pseudoarenaria loves a bit of warmth for its roots.
- Don’t Get Lazy with Airflow: Even though we’re creating humidity, it’s important not to let that environment become stagnant. Lift the plastic bag for a few minutes each day to allow for fresh air circulation. This helps prevent fungal issues.
- Patience is a Virtue (Especially with Leaves Touching Water): If you happen to be trying a very simple water propagation method (less ideal for this plant, but possible for a quick experiment), ensure no leaves are submerged in the water. Even a single leaf touching the water can lead to rot.
Aftercare & Troubleshooting
Once your cuttings have developed a good root system – you’ll know they have roots when you gently tug and feel resistance – it’s time for a bit of TLC.
- Acclimatize: Gradually remove the plastic cover over a few days to allow the new plants to adjust to normal humidity levels.
- Water Wisely: Keep the soil consistently moist but not waterlogged. Overwatering is the quickest way to invite disaster.
- Bright, Indirect Light: Place your newly rooted plants in a spot that receives bright, indirect sunlight. Direct sun can scorch their delicate new leaves.
Now, what if things go wrong? The most common culprit is rot. If you see your cuttings turning mushy and dark, or if the soil stays saturated for too long, that’s a sign of too much moisture and not enough airflow. Over-worrying about watering is far better than underwatering at this stage. If you see signs of rot, try to remove the affected cutting immediately and ensure the remaining soil is not too wet.
A Little Encouragement
Propagating plants is a journey, and every plant parent has their share of successes and occasional setbacks. Be kind to yourself, embrace the learning process, and celebrate every little root that forms. Soon enough, you’ll have a delightful host of Onosma pseudoarenaria to share with friends or to simply enjoy in your own garden. Happy propagating!
Resource:
https://identify.plantnet.org/k-world-flora/species/Onosma%20pseudoarenaria%20Schur/data