Hello my fellow garden enthusiasts!
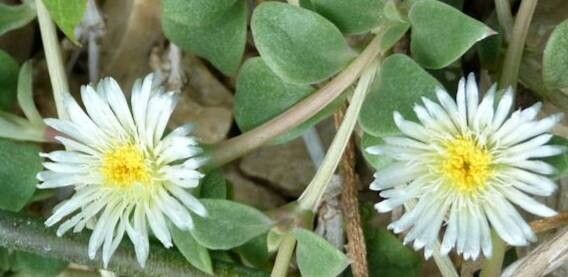
There’s something truly special about creating new life in the garden, isn’t there? Today, I want to share my love for a delightful little succulent, Delosperma tradescantioides. Often called a hardy ice plant, it’s a fantastic groundcover with glistening, jewel-like flowers that practically sparkle in the sun. Watching these tiny gems unfurl is pure joy. And the best part? Propagating them is not only rewarding, but it’s also surprisingly straightforward, even for those just dipping their toes into the world of propagation.
The Best Time to Start
For Delosperma tradescantioides, the sweet spot for propagation is spring and early summer. This is when the plant is actively growing after its winter rest, and the warmer temperatures provide the perfect environment for cuttings to root. Starting then gives your new plants plenty of time to establish themselves before the cooler weather arrives.
Supplies You’ll Need
Here’s a little kit to get you started:
- Sharp Pruning Shears or a Knife: Clean cuts are essential.
- Well-Draining Potting Mix: I always use a mix of cactus and succulent soil with perlite or coarse sand added for extra drainage. This is non-negotiable for succulents!
- Small Pots or Trays: With drainage holes, of course.
- Rooting Hormone (Optional but Recommended): A light dusting can speed things up.
- Watering Can with a Fine Rose: Gentle watering is key.
- A Sunny Spot or Grow Light: For those crucial first few weeks.
Propagation Methods
Delosperma tradescantioides is a champion of propagation, and here are my favorite ways to make more of these beauties:
Stem Cuttings: My Go-To Method
This is my personal favorite for these plants.
- Take Your Cuttings: Using your clean shears, snip off healthy stems that are at least 2-3 inches long. Look for stems that are firm, not floppy or overly woody.
- Prepare the Cuttings: Gently remove the lower leaves from the bottom inch of each cutting. Let the cuttings callus over for a day or two in a cool, dry place. This step is crucial to prevent rot. You’ll see a dry, slightly hardened end where you made the cut.
- Dip in Rooting Hormone (If Using): Lightly dip the callused end into rooting hormone. Tap off any excess.
- Plant the Cuttings: Fill your small pots with your well-draining mix. Make a small hole with a pencil or your finger and insert the callused end of the cutting. Gently firm the soil around it.
- Water Lightly: Give the soil a very light watering. You want it to be moist, not soggy.
Water Propagation: A Watchful Eye
While I prefer soil for these, water propagation can work.
- Prepare the Cuttings: Follow steps 1 and 2 above, but don’t let the cuttings callus quite as long – just a few hours to a day is fine.
- Place in Water: Put the cuttings in a small vase or jar filled with clean water. Make sure no leaves are submerged below the waterline. Leaves sitting in water will rot.
- Find a Bright Spot: Place the jar in a bright, indirect light location.
- Change Water Regularly: Change the water every few days to keep it fresh and prevent bacterial growth.
- Plant When Roots Appear: Once you see roots forming, about an inch long, carefully transplant them into your well-draining potting mix as described in the stem cutting method.
The “Secret Sauce” (Pro Tips)
Here are a couple of tricks I’ve learned over the years that make a real difference:
- Bottom Heat is Your Friend: If you can, place your pots on a heating mat designed for plants. This gentle warmth from below encourages root development much faster than just relying on ambient room temperature. It’s like giving your cuttings a cozy little spa treatment!
- Don’t Overwater, Ever! This is the golden rule for succulents. It’s far better to err on the side of too dry than too wet. I usually wait until the soil has dried out considerably before watering again after planting cuttings.
Aftercare & Troubleshooting
Once your cuttings have developed a good root system (you can gently tug on them to feel resistance, or if you can see roots through drainage holes), it’s time to treat them like mature plants. Water them thoroughly when the soil starts to dry out. Keep them in bright, indirect light for a few weeks before gradually introducing them to more sun.
The most common issue you might encounter is rot. This is usually a sign of overwatering or insufficient drainage. If you see wilting, mushy stems, or a blackening at the base of the cutting, it’s likely rot. Unfortunately, what’s rotted usually can’t be saved. To prevent it, remember my “secret sauce” about well-draining soil and careful watering!
Keep Nurturing
See? Not so intimidating, is it? Propagating Delosperma tradescantioides is a wonderful way to expand your garden and share these little sun-kissed treasures with friends. Be patient with the process. Some cuttings root faster than others. Enjoy watching those tiny roots emerge and the first new leaves appear. Happy propagating!
Resource: