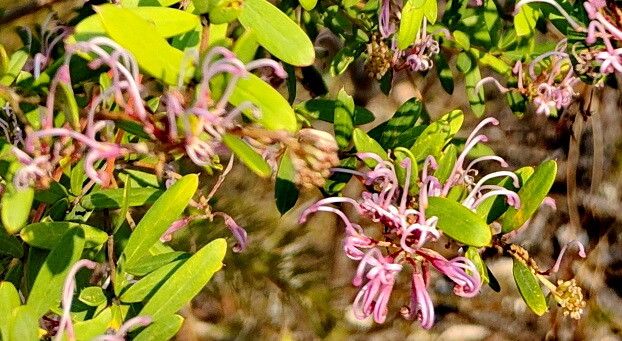
Hello, fellow garden enthusiasts! Today, we’re diving into the wonderful world of propagating Grevillea sericea, also known as the Pink Spider Flower. If you’ve ever admired this stunner in someone’s garden – with its delicate, brush-like pink flowers that attract all sorts of delightful birds and buzzing friends – you’re not alone. Its unique beauty and hardiness make it a real gem. And the best part? You can have more of them!
Propagating Grevillea sericea is a truly rewarding experience. Watching a tiny cutting transform into a thriving plant is one of gardening’s greatest joys. For beginners, I’d say it’s moderately easy, especially if you choose the right method and timing. A little patience and attention go a long way with these beauties.
The Best Time to Start
Timing is everything, isn’t it? For Grevillea sericea, the sweet spot for propagation is generally late spring through early summer. This is when the plant is actively growing and has plenty of energy to put into developing new roots. You’re looking for healthy, semi-hardwood stems – those that are no longer brand new and soft, but not yet old and woody.
Supplies You’ll Need
Gathering your tools makes the whole process smoother. Here’s what I like to have on hand:
- Sharp pruning shears or a clean knife: For making precise cuts.
- Rooting hormone (optional but recommended): A powder or gel that encourages root development.
- A well-draining potting mix: I prefer a mix of coarse sand, perlite, and a little peat moss for good aeration.
- Small pots or trays: Clean pots with drainage holes are essential.
- A clear plastic bag or propagator lid: To create a humid environment.
- Watering can with a fine rose: For gentle watering.
- Gravel or pebbles (optional): For the bottom of pots to improve drainage.
Propagation Methods
I find the most reliable method for Grevillea sericea is stem cuttings. It’s straightforward and gives you a great chance of success.
Here’s how I do it:
- Take Your Cuttings: Using your sharp shears, select healthy stems from your mature Grevillea. Look for pieces about 4-6 inches long. Make a clean cut just below a leaf node (where a leaf attaches to the stem). Remove the lower leaves, leaving just a few at the top.
- Prepare the Cuttings: If you’re using rooting hormone, dip the cut end of the stem into the powder or gel, tapping off any excess.
- Plant Your Cuttings: Fill your small pots with your well-draining potting mix. Make a small hole in the center of the mix with a pencil or your finger. Gently insert the prepared cutting into the hole, ensuring the leaf nodes are below the surface of the soil. Firm the soil gently around the cutting.
- Create a Humid Environment: Water the soil lightly. Then, cover the pot with a clear plastic bag, securing it around the base with a rubber band. You want to trap humidity – it’s like a mini-greenhouse for your cutting. If you have a propagator lid, that works beautifully too.
The “Secret Sauce” (Pro Tips)
Now, for a few things I’ve learned over the years that can really boost your success:
- Don’t Skimp on Drainage: Grevilleas hate wet feet. This is non-negotiable. Ensure your pots have ample drainage holes and that your soil mix is super gritty and free-draining. If your pots don’t have holes, I just can’t stress this enough: drill some!
- Bottom Heat is Your Friend: If you can, place your pots on a heat mat or in a warm spot. Warm soil encourages root formation much faster than cool soil. It really gives those little roots a nudge to get going.
- Patience is Key with Grevillea: They can be a bit tardy with root development. Don’t be tempted to pull them out to check for roots too early. Give them at least 4-6 weeks in their humid environment before you even think about peeking.
Aftercare & Troubleshooting
Once you see signs of new growth – tiny leaves or buds forming at the top – that’s a good indicator your cutting has rooted!
- Gradual Acclimatization: Slowly start to introduce your rooted cutting to less humid conditions. Open the plastic bag a little each day for a few days, or lift the propagator lid. This prevents shock.
- Gentle Watering: Continue to water gently, ensuring the soil stays consistently moist but not soggy.
- Troubleshooting: The most common issue is rot. If your cutting looks mushy, discolored, or completely wilted and gone limp, it’s likely rotted. This usually happens from too much moisture and poor drainage or airflow. If you see any signs, remove the affected cutting immediately to prevent it from spreading. Another issue can be cuttings simply not rooting, which can be due to taking cuttings at the wrong time, inadequate humidity, or lack of bottom heat. Don’t be discouraged; just try again!
A Encouraging Closing
Propagating Grevillea sericea is a journey, and like any good gardening adventure, it’s filled with learning. Be patient with yourself and your cuttings. Celebrate every little success, and don’t be disheartened by the ones that don’t make it. Each attempt is a lesson learned. Happy propagating – and enjoy those beautiful new Pink Spider Flowers!
Resource:
https://identify.plantnet.org/k-world-flora/species/Grevillea%20sericea%20(Sm.)%20R.Br./data