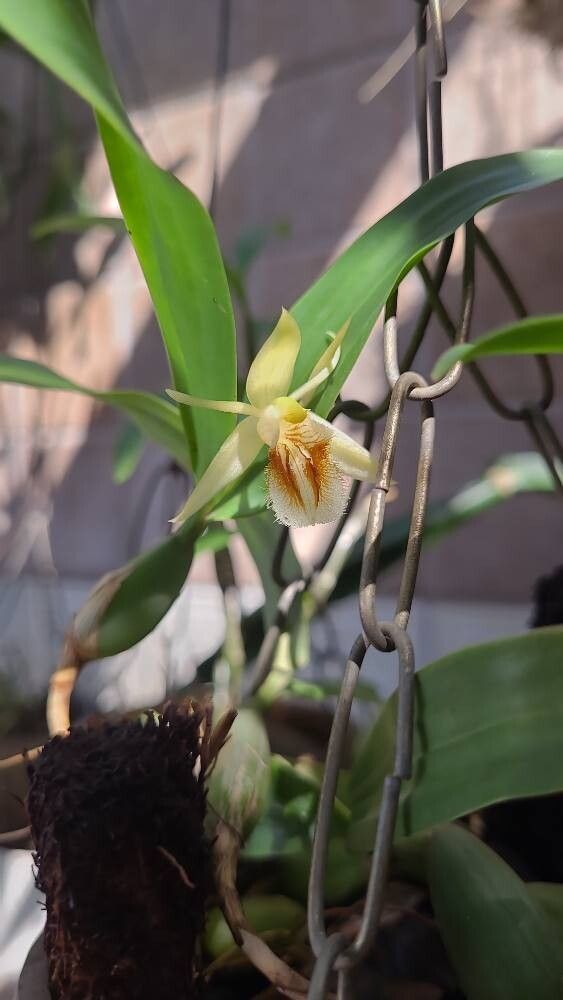
Oh, Coelogyne fimbriata! What a lovely orchid to add to your collection. I remember the first time I saw one, with its delicate, fringed petals and that wonderful spicy fragrance. They have this understated elegance that just draws you in. Propagating them is really satisfying, almost like creating a little piece of orchid magic yourself. Now, is Coelogyne fimbriata a walk in the park for a total beginner? Mmm, I’d say it’s more of a gentle stroll than a hike. It requires a bit of attention, but with a few pointers, you’ll be well on your way.
The Best Time to Start
For Coelogyne fimbriata, the sweet spot for propagation is spring or early summer. This is when the plant is actively growing after its resting period. You’ll see new pseudobulbs forming and growth really taking off. Trying to propagate when the plant is dormant is like asking a sleepy cat to run a marathon – it just won’t be enthusiastic!
Supplies You’ll Need
Here’s what you’ll want to have on hand before you begin:
- Sharp, sterile pruning shears or a clean knife: Essential for making clean cuts.
- Cinnamon powder or a fungicide: To help prevent infection at the cut sites.
- A well-draining orchid mix: Bark-based mixes are ideal. For Coelogyne, a finer grade bark with a bit of perlite for aeration works beautifully.
- Small pots or seedling trays: Clean and with drainage holes.
- Watering can with a fine rose: To water gently.
- Optional: Rooting hormone: While not strictly necessary for all orchids, some growers find it beneficial.
- Optional: Clear plastic bags or a small humidity dome: To maintain humidity around cuttings.
Propagation Methods: Making New Plants
The most successful way to propagate Coelogyne fimbriata is through division. These orchids grow in clumps, and you can gently separate these clumps into smaller, viable divisions.
Here’s how I do it:
- Gently remove the orchid from its pot. You might need to carefully loosen the edges with a knife if it’s stuck.
- Clean off as much of the old potting medium as you can. I usually do this under a running tap, being careful not to damage the roots. This lets you see the structure of the plant clearly.
- Examine the pseudobulbs and their connections. Look for sections that have at least two to three healthy pseudobulbs and a good number of roots originating from that section.
- Use your sharp, sterile shears or knife to carefully cut between the divisions. Be as gentle as possible to minimize root damage. If you encounter significant root tangles, it’s okay to sacrifice a few roots for a clean separation.
- Inspect the cut surfaces. Make sure there’s no mushy or discolored tissue, which can indicate rot.
- Dust the cut surfaces with cinnamon powder or fungicide. This is a crucial step to prevent fungal infections. Allow the cuts to air dry for a few hours if possible, or at least until they look calloused.
- Pot up your new divisions. Place them in their new pots (you can use the same size or slightly smaller than the original) and fill around them with your fresh, well-draining orchid mix. Ensure the pseudobulbs are sitting just at or slightly above the surface of the mix.
The “Secret Sauce” (Pro Tips)
Here are a couple of things I’ve learned over the years that make a big difference:
- Don’t rush the pot-out. After dividing and dusting with cinnamon, I often let the divisions sit out on a dry surface for 24-48 hours before potting. This allows the cut surfaces to fully callus over, significantly reducing the risk of rot.
- Water sparingly at first. After potting, resist the urge to water immediately and deeply. I usually wait 3-5 days before their first light watering. This gives any compromised roots time to heal and further prevents an overly moist environment that can lead to rot.
Aftercare & Troubleshooting
Once your new divisions are potted, give them a light watering. Don’t keep them soggy!
- Light: Place them in bright, indirect light. Avoid direct sun, which can scorch delicate new growth.
- Humidity: They appreciate higher humidity, so consider placing them in a terrarium or using a humidity tray. If you’re using a plastic bag to create a mini-greenhouse effect, open it daily for a few minutes to allow for air circulation.
- Watering: Water when the potting medium is almost dry. It’s better to underwater slightly than to overwater at this stage.
The most common sign of failure is rot. If you see pseudobulbs turning black and mushy, or leaves wilting and yellowing rapidly without new growth, rot is likely the culprit. If you catch it early enough, you might be able to cut away the rotted tissue and re-pot into fresh, dry mix, but often, it’s sadly too late. The key is prevention: clean tools, cinnamon, and careful watering.
A Encouraging Closing
Don’t be discouraged if your first attempt isn’t a showstopper. Propagation takes practice and a good dose of patience. Every gardener has had plants that just didn’t make it, and that’s okay! The process of nurturing a new orchid is incredibly rewarding. So, grab your tools, take a deep breath, and enjoy the journey of creating more of these beautiful Coelogyne fimbriata to share or cherish. Happy growing!
Resource:
https://identify.plantnet.org/k-world-flora/species/Coelogyne%20fimbriata%20Lindl./data