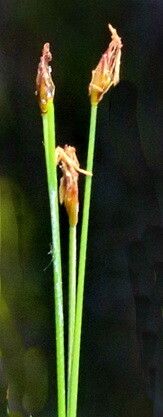
Hey there, fellow garden enthusiasts! I’m so excited to chat with you today about a plant that has completely charmed me over the years: Eleocharis quinqueflora. You might know it as Five-Flowered Spikerush, and oh, it’s a beauty! Its delicate, grass-like foliage adds such a lovely texture to any arrangement, whether you’re designing a miniature pond scene, a terrarium, or just want a touch of green elegance on your windowsill. Plus, there’s a special joy in coaxing new life from existing plants, isn’t there? And the good news is, Eleocharis quinqueflora is genuinely quite forgiving, making it a fantastic candidate for those of you dipping your toes into propagation for the first time.
The Best Time to Start
For the most vigorous results, I’ve found that propagating Eleocharis quinqueflora is best done in the late spring or early summer. This is when the plant is actively growing and has plenty of energy to put into its new babies. You’ll see the most vigorous root development when the weather is warm and the days are long.
Supplies You’ll Need
Here’s what you’ll want to have on hand before you begin your propagation adventure:
- Sharp, clean pruning shears or a sharp knife: For making clean cuts.
- Well-draining potting mix: I love a mix of peat moss, perlite, and a bit of sand. For aquatic varieties, a lean, inert substrate like aquatic soil or even sand will work.
- Small pots or trays: For your new cuttings.
- Clear plastic bags or a propagator lid: To create a humid environment.
- Watering can or spray bottle: For gentle watering.
- (Optional) Rooting hormone: Especially helpful if you’re finding root development a bit slow.
Propagation Methods
Eleocharis quinqueflora is wonderfully adaptable, and I’ve had great success with a couple of straightforward methods.
Division
This is my favorite, most reliable method for Eleocharis quinqueflora. It’s like giving your established plant a little haircut and getting bonus plants in return!
- Gently remove your Eleocharis quinqueflora from its pot. If it’s planted in a water feature, carefully lift it out, keeping as much of the root system intact as possible.
- Assess the root ball. You’ll see clumps of growth emerging.
- Using your fingers or a clean knife, carefully separate the plant into smaller sections. Aim for sections that have both roots and some healthy foliage. Don’t be afraid to be a little firm, but avoid tearing the roots if you can help it.
- Repot the new divisions into their own small pots filled with your chosen potting mix. If you’re dealing with the aquatic form, pot them into a substrate suitable for their needs.
- Water thoroughly and place them in a bright spot out of direct sunlight.
Stem Cuttings (for terrestrial/semi-aquatic varieties)
This method is great when you have a particularly vigorous stem you want to multiply.
- Select a healthy, non-flowering stem. Using your sharp shears, make a clean cut just below a leaf node. You want a cutting that’s a few inches long.
- (Optional) If you’re using rooting hormone, dip the cut end into it.
- Insert the cut end about an inch deep into your moist potting mix. If you have multiple cuttings, give them a little space.
- Mist the cuttings gently with water and cover the pot with a clear plastic bag or propagator lid to trap humidity.
- Place in bright, indirect light.
The “Secret Sauce”
Here are a couple of little tricks I’ve learned that really boost my success rates.
- When doing water propagation (which works well for some varieties), make sure the leaf tips don’t touch the water. This can lead to rot rather than rooting. Just the cut stem needs to be submerged.
- For cuttings, bottom heat makes a world of difference! Placing your pots on a seedling heat mat can significantly speed up root formation. It mimics that lovely warm soil of spring.
Aftercare & Troubleshooting
Once your new divisions or cuttings have started to show signs of life – you’ll see new growth emerging or feel a gentle tug when you lightly tug on a cutting – it’s time to transition them.
- Gradually introduce them to more light over a week or two.
- Continue to keep the soil consistently moist but not waterlogged. For aquatic types, ensure they are in their appropriate water level.
- If you used a plastic bag, begin to open it up for longer periods each day to reduce humidity gradually, preventing shock.
The main thing to watch out for is rot. If your cuttings or divisions turn mushy and black, that’s a tell-tale sign of too much moisture and poor air circulation. If you spot this, move the affected parts away immediately and improve drainage or airflow.
A Little Patience Goes a Long Way
Propagating Eleocharis quinqueflora is a rewarding journey. Don’t get discouraged if your first few attempts aren’t perfect. Every gardener learns by doing! Enjoy the process of nurturing these tiny new plants, and soon you’ll have a whole collection to share or enjoy. Happy growing!
Resource: