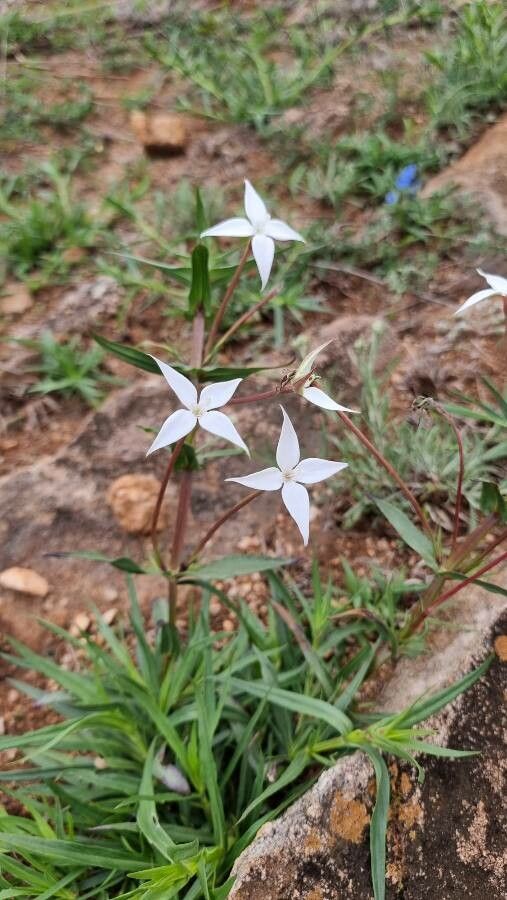
Hey there, fellow plant lovers! I’m so excited to share some wisdom today about a truly special bloom: Conostomium quadrangulare. You might know it by its common name, the Square-Stemmed Bellflower, but honestly, that doesn’t quite capture the delicate elegance of those gracefully nodding, star-shaped flowers. They’re a real breath of fresh air in any garden, aren’t they? Growing them from scratch is just about as rewarding as it gets. Now, to be totally upfront, this isn’t necessarily a beginner plant to propagate. It can be a tad finicky, but with a little patience and the right approach, you’ll be rewarded with a whole new crop of these beauties.
The Best Time to Start
Honestly, for Conostomium quadrangulare, the sweet spot is late spring to early summer. This is when the plant is in active growth, having recovered from its winter slumber and gearing up for its main blooming season. You’re looking for healthy, non-woody stems – think young, vigorous growth, not anything that feels tough or old.
Supplies You’ll Need
Here’s what you’ll want to have on hand:
- Sharp, clean pruning shears or a craft knife. Sterilize them with rubbing alcohol before you begin!
- A well-draining potting mix. I like a blend of equal parts perlite, peat moss, and coarse sand.
- Small propagation pots or trays with drainage holes.
- Rooting hormone (optional, but it can give you a boost!).
- A plastic bag or propagator lid to create a humid environment.
- A spray bottle for misting.
- A labels and a marker – trust me on this one!
Propagation Methods: Stem Cuttings
This is my go-to method for Conostomium quadrangulare. It’s straightforward and usually yields the best results.
- Select Your Cuttings: In late spring or early summer, choose healthy, vibrant stems. Look for ones that are about 4-6 inches long. Gently twist or cut them off just below a leaf node (where a leaf meets the stem).
- Prepare the Cuttings: Carefully remove the lower leaves, leaving only the top two or three sets. This prevents them from rotting when buried or sitting in water. If your cuttings are on the longer side, you can take the top cut again, just at a slight angle, to encourage rooting.
- Apply Rooting Hormone (Optional): If you’re using rooting hormone, dip the cut end of the stem into it. Tap off any excess. This isn’t strictly necessary, but it can give those roots a helpful nudge.
- Plant Your Cuttings: Fill your small pots or trays with your prepared potting mix. Make a hole in the center with your finger or a pencil. Gently insert the cut end of the stem into the hole, ensuring at least one leaf node is buried. Firm the soil gently around the stem.
- Water and Cover: Water thoroughly but gently. You want the soil to be moist, not soggy. Cover the pots with a clear plastic bag or a propagator lid. This creates a mini-greenhouse, keeping humidity high, which is crucial for cuttings to root.
The “Secret Sauce”
Here are a couple of tricks I’ve picked up over the years that really make a difference:
- Don’t Let Leaves Touch the Water (if water propagating): If you decide to try water propagation, which is an option for Conostomium quadrangulare, though I find soil to be more reliable, make sure absolutely no leaves are submerged. They’ll rot in no time and drag the whole cutting down with them. Only the stem should be in the water.
- Bottom Heat is Your Friend: These guys appreciate a little warmth from below. Placing your propagation tray on a gentle heating mat can significantly speed up the rooting process. It mimics the warmth of the soil in spring and encourages those crucial root hormones to kick in.
Aftercare & Troubleshooting
Once your cuttings are planted, here’s how to keep them happy:
- Placement: Find a spot with bright, indirect light. Direct sun will scorch those tender new cuttings.
- Misting: Mist your cuttings every day or two to keep the humidity up inside the bag. You can also lift the bag for a few minutes to allow for some air circulation.
- Checking for Roots: After about 4-6 weeks, you can gently tug on a cutting. If you feel resistance, you’ve got roots! You’ll also start to see new leaf growth.
- Transplanting: Once your new plants have a good root system and are showing healthy growth, you can transplant them into slightly larger pots with regular potting soil.
- Troubleshooting: The most common issue you’ll face is rot. If you see your cuttings turning mushy or black, it’s usually a sign of too much moisture or poor air circulation. Make sure your soil drains well and open up the propagator more frequently. If a cutting just wilts and never seems to perk up, it might just not have had what it needed to root. Don’t despair!
A Little Patience Goes a Long Way
Propagating Conostomium quadrangulare is a journey, and like any good journey, it requires a bit of patience. But oh, the joy of seeing those tiny roots emerge, and then holding a brand-new plant that you brought into existence yourself! Keep going, learn from each attempt, and most importantly, enjoy the process. Happy growing!
Resource: