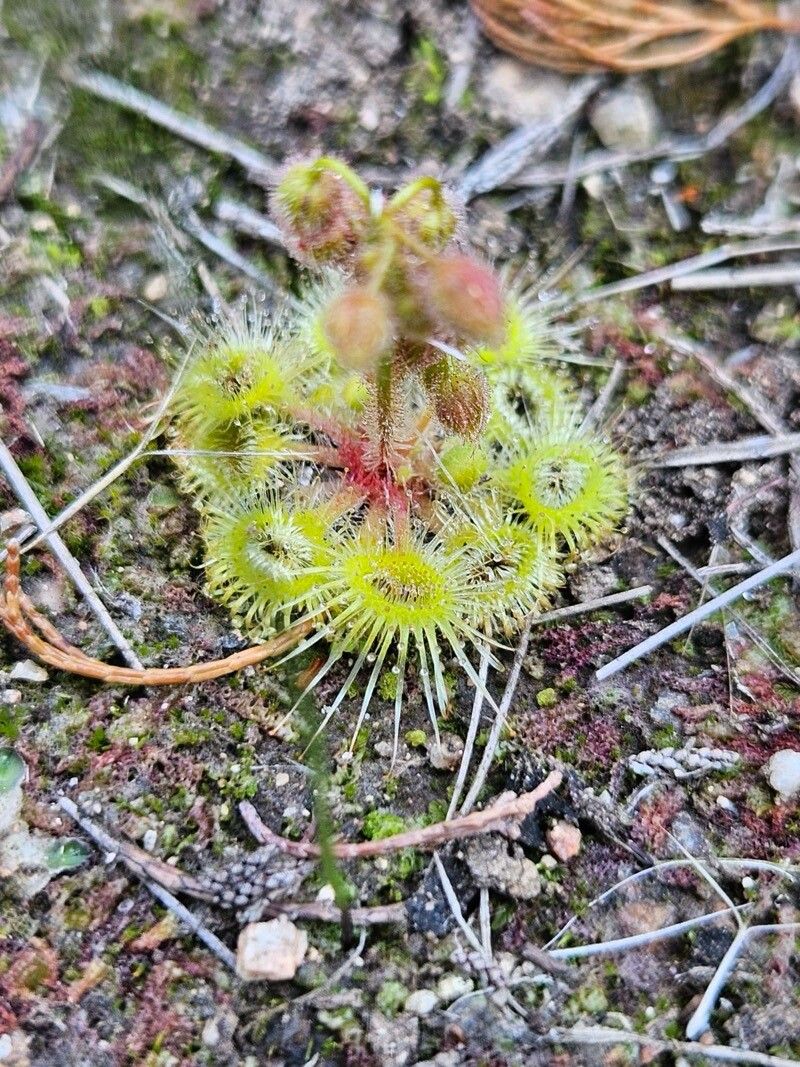
Hey there, fellow plant pals! If you’ve ever gotten a glimpse of a Drosera peltata, or sundew, you know the charm. Those tiny, glistening tentacles, looking like they’re dusted with morning dew, are simply mesmerizing. Not to mention, they’re little bug-catchers, which is a neat bonus! Propagating them is such a satisfying way to multiply that magic, and honestly, it’s a journey I think you’ll really enjoy.
Now, about your experience level – if you’re just starting out with carnivorous plants, Drosera peltata is a pretty fantastic entry point. It’s not overly fussy, which makes its propagation all the more rewarding.
The Best Time to Start
For the highest success rate with Drosera peltata, I always recommend starting in the spring, as the plant is coming out of its dormant period. You’ll see fresh growth emerging, and that’s exactly what we want. Late spring or early summer is also a good window, as the plant is actively growing and has plenty of energy to put into new roots. Avoid trying to propagate during the hottest part of summer or when the plant is showing signs of winding down for winter.
Supplies You’ll Need
Here’s a handy list of what you’ll want to have on hand:
- Specialized Carnivorous Plant Soil: A mix of peat moss and perlite or silica sand is ideal. Make sure it’s pH neutral and nutrient-free.
- Sharp, Clean Pruning Shears or a Craft Knife: For taking clean cuts. Sterilize them with rubbing alcohol.
- Small Pots or Trays: Clean ones are key! Think 2-3 inch pots.
- Distilled Water, Rainwater, or Reverse Osmosis (RO) Water: Tap water is a no-go; it contains minerals that will harm your sundew.
- A Spray Bottle: For keeping things humid.
- Optional: A Heat Mat: Can speed things up a bit, but not strictly necessary.
- Optional: Rooting Hormone: While not always needed for sundews, it can give an extra boost. Look for one specifically for carnivorous plants or use a general one sparingly.
Propagation Methods
Drosera peltata is quite versatile when it comes to propagation. Here are a couple of methods that work wonderfully:
1. Leaf Cuttings (The Most Common & Rewarding)
This is my go-to and usually the easiest way to get started.
- Select a Healthy Leaf: Look for a mature, vibrant leaf from the main plant. You want a leaf that’s not too new (it might be too fragile) or too old (it might have less energy).
- Make the Cut: Gently cut the leaf as close to the base as possible with your sterilized shears or knife. Try to get a tiny bit of the white basal tissue along with the leaf blade.
- Prepare the Leaf: Once you have your leaf, you can leave it as is, or if the leaf is quite large, you can gently cut it in half lengthwise. Some growers even cut off a portion of the leaf blade itself. The important thing is to ensure the bit you’re planting has some connection to the base or a bit of the dew-producing surface.
- Planting: Moisten your peat/perlite mix in a small pot. Gently lay the leaf cutting on the surface of the soil, with the cut end or basal portion just slightly pressed into the media. You don’t want to bury it deep.
- Humidity is Key: Place the pot in a humid environment. I like to put mine in a clear plastic bag or cover it with a cloche. Make sure there’s some air circulation; don’t seal it up completely like a jar!
2. Division (For Mature Plants)
If your Drosera peltata has grown into a nice clump, you can often divide it.
- Gently Unpot: Carefully remove the plant from its pot.
- Separate the Divisions: Look for distinct growth points or tubers. You can gently pull the plant apart with your fingers or use a clean knife to make dividing cuts. Each division should have some healthy roots.
- Repot: Plant each division in its own small pot with fresh, damp carnivorous plant soil. Water gently.
The “Secret Sauce” (Pro Tips)
Here are a few little tricks I’ve picked up over the years that really help:
- Don’t Let Leaves Touch the Water: If you’re using a tray method where the pot sits in water (which is common for sundews), make sure the leaves of the cuttings don’t directly sit in standing water. This can lead to rot. The soil should be moist, but the plant itself shouldn’t be submerged.
- Bottom Heat is Your Friend: While not essential, placing your pots on a gentle heat mat (around 70-75°F or 21-24°C) can really speed up the process of new root and growth formation. It mimics the warmth of spring and encourages activity.
- Patience with Waxy Leaves: You might notice the leaf you planted looking a bit sad or even turning brown and shriveling slightly. Don’t panic! This is often normal as the plant conserves energy to form new roots. That waxy dew can sometimes trap moisture and encourage rot if not managed right.
Aftercare & Troubleshooting
Once you see tiny new leaves or roots emerging from your cuttings, you’re on your way! Your new little sundews will still need consistent moisture and humidity. Keep the soil damp but not waterlogged. Gradually introduce them to brighter light, but avoid harsh, direct sun that can scorch them.
The most common sign of trouble is rot. If your cuttings turn black and mushy, especially at the base, it’s usually a sign of too much moisture without enough air circulation, or the use of incorrect water. Ditch any rotting material and ensure good airflow. If a whole cutting fails, don’t be discouraged. Just try again with a fresh piece!
A Little Encouragement
Propagating plants is always a bit of an experiment, and that’s part of the fun. Be patient, observe your cuttings closely, and enjoy the process of nurturing new life. Soon enough, you’ll have a whole collection of these fascinating little dew-droppers! Happy growing!
Resource:
https://identify.plantnet.org/k-world-flora/species/Drosera%20peltata%20Thunb./data