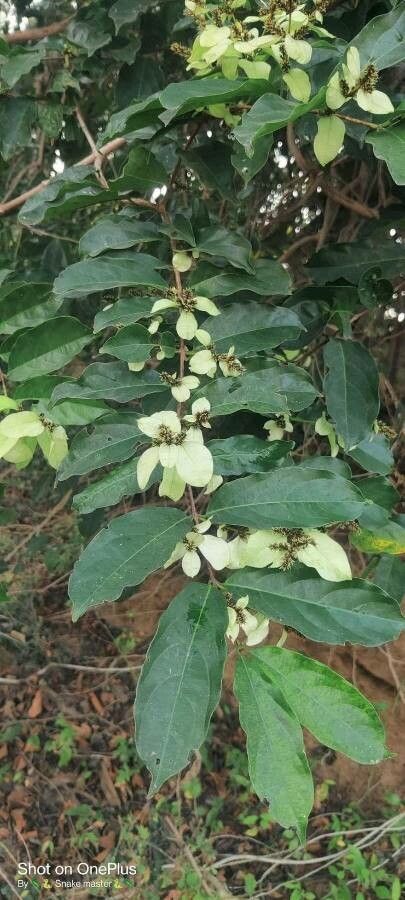
Hello there, fellow plant enthusiasts! It’s always a joy to talk about plants, and today, I want to share my love for a particular beauty: Combretum roxburghii. This plant, often known for its stunning fiery blooms, is a real showstopper. Seeing it explode with color is one thing, but the real satisfaction comes from coaxing new life from it yourself. Propagating Combretum roxburghii might sound a bit daunting, but trust me, with a little know-how and patience, you’ll be well on your way to a whole new collection. For beginners, I’d say it’s moderately easy – a rewarding challenge that teaches you a lot about plant resilience.
The Best Time to Start
When it comes to getting our Combretum roxburghii babies going, think active growth. This generally means late spring into early summer, right after it’s finished its main flowering show. The stems are strong and pliable then, full of vigor, making them the best candidates for taking cuttings. Avoid trying to propagate from woody, dormant stems; they’re just not as receptive to forming new roots.
Supplies You’ll Need
Gearing up for propagation is like preparing for a delicious baking project – have everything at the ready! Here’s what you’ll want in your propagation toolkit:
- Sharp, sterile pruning shears or a sharp knife: Clean cuts are crucial.
- Rooting hormone (powder or gel): This little helper significantly boosts your success rate.
- Well-draining potting mix: A blend of perlite, peat moss, and a bit of coarse sand works wonders. You can also buy pre-made cutting mixes.
- Small pots or seedling trays: Make sure they have drainage holes.
- Clear plastic bags or a propagation dome: These create a humid environment for your cuttings.
- Watering can or spray bottle: Gentle watering is key.
- Labels and a marker: Don’t forget to label your cuttings!
Propagation Methods
Let’s get our hands dirty with the practical stuff. For Combretum roxburghii, stem cuttings are my go-to method.
Stem Cuttings:
- Select your parent plant: Choose a healthy, vigorous Combretum with plenty of new growth.
- Take cuttings: Using your sterilized shears, take cuttings that are about 4-6 inches long. Look for stems that are semi-hardwood – they should be firm but still have a little flexibility. Make your cut just below a leaf node (where a leaf attaches to the stem).
- Prepare the cuttings: Gently remove the lower leaves, leaving just a couple of sets at the top. This prevents them from rotting when buried. If the leaves are very large, you can even cut them in half horizontally to reduce water loss.
- Apply rooting hormone: Dip the cut end into your rooting hormone, tapping off any excess. This gives your cuttings a great head start.
- Pot them up: Moisten your potting mix, and then gently insert the cuttings into the prepared pots, making sure the leaf nodes are buried. Don’t pack the soil too tightly around them.
- Create humidity: Water them gently until the soil is evenly moist. Then, cover the pots with a clear plastic bag or a propagation dome. This traps moisture and keeps the humidity high, which is vital for root development. You can secure the bag with a rubber band or place the pot inside a larger clear bag.
- Find a warm spot: Place the pots in a bright location that receives indirect sunlight. Avoid direct sun, as it can scorch the delicate cuttings.
The “Secret Sauce” (Pro Tips)
You want those cuttings to feel pampered, right? Here are a few tricks I’ve learned over the years:
- Bottom heat is your friend: Combretum roxburghii‘s roots love a bit of warmth. Placing your pots on a seedling heat mat can dramatically speed up root formation. It mimics the warmth of the soil in summer.
- Don’t let those leaves touch the water: If you opt for water propagation (which is less successful for this particular plant but still possible for a few), make sure no leaves are submerged. Rot sets in quickly when leaves sit in water. Stick to stems only!
- A gentle misting routine: Instead of watering from the top, which can dislodge cuttings or even cause rot, I like to lightly mist the leaves and the surface of the soil with a spray bottle every couple of days, especially if the humidity isn’t as high as I’d like. This keeps things fresh without overwatering.
Aftercare & Troubleshooting
Once your little cuttings have developed roots – you might even see them peeking out from the drainage holes or feel a gentle tug when you lightly pull on a stem – it’s time for a little more TLC.
Acclimatization: Slowly start to acclimatize them to lower humidity by opening the plastic bag or dome for a few hours each day. Once they seem sturdy, you can remove the covering entirely.
Watering: Continue to water them regularly, but let the top inch of soil dry out between waterings. Overwatering is still the most common culprit for failure, leading to root rot.
Troubleshooting: The biggest red flag is wilting or mushy stems. This is usually a sign of rot. If you catch it early, you might be able to save the cutting by trimming away the affected parts and repotting it in fresh, dry mix. If the leaves turn yellow and fall off, it could be a sign of too much light or insufficient moisture. Be patient; some cuttings take longer than others.
A Encouraging Closing
There you have it – your guide to propagating Combretum roxburghii. Remember, gardening is a journey, and propagation is an incredible part of that. Don’t be discouraged if not every cutting takes. Each attempt is a learning experience. Be patient, keep your cuttings happy, and before you know it, you’ll have beautiful new Combretum plants to adorn your home or share with friends. Happy propagating!
Resource:
https://identify.plantnet.org/k-world-flora/species/Combretum%20roxburghii%20Spreng./data