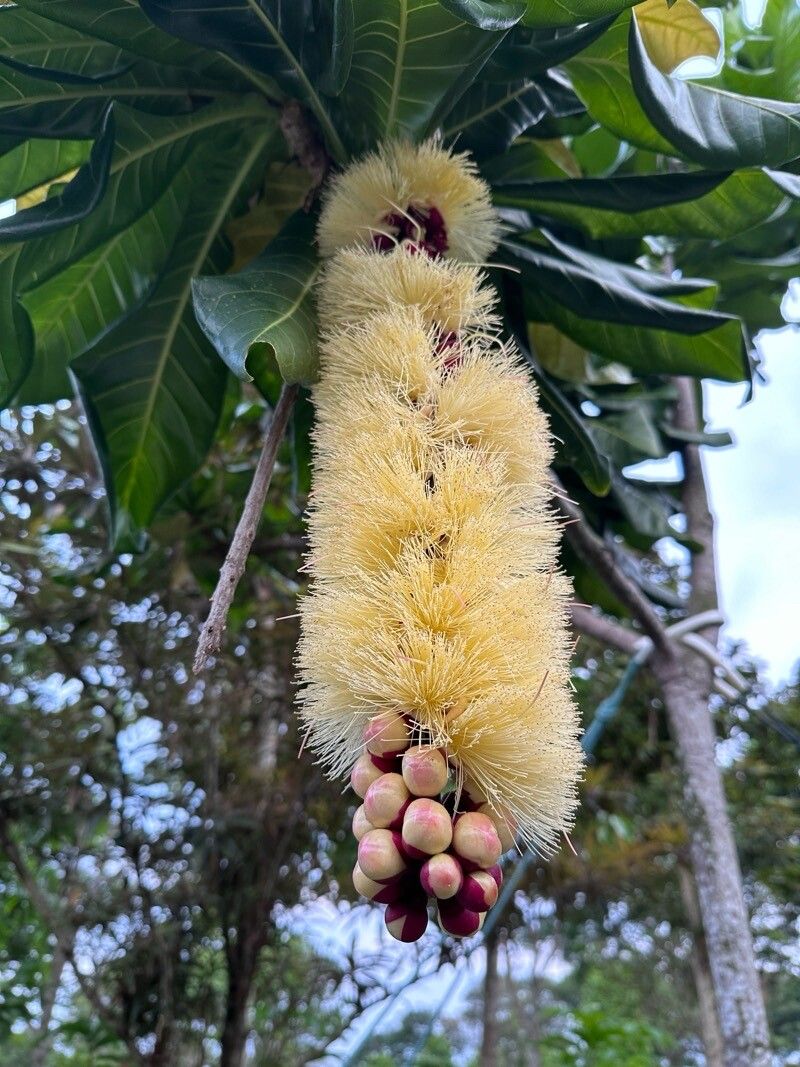
Oh, hello there! It’s so lovely to have you join me. Today, we’re diving into the wonderful world of propagating Barringtonia edulis, also known as the Patawa or Brazil Nut. If you’ve ever admired its striking foliage and the intriguing seed pods it produces, you’re in for a treat. The joy of coaxing a new life from a piece of your beloved plant is truly special, and with the Patawa, it’s a wonderfully rewarding endeavor. Now, I won’t lie – it’s not the absolute easiest plant for a complete beginner to propagate, but with a little patience and these tips, I’m confident you can achieve success!
The Best Time to Start
For Barringtonia edulis, the prime time for propagation is generally during its active growing season. This usually falls in the late spring or early summer, when the plant is bursting with energy and has plenty of healthy new growth. You’ll want to select stems that are firm and have developed some woody texture, but aren’t yet old and brittle. Think of it as picking a piece that’s still full of youthful vigor!
Supplies You’ll Need
Gathering your supplies beforehand makes the whole process smooth sailing. Here’s what I’d recommend:
- Sharp Pruning Shears or a Clean Knife: For making clean cuts. Sterilize them with rubbing alcohol before you begin.
- Rooting Hormone: While not strictly essential for all methods, it can certainly give your cuttings a helpful boost. I prefer a powder form.
- Well-Draining Potting Mix: A good mix of peat moss, perlite, and coarse sand (about 1:1:1 ratio) works wonders for encouraging oxygen flow to the roots.
- Small Pots or Trays: Clean ones, please! A 4-inch pot is usually a good size to start.
- Clear Plastic Bag or Humidity Dome: To keep the humidity high around your cuttings.
- Watering Can with a Fine Rose: For gentle watering.
- Optional: Bottom Heat Mat: This can significantly speed up root development.
Propagation Methods
While Barringtonia edulis can be a bit particular, stem cuttings are our most reliable friend here. Let’s walk through it.
Stem Cuttings:
- Take Your Cuttings: On a bright, healthy stem, look for a section about 6-8 inches long. Make a clean cut just below a leaf node (where a leaf attaches to the stem). You want to take a semi-hardwood cutting, meaning it’s not brand new and green, but also not fully old and woody. Remove any leaves from the bottom half of the cutting. If the remaining leaves are very large, you can cut them in half to reduce water loss.
- Apply Rooting Hormone: Dip the cut end of the stem into your rooting hormone, tapping off any excess.
- Plant Your Cuttings: Fill your clean pot with your well-draining potting mix, moisten it thoroughly, and then make a hole in the center with your finger or a pencil. Gently insert the cutting, ensuring the nodes are buried. Firm the soil around the base of the cutting.
- Create a Humid Environment: Water gently and then cover the pot with a clear plastic bag or place it under a humidity dome. Make sure the leaves don’t touch the inside of the plastic if possible.
- Placement is Key: Place the pot in a bright spot with indirect light, away from harsh direct sun.
The “Secret Sauce” (Pro Tips!)
Here are a couple of things I’ve learned over the years that make a big difference:
- The Gentle Dip is Best: When you’re dipping your cutting into the rooting hormone, give it a quick dip and tap. Don’t swirl it around for ages; we just want to coat the wounded area.
- Embrace Bottom Heat: If you have a bottom heat mat, use it! Patawa cuttings absolutely love a little warmth from below. It mimics nature’s cozy embrace and encourages those roots to form much more quickly. Keep the mat on a low setting.
Aftercare & Troubleshooting
Once your cuttings have been potted, the real work of patience begins!
- Keep it Moist, Not Soggy: Check the soil moisture regularly. The potting mix should remain consistently moist but never waterlogged. If you’re using a plastic bag, you’ll see condensation. If it gets too much, briefly vent the bag.
- Look for Roots: It can take anywhere from 6 weeks to a few months for roots to develop. You can give your cutting a very gentle tug. If you feel resistance, roots are likely forming. You can also look for new leaf growth, which is a strong indicator.
- Signs of Trouble (Rot): The most common issue is rot. If you see the cutting turning black and mushy, or developing fuzzy mold, it’s a sign of too much moisture and not enough air circulation. Sadly, a rotted cutting is usually a goner. If you catch it early, you might be able to salvage it by cutting away the rotten bits and repotting in fresh, dry mix, but it’s a long shot. Prevention is key here – err on the side of slightly drier rather than too wet.
A Encouraging Closing
Growing new plants is a journey, and Barringtonia edulis is a beautiful companion for that journey. Don’t get discouraged if your first attempt isn’t a roaring success. Every gardener has had their share of cuttings that just didn’t make it. Be patient, enjoy the process of nurturing these little bits of life, and celebrate the tiny roots and new leaves that appear. Happy propagating!
Resource:
https://identify.plantnet.org/k-world-flora/species/Barringtonia%20edulis%20Seem./data