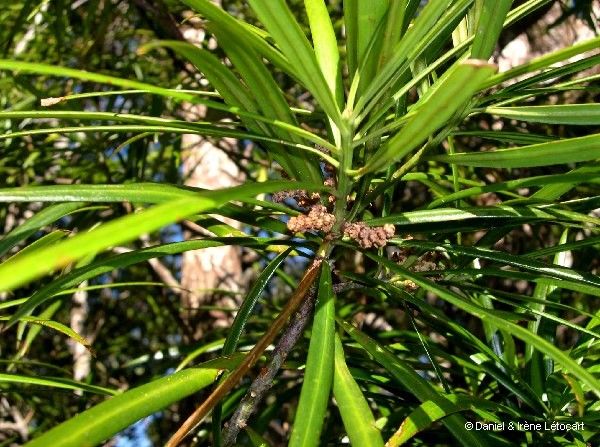
Oh, Austrotaxus spicata! You know, I’ve always had a soft spot for these lovely conifers. Their elegant, upright form and rich green foliage bring such a graceful presence to any garden. Growing your own from cuttings or seeds is such a satisfying endeavor. It’s a plant that can be a tad tricky, a bit of a special treat to propagate, but with a little patience and the right approach, you can absolutely succeed. Think of it as a rewarding challenge for us keen gardeners.
The Best Time to Start
For Austrotaxus spicata, you’ll find the best luck propagating from semi-hardwood cuttings in late spring to early summer. This is when the new growth has started to firm up a bit but isn’t fully woody yet. It’s the sweet spot where the stems have enough energy to root but are still pliable enough to respond well to rooting hormones.
Supplies You’ll Need
Before we dive in, let’s get our toolkit ready. Having everything at hand makes the whole process smoother:
- Sharp, clean pruning shears or a knife: For making clean cuts that minimize damage.
- Rooting hormone: A good quality powder or liquid will significantly boost your success rate.
- Well-draining potting mix: A blend of peat moss, perlite, and a bit of sand works wonders. Or, you can find specific conifer or seed-starting mixes.
- Small pots or propagation trays: Cleaned thoroughly, of course.
- Plastic bags or a propagation dome: To create a humid environment.
- Watering can with a fine rose: For gentle watering.
- Optional: Bottom heat mat: This can really speed up root development.
Propagation Methods: Stem Cuttings (My Go-To!)
This is hands-down the most common and successful way to get more Austrotaxus spicata. Here’s how I do it:
- Select Your Cuttings: Look for healthy, new growth branches that are about 4-6 inches long. They should be firm but slightly bendable, not brittle. Gently twist or snip them from the parent plant.
- Prepare the Cuttings: Carefully strip off the lower leaves. You want a clean section of stem for inserting into the soil. If you’re using a knife, make a shallow cut or scrape on one side of the base of the stem; this is called “wounding” and can encourage rooting.
- Apply Rooting Hormone: Dip the cut end of the stem into your rooting hormone, tapping off any excess. Make sure the hormone covers the wounded area.
- Plant Your Cuttings: Fill your clean pots or trays with the well-draining potting mix. Make small holes in the soil with a pencil or your finger. Gently insert the cuttings into the holes, about an inch or two deep, and firm the soil around them.
- Create the Humid Environment: Water the potting mix thoroughly but gently. Then, cover the pots with a plastic bag or place them under a propagation dome. Make sure the plastic doesn’t touch the leaves too much. You can use stakes to keep the bag from drooping.
- Find the Right Spot: Place the pots in a bright location, but out of direct, hot sunlight. A greenhouse bench or a windowsill that gets gentle morning light is perfect. If you have a bottom heat mat, now’s the time to use it – aim for a consistent temperature of around 70-75°F.
The “Secret Sauce” (Pro Tips)
Here are a couple of tricks I’ve learned over the years that can make a big difference:
- Cleanliness is Crucial: I cannot stress this enough. Always use your cleanest tools and pots. Fungus and bacteria are the enemies of cuttings, and a clean start prevents a whole lot of heartache later on.
- The “Air Layering” Touch: If you find a particularly lovely, long branch that you’re hesitant to cut, try a bit of air layering. You can lightly wound a section of the stem, pack it with damp sphagnum moss, and then wrap the whole thing in plastic wrap. Tie it off at both ends. Roots will often form within the moss, and then you can cleanly cut the rooted section off below the moss. It takes longer, but it’s a rather elegant method.
Aftercare & Troubleshooting
Once your cuttings have settled in, keep the soil consistently moist but not waterlogged. Check the humidity under the plastic daily; if you see condensation, you can give them a little air.
You’ll know your cuttings are rooting when you see new growth appearing or when they resist a gentle tug. This usually takes anywhere from 6 weeks to 3 months, sometimes longer. Once they’ve developed a good root system, you can carefully transplant them into individual pots.
Now, for the not-so-fun part: problems. The most common issue is rot. If you see your cuttings turning black and mushy, it’s usually a sign of too much moisture and not enough air circulation. If it’s a widespread problem, you might need to start with fresh cuttings and adjust your watering and airflow. Yellowing leaves, on the other hand, can sometimes indicate a lack of light, so move them to a brighter spot if that’s the case.
A Little Patience, A Lot of Reward
Propagating Austrotaxus spicata is a journey. There might be a few casualties along the way, and that’s perfectly normal. Don’t get discouraged! Celebrate the successes, learn from any setbacks, and most importantly, enjoy the process of nurturing these beautiful plants. Soon you’ll have a whole new generation of elegant conifer companions. Happy gardening!
Resource:
https://identify.plantnet.org/k-world-flora/species/Austrotaxus%20spicata%20Compton/data