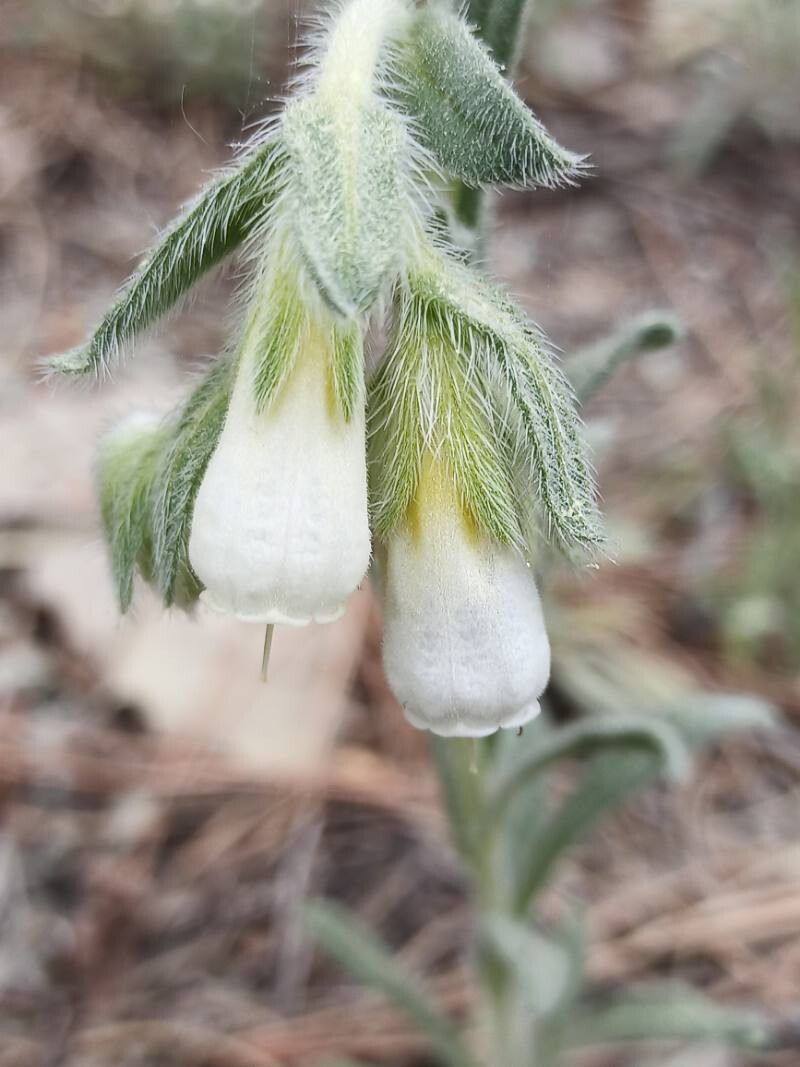
Oh, Onosma arenaria! Isn’t she a beauty? With those delicate, nodding clusters of creamy white flowers that often have a hint of blush, and their lovely, almost fuzzy foliage, they just bring a touch of understated elegance to any sunny spot. I’ve always found them to be such a rewarding plant to grow, and propagating them yourself? Well, that’s just pure gardening joy. It’s like making tiny plant babies, and the satisfaction of seeing them thrive is immense. For those new to propagation, Onosma arenaria can be a moderately easy plant to start with. It’s not foolproof, but with a little attention, you’ll be successful.
The Best Time to Start
For the highest success rate with Onosma arenaria, I always aim to propagate in late spring to early summer. This is when the plant is actively growing, and new, pliable stems are forming. Taking cuttings at this stage means they have the best chance of rooting quickly before the heat of summer truly sets in or before the plant starts to think about winding down for autumn.
Supplies You’ll Need
Here’s what you’ll want to have on hand:
- Sharp pruning shears or snips: Cleanliness is key here.
- Rooting hormone powder or gel: This isn’t strictly necessary for all plants, but it gives your cuttings a fantastic boost.
- A well-draining potting mix: I like a blend of coarse sand, perlite, and a good quality peat-free compost. Think gritty!
- Small pots or seed trays: Clean ones are crucial to prevent disease.
- A watering can with a fine rose or a spray bottle: Gentle watering is essential.
- Clear plastic bags or a propagator: To create a humid environment.
- Labels: Don’t forget to label your babies!
Propagation Methods
The most reliable method for Onosma arenaria is stem cuttings.
- Select your stems: Look for healthy, non-flowering shoots that are about 3-4 inches long. They should be firm but not woody.
- Take the cuttings: Using your clean snips, make a clean cut just below a leaf node. A leaf node is where a leaf grows from the stem, and it’s where roots are most likely to form.
- Prepare the cuttings: Gently remove the lower leaves from the cutting, leaving just two to three leaves at the top. If the top leaves are very large, you can even cut them in half to reduce water loss through transpiration.
- Apply rooting hormone: Dip the cut end of each stem into your rooting hormone, tapping off any excess.
- Plant the cuttings: Fill your pots with the well-draining mix. Make a small hole with a pencil or dibber and insert the cutting, ensuring the bottom leaves are above the soil line. Firm the soil gently around the stem for good contact.
- Water gently: Water thoroughly but gently so as not to disturb the cuttings.
- Create humidity: Cover each pot with a clear plastic bag or place them in a propagator. This will create a mini-greenhouse effect, keeping the humidity high which is essential for cuttings to root without drying out. You can support the bag with sticks so it doesn’t touch the leaves.
The “Secret Sauce” (Pro Tips)
- Bottom Heat is Your Friend: If you have access to a heated propagator or a heat mat, using bottom heat can significantly speed up rooting. Aim for a consistent temperature of around 70-75°F (20-24°C). It mimics the warmth of summer soil and really encourages those roots to get going.
- Don’t Overwater, Ever: This is a big one for many succulents and plants with similar needs like Onosma. When the cuttings are in their humid environment, they don’t need much external watering. Only water when the surface of the potting mix starts to feel a little dry. Overwatering is the quickest way to invite rot.
- Patience with Leaf Drop: Sometimes, cuttings might drop a leaf or two. Don’t panic! If the stem itself still looks firm and green, it’s often just the plant shedding what it doesn’t need while it focuses energy on root development.
Aftercare & Troubleshooting
Once you start to see new growth appearing on your cuttings, that’s a tell-tale sign that roots have formed!
- Gradually Acclimatize: Once roots are established (you can often tell by gently tugging on the cutting – it should feel anchored), start to gradually remove the plastic bag or open the vents on your propagator over a few days. This helps the new plant get used to normal humidity levels.
- Watering Moving Forward: Continue to water when the top inch of soil is dry. These young plants still appreciate good drainage.
- Troubleshooting: The main issue you’ll encounter is rot. If a cutting turns mushy and black at the base, unfortunately, it’s usually a sign of too much moisture and not enough air circulation. If this happens, discard the rotted cutting immediately to prevent it from affecting others. If your cuttings just seem to wither and die without rooting, it might be they weren’t getting enough humidity, or the rooting hormone wasn’t effective, or perhaps the temperature was too low.
So there you have it – the simple steps to multiplying your Onosma arenaria collection. It’s a process that requires a bit of faith and a good dose of patience, but the rewards are so worth it. Each tiny new plant is a testament to your green thumb. Happy propagating!
Resource:
https://identify.plantnet.org/k-world-flora/species/Onosma%20arenaria%20Waldst.%20&%20Kit./data