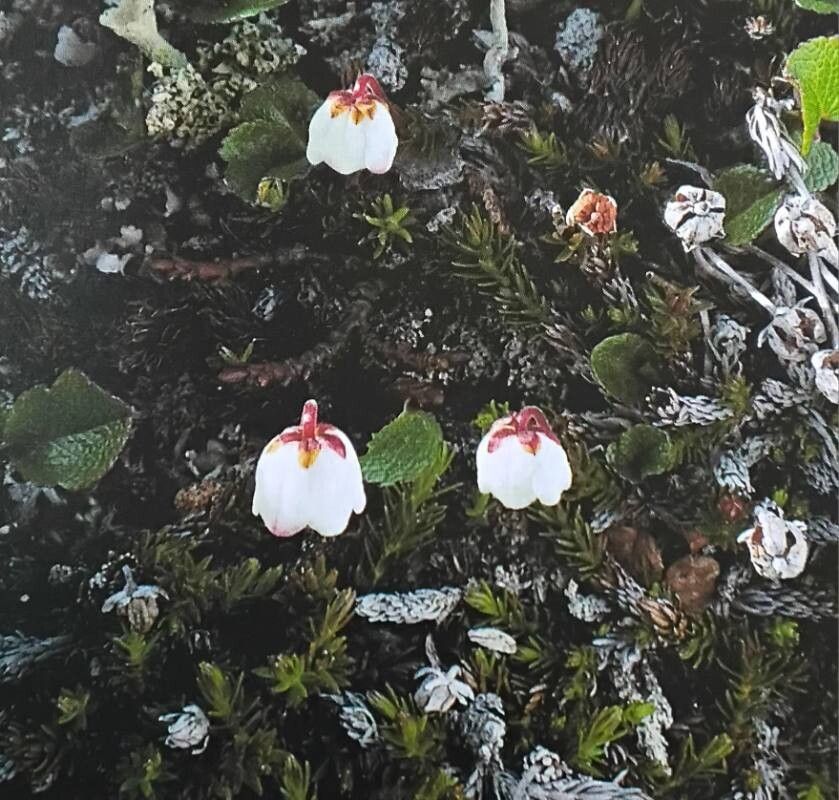
Oh, Cassiope hypnoides! Isn’t it just the most charming little thing? I’ve spent countless hours admiring those delicate, almost moss-like sprays of tiny white bells. They bring such a delightful grace to shady, woodland-style gardens. If you’ve fallen for its charm too, you’ll be thrilled to know that propagating it is absolutely achievable, though I’d say it’s a bit more of a patient gardener’s pursuit than a beginner’s first project. It requires a gentle touch and a keen eye, but the reward of seeing your own little Cassiope babies flourish is truly special.
The Best Time to Start
For the highest success rate with Cassiope hypnoides, I find that late spring to early summer is your golden window. This is when the plant is actively growing, and its new shoots are firm but not yet woody. You want to take cuttings from healthy, vigorous stems that have recently finished their main flush of growth. Trying to propagate too early in the spring when it’s still waking up, or too late in the fall, can lead to slower rooting and a higher chance of failure.
Supplies You’ll Need
Gathering your tools beforehand makes the whole process smoother. Here’s what I always have on hand:
- Sharp, sterilized pruning shears or a sharp knife: For clean cuts that heal quickly.
- Rooting hormone powder (optional but recommended): A gentle dip can really give your cuttings a boost. Look for one formulated for softwood cuttings.
- Propagating trays or small pots: Clean ones are key to preventing disease.
- A well-draining seed-starting mix or a blend of peat moss, perlite, and coarse sand: Cassiope hates soggy feet! Aim for an acidic medium.
- Clear plastic bags or a propagation dome: To create a humid environment.
- Watering can with a fine rose or a spray bottle: For gentle misting.
- Labels: So you don’t forget what you planted!
Propagation Methods
While division is possible for established plants, I find stem cuttings to be the most reliable and rewarding method for multiplying Cassiope hypnoides.
-
Take Your Cuttings: With your sterilized shears or knife, select healthy, non-flowering shoots from your parent plant. You’re looking for stems that are about 2-4 inches long. Make your cut just below a leaf node. Gently remove the lower leaves from the bottom inch of the stem. I like to do this by carefully teasing them away with my fingernail.
-
Apply Rooting Hormone (Optional): If you’re using rooting hormone, lightly moisten the cut end of the stem and dip it into the powder, tapping off any excess.
-
Plant Your Cuttings: Fill your small pots or trays with your prepared, moist soil mix. Make a little hole in the center of the soil with a pencil or your finger. Carefully insert the cut end of your Cassiope cutting into the hole, ensuring the leaf nodes that will be buried are below the soil surface. Gently firm the soil around the stem.
-
Create a Humid Environment: Water the soil gently so it’s evenly moist but not waterlogged. Cover the pots with a clear plastic bag or place them under a propagation dome. This traps humidity, which is crucial for stem cuttings to root.
-
Provide the Right Spot: Place your cuttings in a bright location that receives indirect light. Avoid direct sun, as it can cook your precious cuttings inside their plastic tents. They also appreciate a bit of warmth, so a spot on a heat mat (if you have one) can speed things up.
The “Secret Sauce” (Pro Tips)
Here are a few things I’ve learned over the years that can make a real difference:
- Don’t Let the Leaves Touch the Water: If you’re ever tempted to try water propagation (and I’ll caution it’s trickier for Cassiope!), make absolutely sure no leaves are submerged. They will rot instantly. It’s better to stick to soil for these beauties.
- Bottom Heat is Your Friend: For Cassiope, a gentle bottom heat of around 68-75°F (20-24°C) can dramatically improve rooting success. It encourages root development from below without drying out the top of the cutting too quickly.
- Patience is Paramount: Cassiope isn’t a fast rooter. Don’t be discouraged if you don’t see signs of life for several weeks. I often leave cuttings for 6-8 weeks before I even start gently tugging to check for resistance.
Aftercare & Troubleshooting
Once your cuttings have developed a good root system – you’ll know because they’ll resist a gentle pull and you might even see new growth emerging – it’s time to give them a little more space. Carefully transplant them into slightly larger pots using a similar free-draining acidic mix. Continue to keep them in bright, indirect light and water them consistently, allowing the soil to dry out slightly between waterings.
The most common issue you’ll encounter is rot. This is almost always due to overwatering and poor drainage. If you see your cuttings turning black or mushy, it’s a sad sign. Remove them immediately and ensure the remaining ones have better ventilation and are not sitting in soggy soil. Lack of rooting is usually a sign of insufficient humidity, too cool temperatures, or cuttings that were taken too late in the season.
A Gentle Encouragement
Propagating Cassiope hypnoides is a journey of observation and a little bit of faith. Don’t be discouraged if your first few attempts don’t yield a forest of new plants. Each cutting you take is a learning experience. Take your time, enjoy the process of nurturing these tiny treasures, and soon enough, you’ll have more of these woodland jewels to share with friends or to plant out in your own garden to enjoy for years to come. Happy growing!
Resource:
https://identify.plantnet.org/k-world-flora/species/Cassiope%20hypnoides%20(L.)%20D.Don/data